• Zur Hauptnavigation springen
  • Skip to main content
  • Zur Fußzeile springen

feel food club

  • Home
  • About me
  • My Recipes
  • Blog
  • Navigation Menu: Social Icons

    • Instagram

vegan

(The best) Coconut Citrus Porridge w/ Caramelised Oranges

April 9, 2021 by katharina.kuehr Kommentar verfassen

I am going to be really honest with you, I like porridge. But I definitely have never been this person dying for porridge. It was good but never wow. Until. Until I discovered this and (not exaggerated) it changed my whole breakfast game.

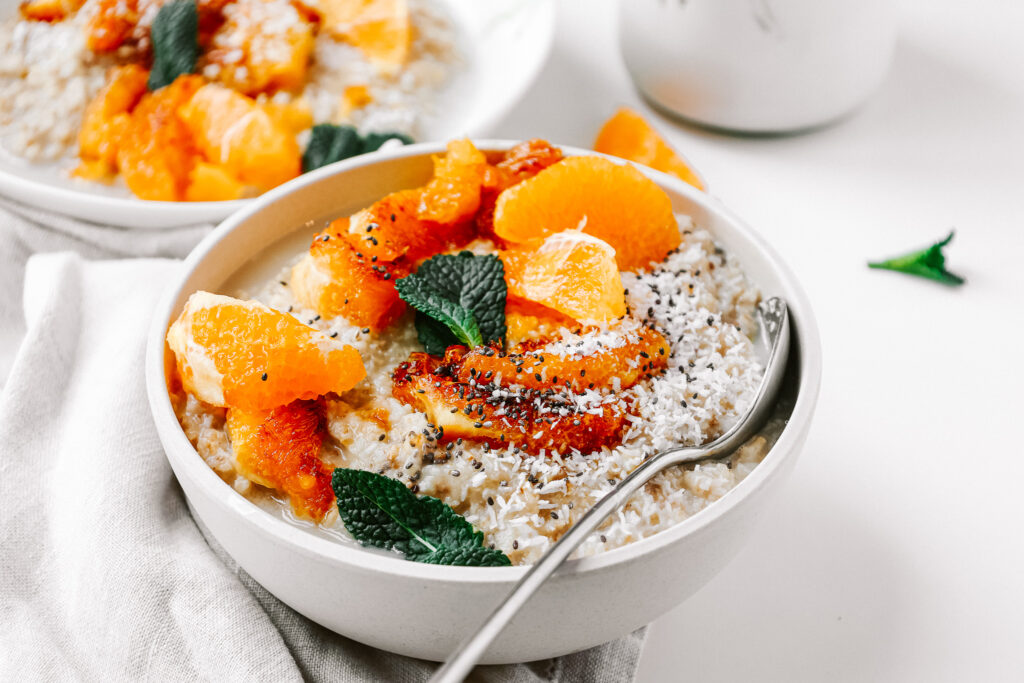
Creamy, fresh deliciousness at its finest. You are getting all the tropical vibes you need to get through till summer and all the energy + tastiness you need to start into your day. Why is this porridge SO MUCH BETTER than all the other ones you tried before? The coconut flakes in it make it a lot lot better, plus, now comes the game changing part, the citrus juice. Orange and Lemon juice respectively. I do not know why but I know hooow big and good of a change it is.

What is special about this dish?

As already mentioned, it is not your average porridge cooked in milk and water (life really is too short to be eating average food tbh). It does not taste like plain pulp but it actually is good. Instead of only using water and milk to cook it, we are adding the juice of an orange and a lemon. Sounds like a small change but makes a huge difference. It somehow brings out the flavours a lot more, makes it fresher and more delicious.

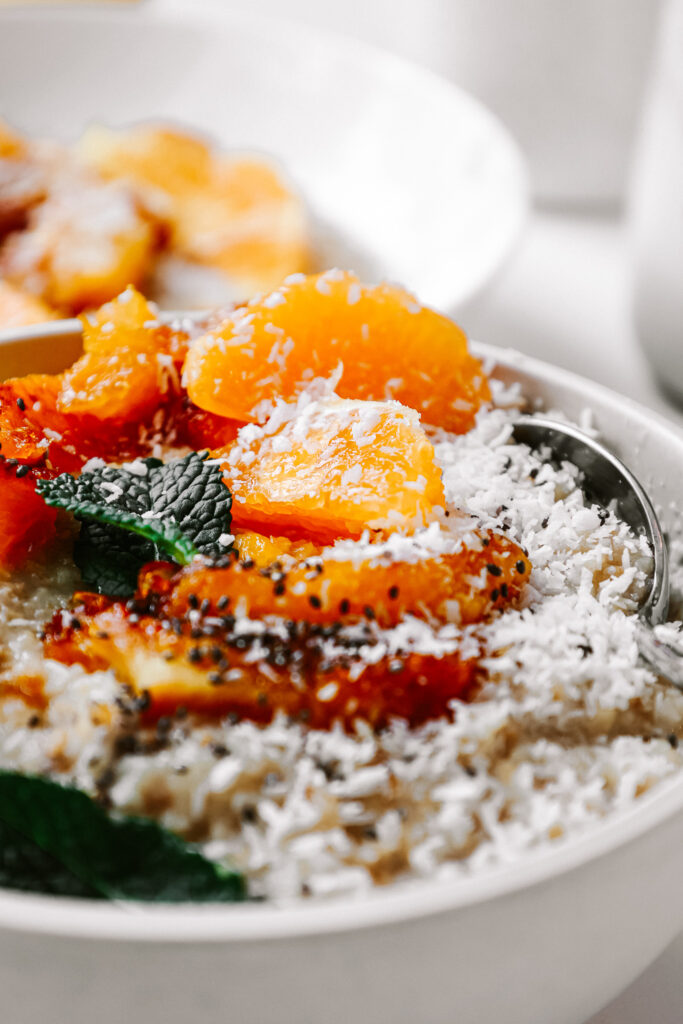
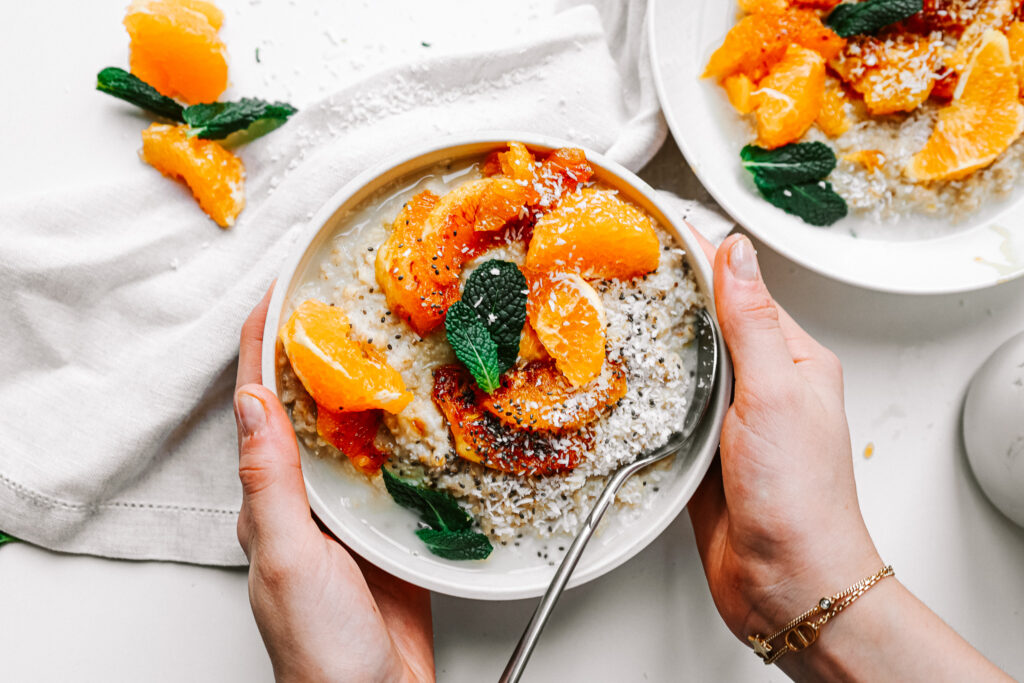
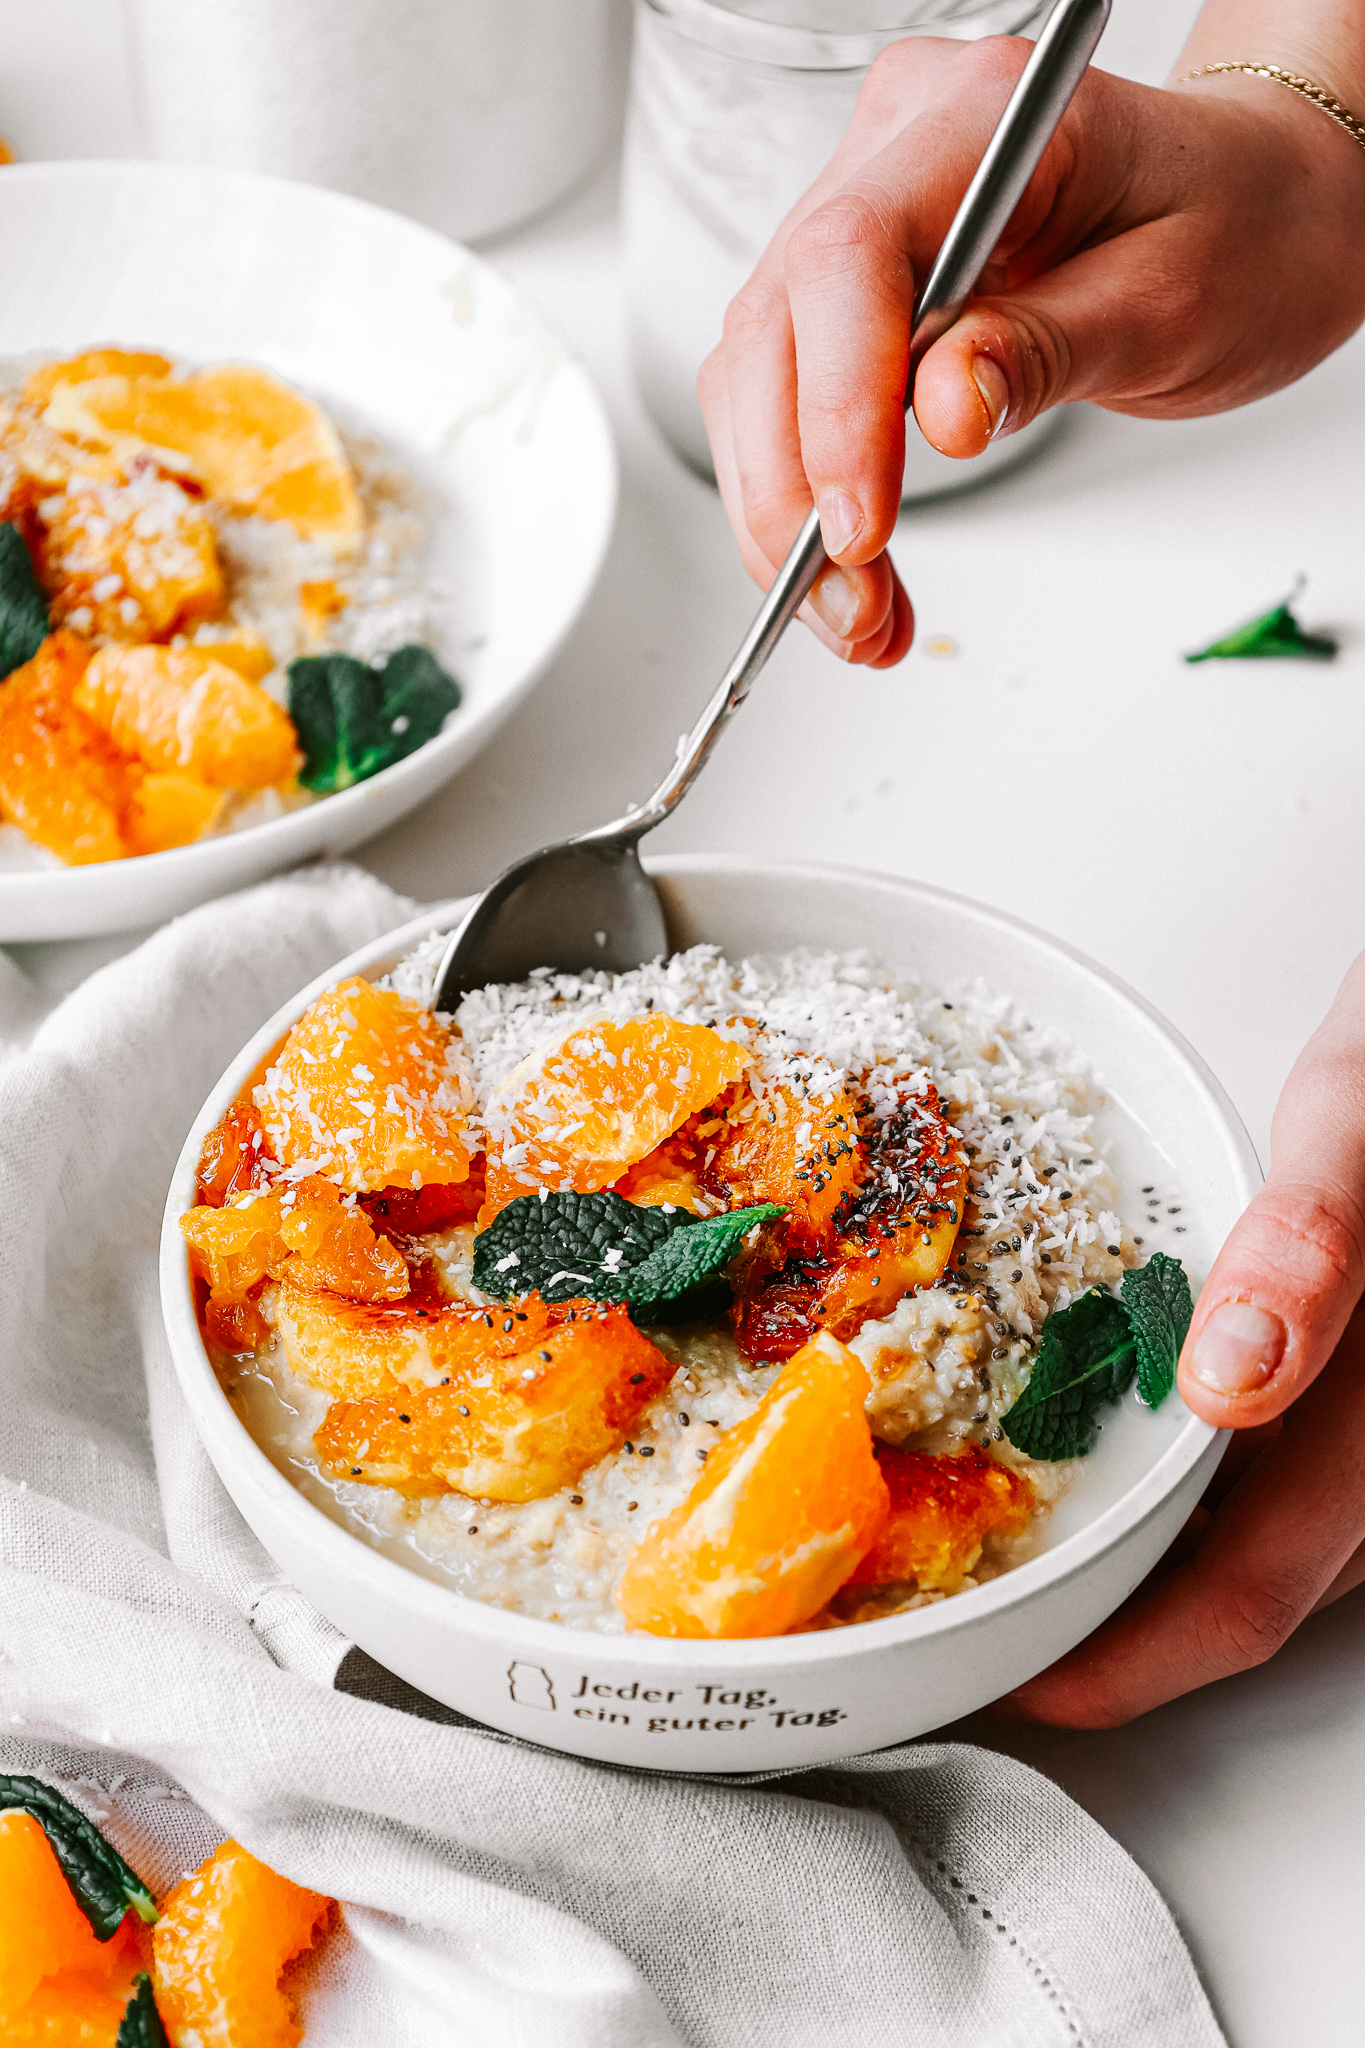
That is it as far as our base goes but a porridge never really is a porridge without its toppings. And here we cannot be average either. So. What we are doing is sweet, maple caramelised oranges. No, this is not too many oranges but this is really, really good!

Is this dish healthy?

Yep, yep, yep. Actually citrus fruits are super healthy and beneficial for you, especially in winter. Their high content of Vitamin C helps strengthen your immune system and prevents you from getting sick or getting a cold. So they are good for you. Also, in German we say „sauer macht glücklich“, which means „sour makes happy“, so lemons are supposed to make you happy. Apparently this is being said because lemons, which are sour, have a positive impact and are good for our gut. And our gut has a tremendous impact on our emotional state of being. Therefore, sour makes happy. So, the citrus fruits in here do not only make you healthy, but also happy.

Besides our citrus star, we have got some more health nerds. The oats for example. basically a bomb of carbohydrates, fibre, vitamins and minerals. One of the oldest and still most nutrient-dense foods. They are just incredible to have in the morning because they will fill you up, keep you full and give you all the energy you need!

How to make this dish?

Easy peasy lemon squeezy. But for real, it is. It comes down to simmering the oats, coconut shreds and chia seeds with water, plant based milk and lemon + orange juice. Next we cut up the oranges into slices and caramelise them. You can either carefully filet them, so there are no white skins (which is a bunch of work – for the tutorial you can check my insta highlights) or just cut them regularly. We heat up the maple syrup in a pan and fry them in there on both sides till golden, brown, and caramelised.

Now we only need to finish everything up. To make it even creamier and coconutier (this very likely is not a word – although it would be really cool if it was), we are adding in a dollop of creamy, canned coconut milk. Then we serve it all up in a bowl, add some more plant based milk and that is it. Your breakfast game will bee changed forever.

How & when to best have it?

The Great thing about this dish is that it is perfect for mealprep. The base can be cooked and stored in the fridge for several days. When you want to enjoy it, you can either heat it up in the microwave or on the stove with a bit more plant based milk. As for the oranges, I would recommend to caramelise them freshly but what you can do beforehand is to cut them up and store in the fridge.

I personally love this as a breakfast but also a brunch or lunch would be perfect. And, not to forget, it actually is a really good dessert. Just as coconut mango rice but with oats and oranges. So very different actually, except for the coconut, but you get the concept right?

I hope you’ll enjoy this as much as I do (and I really do enjoy it) and make this on repeat until we really have those tropical vibes outside that we have on the inside when eating this bowl. Have a wonderful and delicious day!

Print

(The best) Coconut Citrus Porridge w/ Caramelised Oranges

This is at least 10x better than your average porridge! Fresh, tropical and citrusy vibes in a warm, creamy and comforting bowl of coconut oats topped of with perfectly craamelized oranges. It is called heaven on earth.

Course Breakfast, brunch, Dessert
Prep Time 5 Minuten
Cook Time 15 Minuten
Total Time 20 Minuten
Servings 2 servings

What you will need

  • 100 g rolled oats fine rolled oats work best here
  • 4 tbsp coconut shreds
  • 1 tbsp chia seeds (optional)
  • 100 ml water
  • 150 ml (plant based) milk
  • 1 heaped tbsp coconut milk from the can
  • 1/2 lemon
  • 1 orange
  • 2 tbsp maple syrup
  • a pinch salt

How to

  1. To a pot add the oats, coconut shreds, chia seeds, plant based milk, a pinch of salt and water. Heat it up and let simmer on medium heat stirring constantly until thickened.

  2. In the meantime sliceup the orange into wedges. If tehre is some juice running out and remaining on the cutting board, add it to the porridge. Zest the lemon and add this zest along with the juice of half of the lemon to the porridge.

  3. Add the maple syrup to a pan and heat it up. ONce it is bubbling, add the orange wedges and let them fry for about 2-3 minute son each side until golden brown.

  4. Before serving, stir the coconut milk into the porridge. Then divide onto the bowls, top with the oranges, more shredded coconut and also a splash of plant based milk.

  5. Serve and enjoy!

Love,
Katie // Une Petite Cuisinière

Kategorie: Breakfast, Diet-Specific, My favorites, Vegan, Vegetarian Stichworte: breakfast, brunch, citrus, easy breakfast, family brunch, family friendly brunch, healthy, healthy breakfast, meal prep, meal prep breakfast, oatlover, Oatmeal, oatmeal recipes, oats, plant based, porridge, spring food, tropical, vegan, winter, winter breakfast

The Easiest 20 Minute Garlic Curry Eggplant

März 24, 2021 by katharina.kuehr Kommentar verfassen

20 minutes in combination with curry and soft eggplant? Who can say no to that? Seriously, standing in the kitchen for hours when we are hungry and don’t have much time is just not great fun. So we often grab something quick and often not the healthiest options. But this does not have to be the case! It is sooo easy to make something healthy and delicious is like only twenty minutes! And really, these 20 minutes of cooking probably are the most meditative break during your busy day.

What’s special about this dish?

it is not quite a regular curry – but it also is not a stir fry. It is something inbetween. Actually I have been inspired by Baba Ganush when I came up with this dish (which is a middle eastern eggplant dip) and wanted to make a curry version of it that is not quite as creamy. And that kind of is what it turned out to be – a mix of Baba Ganush, Curry and Stir Fry. Anyway, no matter how you label it, it is super addicting.

Contrary to regular curry, it does not contain many different veggies and it not as saucy. The only veggies in it are the eggplant and the edamame. Why? Because we’re keeping it simple. This way the flavors also come through more intense and you can really focus on the eggplant and edamame. The eggplant is basically the base and adds some softness and the edamame gives a nice & fresh contrast.

Is this dish healthy?

OH YES! The main star of the show is eggplant! Besides being super tasty, eggplant also is super healthy! Eggplants are loaded with vitamins, minerals and fibre. Plus they come with a bunch of antioxidants and they are incredibly easy to cook! You could roast them like in the Sesame Roasted Miso Eggplant Recipe or you could add it to an italian tomato stew or throw it into a salad! Options are endless!

Then we also have edamame. Edamame actually is one of my favourite foods ever! The actually are a bean, and therefore extremely high in fibre and protein!! Plus, obv. a bunch of minerals! That all comes with a side of rice, which provides us the carbs to stay happy and healthy and full of energy throughout the entire day!

How to make this dish?

That now really is easy as pie!! It really only comes down to chopping garlic and eggplant and frying them in oil untl soft. Here we need to salt the eggplant, because the salt helps to get the water out of the eggplant, which makes it cook quicker. All that’s left to do now, is to add the edamame and the curry paste that has been mixed with the coconut milk and let it simmer. To garnish we only chop up some spring onions and cilantro and there you go! Easy as pie!

Meal prep friendly?

Yepyepyep! Curry actually is one of the foods that is the meal prep friendliest. It actually enhances in flavour when you let it stand overnight. You can just store it separately from the rice and either heat it up in a pot with a splash of water or in the microwave. This really makes it even more suitable as a quick lunch, because then it really only takes about 5 minutes!

Honestly, this has become one of my new favourites and it is soso good! Easy, quick, super tasty, and healthy! I do not know what you are waiting for any more and why you are not already in the kitchen cooking! Have fun cooking!

Print

The easiest 20 minute garlic curry eggplant

Ready in basically no time and yet so full of flavor and deliciousness. Th perfect dish for quick lunches or easy dinners. Soft and garlicy eggplant tossed in a spicy red curry sauce on a bed of fluffy rice. All you really need!

Course dinner, lunch, Main Course
Prep Time 5 Minuten
Cook Time 15 Minuten
Total Time 20 Minuten
Servings 2 servings

What you will need

  • 1 eggplant
  • 4 tbsp curry paste
  • 100 ml coconut milk
  • 1 tbsp oil
  • 2 garlic cloves
  • 1 tbsp soy sauce
  • spring onions & cilantro for garnish
  • 150 g rice

How to

  1. To a pot add the rice along with twice the amount of water and a generous pinch of salt. Bring to a boil, then reduce to a simmer. Once all water is absorbed turn down to very low heat and let the rice stand to fluff.

  2. In the meantime finely chop the garlic clove and roughly cut the eggplant into about 2-3cm sized chunks. In a pan heat up the oil, then fry the garlic in it for about 1-2 minutes until fragrant before adding the soy sauce. Then add the eggplant and fry on medium high for about 5-8 minutes.

  3. In the meantime combine the curry paste and coconut milk in a bowl and slice the spring onions.

  4. Then add the coconut-curry mix to the eggplant and stir it in. Turn down to medium heat and let cook for about 8 minutes, until the eggplant is nice and soft.

  5. By now the rice should be done too. Divide it onto the plates and top with the eggplant. Sprinkle some sesame seeds and spring onions and serve with a little cilantro!

    Enjoy!

Enjoy,
love,
Katie

Kategorie: Uncategorized Stichworte: 20 minutes, aubergine, easy, easy lunch, easy meal, eggplant recipes, einfach, family meals, gesund, healthy, healthy vegan, lunch, plant based, quick, quick meals, schnell, schnelles Essen, schnelles Mittagessen, vegan, vegetarian, vegetarisch, weeknight dinners

Super Easy 20-Minute Sticky Orange Tofu

März 18, 2021 by katharina.kuehr Kommentar verfassen

Put all our prejudices aside and make this recipe. If you used to think tofu is boring, you will be proven differently. We have got the sweet and slightly spicy flavours of orange and chilli combined in a sticky sauce that covers the tofu. Definitely not your average tofu.

Orange Tofu is a dish that originally is made with chicken instead of tofu and therefore also called orange chicken. Orange Chicken originated in China, where it is rarely found in traditional restaurants today. It got really popular in the US through Panda Express. There the chicken is battered, then fried and then tossed in a orange sauce, which thickens and caramelizes. 

What’s special about this dish?

It is a vegan version if the orange chicken and a mich healthier one too. It is not battered and deep fried and also not tossed in a sauce loaded with white refined sugar. It is a much healthier, easier and quicket version of the original and still tastes really intense and good! So you could say that it rather is a Chinese inspired dish and less the original one.

Is this dish healthy? 

Yep yep. What is it made of? Well our main ingredient is tofu. Tofu is really high in protein and also comes with some fiber. Then our main „ingredient“ is the orange sauce. This is mainly made from freshly squeezed orange juice, which is a vitamin C bomb. Then we have some soy sauce, vinegar, fresh ginger and garlic and some honey, plus some cornstarch in which the tofu is tossed and then fried in a little hot oil.

Contrary to regular orange chicken, we have rather little fat here because instead of deep frying it, it is simply stir fried in a pan. Also, we are using honey instead of white refined sugar. Honey still contains sugar but less per 100g in comparison to regular sugar and it actually comes with antioxidants. 

How to make this dish:

This is super simple. So, we start by pressing the tofu. To do so we just lay some kitchen paper beneath and on top of a block of tofu and them let something heavy press it down for a few minutes. This will make the liquid drain from the tofu so it gets crispier in the pan later on.

Next we just chop it up into about 1 cm sized cubes. These are then tossed in some cornstarch. The cornstarch binds the remaining liquid and kind of forms a crust when frying. After that, the tofu is fried in some hot oil from each side for about 1-2 minutes till crispy. 

In the meantime we combine the orange juice & zest, soy sauce, honey or maple, cornstarch, ginger, garlic and vinegar in a bowl and then pour it over the tofu and let it simmer on low heat for a few minutes. Because of the cornstarch the sauce will thicken and the honey makes it caramelise. That already pretty much is it, we now only have to divide it onto plates or bowls and garnish with some greens!

Meal prep friendly

You can easily make this dish in advance and reheat it. If you have a stove I would prepare everything in advance and store the tofu and sauce separately and heat it up together whenever you want to have it. If you do not have a stove when eating it, you can simply heat it up in the microwave all together. Maybe you’ll then need to add a little water.

Print

Super Easy 20-Minute Sticky Orange Tofu

Easy, delicious and healthy. A vegan and lighter version of the american-chinese classic and let me tell you, it at least is as delicious!

Course dinner, lunch, Main Course
Cuisine American, Chinese
Prep Time 10 Minuten
Cook Time 10 Minuten
Total Time 20 Minuten
Servings 2 servings

What you will need

  • 300 g tofu
  • 4 tbsp cornstarch
  • some rice or quinoa to serve with

For the sauce:

  • 1 orange zest & juice
  • 2 tbsp soy sauce
  • 1 garlic clove
  • 1 cm ginger
  • 1 tbsp cornstarch
  • 60 g honey or maple
  • 1 tbsp vinegar

How to

  1. Lay the tofu onto some kitchen paper and cover it iwth some more. Lay something heavy on top and let it press for abou 5-10 minutes, so as much liquid as possible goes out in order for the tofu to become crispy when frying. Then cut into 1 cm sized cubes and toss it in the cornstarch

  2. In the meantime grate the orange, then press it. Combine it with the remaining ingredients for the sauce.

  3. Heat up the oil in a pan and fry the tofu on each side for about 1-2 minutes until crispy and golden. Turn the heat down to medium heat and pour in the orange sauce. Give everything a good mix and let simmer for about 3-4 minutes until it has thickend a bit.

  4. Serve with some rice or quinoa and garnish with some cilantro! Serve and enjoy!

Honestly, this dish is so quick, so easy to make and so good! You’ll really, really love it and it is so so simple! I hope you’ll like it as much as we do and have a great time cooking it!

Enjoy!
Love,
Katie // Une Petite Cuisinière

Kategorie: American, Chinese, Cuisine, Diet-Specific, Lunch/ Dinner, My favorites, Vegan, Vegetarian Stichworte: 20 minutes, American, Chinese, easy tofu recipes, easy vegan, healthy lunch, healthy vegan, lunch, orange, plant based, quick, quick and easy, tofu, tofu recipes, vegan, vegan cooking, vegan lunch

The Ultimate Barbecue Cauliflower Wing Stir Fry

Februar 26, 2021 by katharina.kuehr Kommentar verfassen

Really, I do not quite know what this is or how to name this respectively but what I can tell you is that it is seriously good! It kind of is a mix of wings, a barbecue salad and a stir fry. Yepyep, I know this sounds a bit interesting but honestly, it could not be more delicious!

We have got the wing shape and texture since the cauliflower is baked. Then we have got the stir fry flavours, especially in the vegetables and the good old barbecue taste. The cauliflower has the good soggy-after-crispy-saucy taste (I hope anyone understands what I mean here). It’s like when you bake something crispy and then toss it in a sauce and it gets softer and so full of flavour. Definitely amazing! If you only are a fan of crispy wings, you should go check out my cauliflower taco recipe and try this (insane!)

What is special about this dish?

It is not a classic of any cuisine, that needs to be said. We have so many different flavours and textures, like a fusion of the whole world in one bite. And, even though it is such a fusion, it really is not difficult to make. It comes down to a few minutes essentially. Plus, it really is something that everyone will like. It is one of those family meals anyone wants, while at the same time being great for just making it for one self. So, it is kinda extra but not hard to make.

Is this dish healthy?

I would definitely say so. We have got the cauliflower. I think cauliflower really is worth all its hype because it simply is great. Not only can you make an incredible variety of dishes with it, ranging from pizza to gnocchi and wings but it also is really nutritious and very very filling. Cauliflower is high in fibre and antioxidants as well as several Vitamins such as C, K, and B6. Just a really cool vegetable, plus it mostly is grown locally so, no excuses to not get it.

Besides the cauliflower we have got (plant based) milk, wholewheat flour, breadcrumbs, spices, oil and barbecue sauce. Wholewheat flour is a great source of fibre and carbs, same as the breadcrumbs (if you chose wholegrain ones). The spices, milk, and oil also contain several minerals, vitamins and healthy fats, which are great for your body.

Now we have got the barbecue sauce left, which is a tricky one. Let’s put it that way: Homemade ALWAYS is better than store bought. Why? You actually know the ingredients that are in it and you can pronounce them. Store-bought ones are often loaded with sugar, preservatives, artificial colouring, and, and, and. You know, the list goes on. If you decide to get a store bought one, make sure to check the label and see which ingredients it contains. Nevertheless, you can easily make a homemade one. You verrryyy likely already have all the ingredients at home and have it mixed in less than 5 minutes. The recipe will be down below here or in the barbecue chicken salad recipe.

How to make it:

If you have watched my Vegan What I Eat In A Day on Instagram, you by now know. It is everything else than tricky or complicated. No need to pre-cook anything or something like that, just an easy recipe. We start by chopping up the cauliflower and tossing it in a mix of plant based milk, cornstarch, wholegrain flour and spices. Next, we toss them in the breadcrumbs. Now they go on a baking tray, are drizzled with some oil and baked.

That’s it for this part. now you an chop up some veggies. I believe what works best here are bell peppers and spring onions, but feel free to use whatever you like and desire. These are just quickly stir fried in a hot pan with some oil. When the cauliflower is done baking, it is added along with the (homemade) barbecue sauce. Just combine all of this and serve with some rice, salad, bread, potatoes, or anything else you like! That already is it!

How and when to best have it:

You can meal prep it and store in the fridge with some extra barbecue sauce if you want. I most of the time serve it with rice and/or salad but it also must taste great in salad, or with some crispy, fries-style potatoes! That is it!

Print

The Ultimate Barbecue Cauliflower Wing Stir Fry (Vegan)

Soggy-after-crispy sauce & super flavorful barbcue caulidlower wings. So easy, so good and so healthy. Just heaven.

Course Appetizer, dinner, Main Course
Prep Time 10 Minuten
Cook Time 25 Minuten
Total Time 35 Minuten
Servings 2 servings

What you will need

For the barbecue sauce:

  • 100 g unsweetend ketchup
  • 4 tbsp soy sauce
  • 2 tbsp maple syrup or coconut sugar
  • 1 tbsp vinegar
  • 1 tsp Worcestershire sauce
  • 1 tsp hot sauce
  • 1 tsp salt

For the rest

  • 1/2 head of cauliflower (or one small one)
  • 200 ml plant based milk
  • 5 tbsp wholegrain flour
  • 1 tbsp cornstarch
  • 5 tbsp breadcrumbs
  • 1 red bell pepper
  • 3-4 spring onions
  • rice to serve with

How to

  1. Preheat the oven to 200°C. Break the cauliflower apart into smaller, bite-sized florets. Combine milk with flour, cornstarch, paprika and salt in a bowl. Add the cauliflower florets and toss them in the mixture.

  2. Add the breakcrumbs into another bowl and toss the cauliflopwer in it after the mixture, so they are all covered with the crumbs. Add them noto a baking tray and drizzle with oil. Here it is important that every floret is covered with some oil, otherwise they won't be crispy after baking and bake for 20-25 minutes until golden brown and crispy.

    Combine all the ingredients for the barbecue sauce!

  3. In the meantime deseed and chop the bell pepper and pealed spring onions into about 1cm sized pieces. Heat up about 1tbsp of oil in a pan and stir-fry those for about 2-3 minutes. Then add in the baked cauliflower and the barbecue sauce and give it a good mix! Fry for another 2 minutes, then serve with some rice and/ or salad! Enjoy!

Kategorie: Appetizers, Diet-Specific, Lunch/ Dinner, My favorites, Vegan, Vegetarian Stichworte: barbecue, barbecue recipe, cauliflower, cauliflower nuggets, cauliflower recipes, cauliflower wings, dinner, easy, easy vegan, family friendly, family recipe, game night recipe, healthy vegan, meal prep, plant power, vegan

« Vorherige Seite
Nächste Seite »

Footer

What has been happening on my Instagram

Copyright © 2024 Une Petite Cuisinière on the Foodie Pro Theme