• Zur Hauptnavigation springen
  • Skip to main content
  • Zur Fußzeile springen

feel food club

  • Home
  • About me
  • My Recipes
  • Blog
  • Navigation Menu: Social Icons

    • Instagram

Cuisine

Vegan (!!) Lemon-Teriyaki Shrimpz Stir-Fry Noodles w/ Bell Pepper

November 4, 2021 by katharina.kuehr Kommentar verfassen

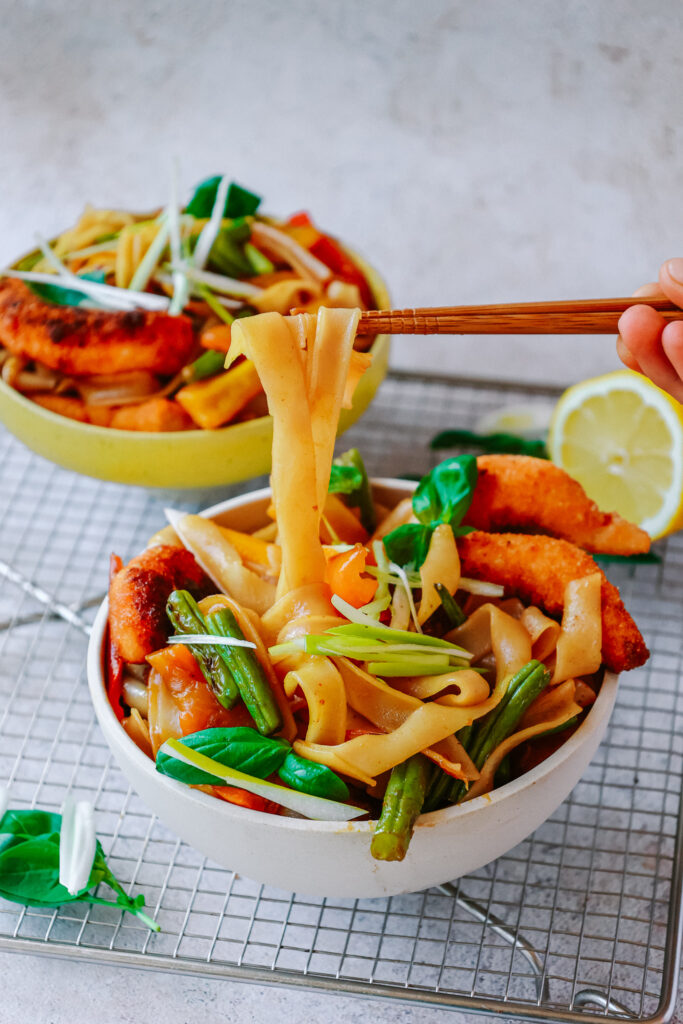
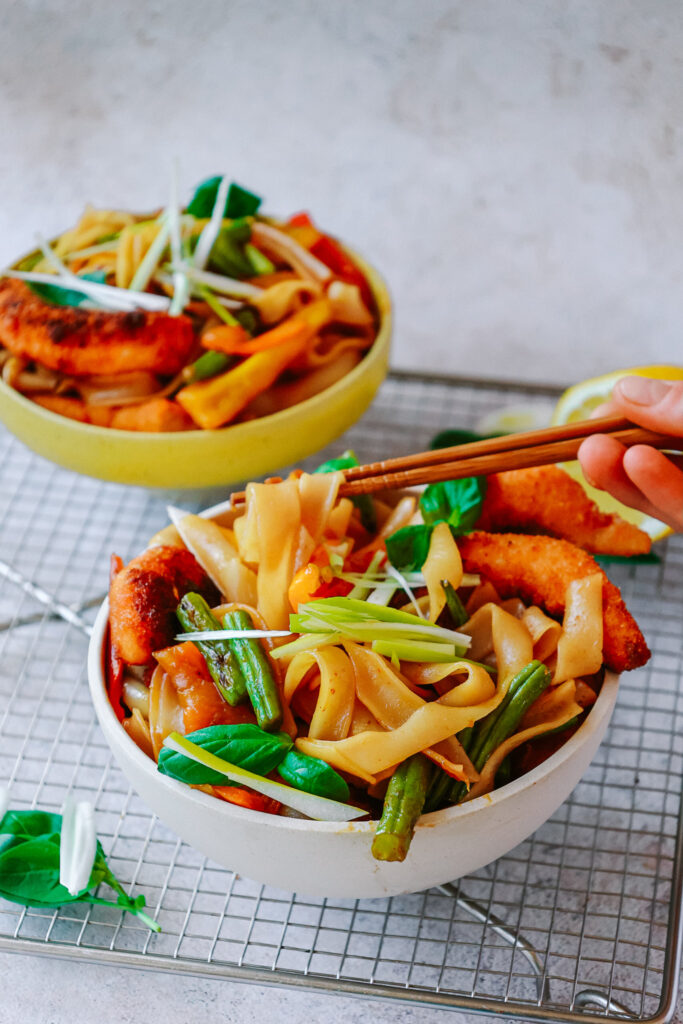
Vegan what?? Vegan Shrimpz! Yes, you read correctly! And no, we are not doing any boring vegan fish alternative here but an incredibly delicious one, that actually tastes like the real deal! To make these Shrimpz taste even more delicious, we are combining them with saucy noodles with a lemony twist and fresh veggies. The combination is a real dream. And trust me, you will miss nothing in here.

I totally understand if this is a bit suspicious to you and you have some worries regarding the taste in a vegan fish alternative. I totally understand it because I have been there too. Nonetheless, I gave Vegan Zeastar Shrimpz a shot and I am super happy I did – because I was totally convinced. All in all I would say that they probably taste somewhere between 85-90% like ‚real‘ Shrimpz. The only difference is that these have a slight lemon flavour to them and are a bit softer texture-wise.

What is special about this dish?

First of all, we have the vegan Shrimpz, which already are very special. If you want to read more about those, skip to the next paragraph. Besides these though, there also are a few other aspects that make this dish kinda special. For example the teriyaki sauce. It is not the regular sweet and salty teriyaki sauce that you get with your favourite takeout dish. In here we are adding fresh lemon juice to the mix, which gives it a surprisingly good and super tasty flavour. It lightens everything up and adds a fresh note.

What is more, this recipe is really incredible versatile! In here the recipe calls for bell peppers and green beans because it is what, in my opinion, goes best with the sauce and the Shrimpz. If you do not happen to have these veggies at home however, you can easily substitute them for other ones like broccoli, carrot, zucchini, asparagus, peas – whatever you can find! Also the protein source can be altered and switched to chicken, tofu, or something else if you wish to do, although it definitely tastes best with these vegan Shrimpz!

Vegan Shrimpz? Really?

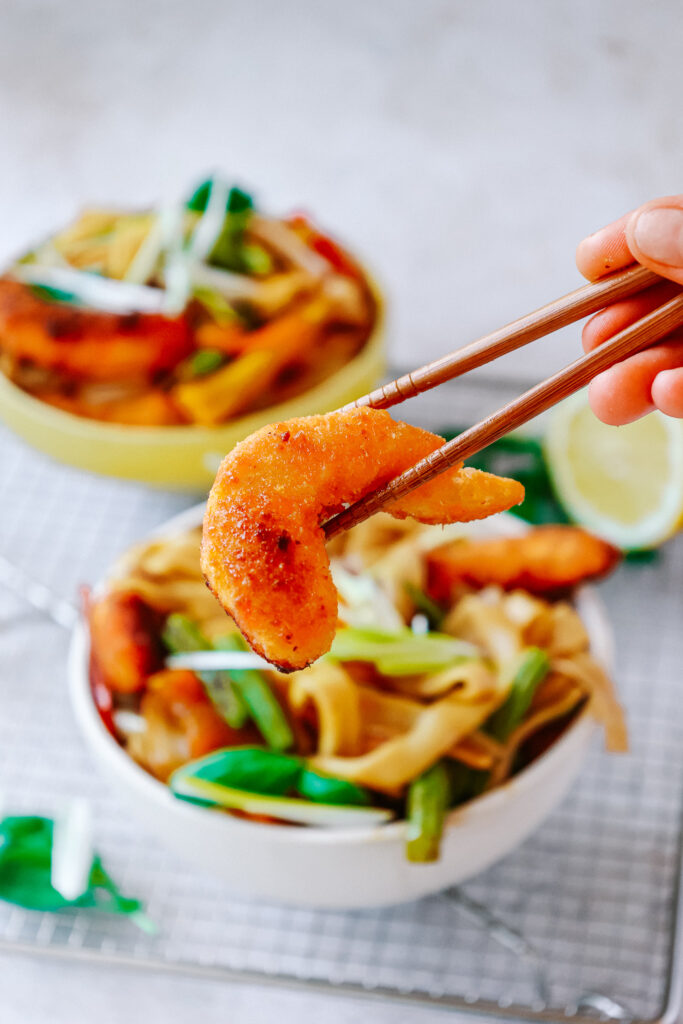
Nothing beats some crispy on the outside, soft on the inside, delicious shrimps, right? Well it definitely is a dream tastewise, but after having watched Seaspiracy, you know that fish consumption definitely is not a dream from a sustainability perspective (Seaspiracy is a documentation about the fishing industry and its dramatic consequences). Fortunately, we do not need to destroy our oceans and environment in order to have that delicious shrimp flavour. How so? By opting for vegan fish alternatives like Vegan Zeastar!

I too was a bit suspicious when I prepared the Shrimpz for the first time. Given that, it was twice as surprising that these Shrimpz really resemble the taste of real shrimps very, very well. They are mainly made out of starch, water, soy and lemon, which makes it even more fascinating in my opinion! When you purchase them, they come already covered in breadcrumbs, which not only saves you time and work but also is extra delicious!

Vegan Zeastar offers a variety of other products too, including vegan Sashimi and Calamari, however the shrimpz are my favourite from what I have tried so far. All products also are super easy to prepare, which I believe is amazing!

Where to find them?

In Austria you can find the Vegan Zeastar products, including the Vegan Shrimpz at the SPAR supermarket in the frozen section!

how to make this dish – and how to prepare these shrimpz?

Both are way easier than they may seem at first. To make the stir fry, all it essentially comes down to is to chop the veggies, fry them in a pan, mix the teriyaki sauce, boil the noodles and mix it all together! Really not complicated, is it? Also making the sauce is not complicated since you only need to mix ingredients you probably have at home anyway!

the shrimpz: 3 different ways of making them

The package suggests that you deep fry them. Nevertheless, I tried 3 different version of preparing them and they all turned out to taste equally delicious: deep frying, semi-deep frying and oven baking.

  1. Deep-frying: this is the preparation method the package suggests. To do this we need to add about 4 cm of oil to a pan, enough that the Shrimpz can swim in it. In order to fry them, the oil needs to be super hot. If it is not hot enough, they will only soak up the oil and not turn out crispy. So be patient with heating up the oil and once hot, fry the Shrimpz for about 2 minutes on each side until golden-brown and crispy!
  2. semi-deep frying: for this method less oil is used, only about one centimeter. The remaining process is the same as it is for deep-frying, just that it probably takes about 4 minutes for each side!
  3. oven baking: if you want to go for this method, just drizzle the Shrimpz with oil and bake them at 225°C for 20 minutes, flipping them every 5 minutes

My preferred method definitely is oven baking because 1) it is the easiest to make with the least work, 2) it is the healthiest method since the least fat is used and 3) there is no food waste (when deep frying food, usually most oil is wasted). And really, there barely was any difference in taste. However, deep frying them definitely is the quickest way to prepare them.

Is dish dish healthy?

Yes! Because of its high veggie content, it is loaded with fibre, vitamins and nutrients. The bell peppers are packed with Vitamin C, making sure your immune system stays healthy throughout the cold season. Also the homemade teriyaki sauce definitely is healthier than store bought one since you really know and can decide what goes into it. Plus, the noodles not only give you a very comforting feeling but actually provide carbs, so you stay full of energy!

A MUST MAKE!

No matter whether you are vegan or not, you really need to try this recipe! It tastes SO incredibly delicious, is full of flavour and so easy to make! Definitely a new staple recipe at our house! Also, I can only highly recommend you try these Shrimpz, even, or especially, if you are a non-vegan!

Print

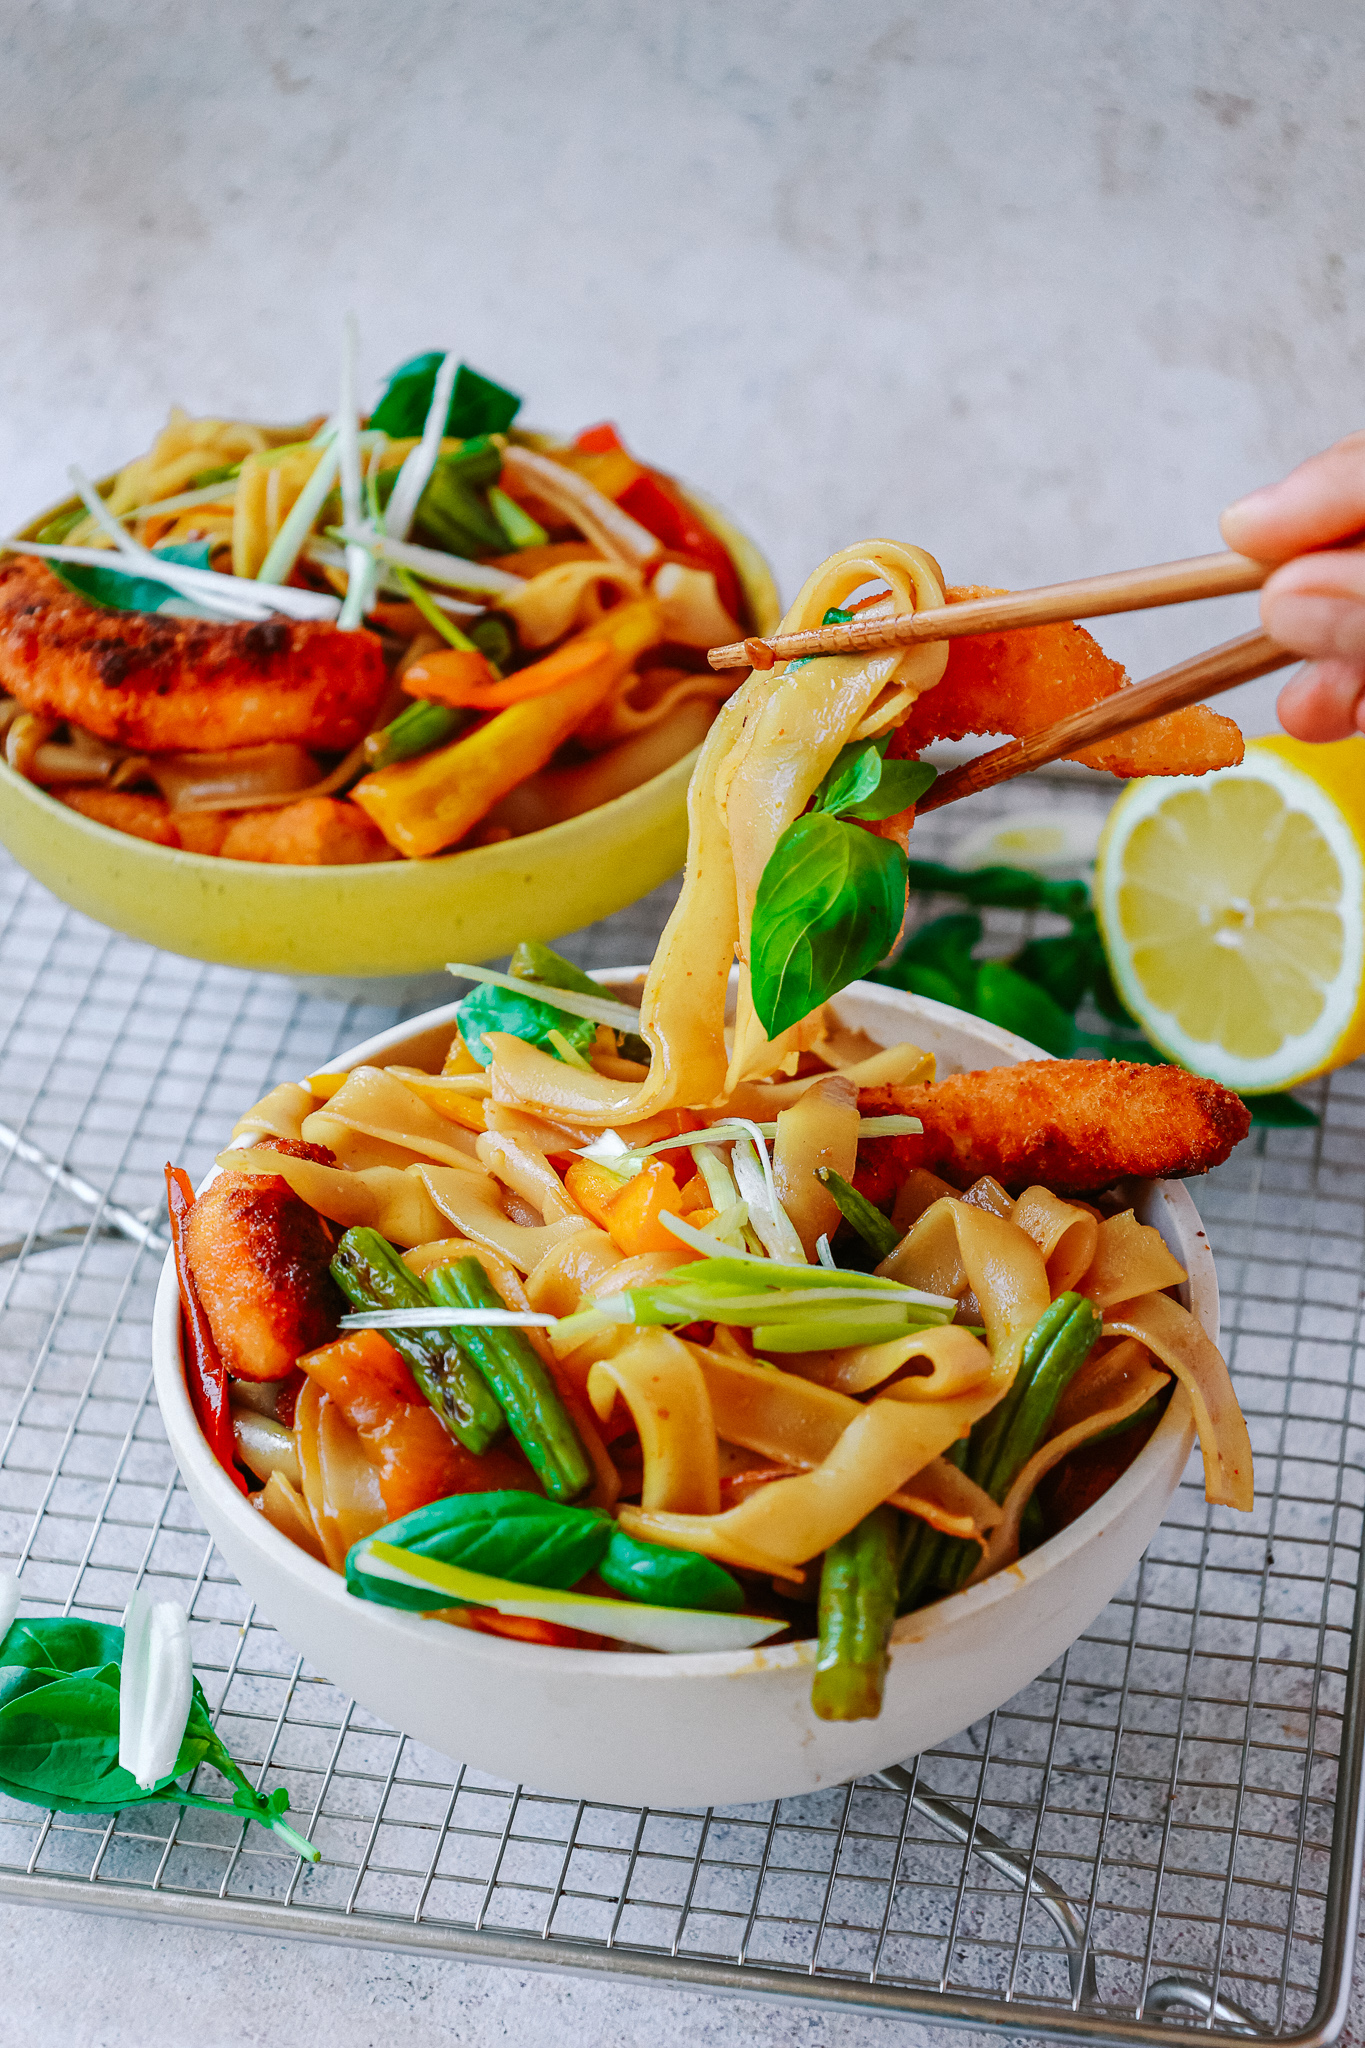
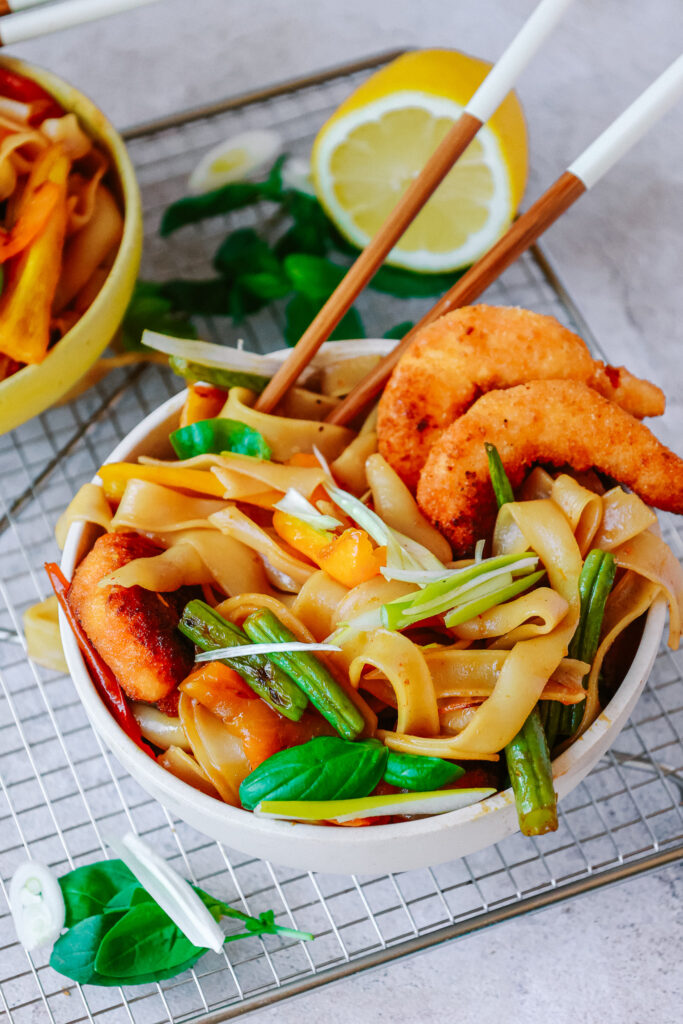
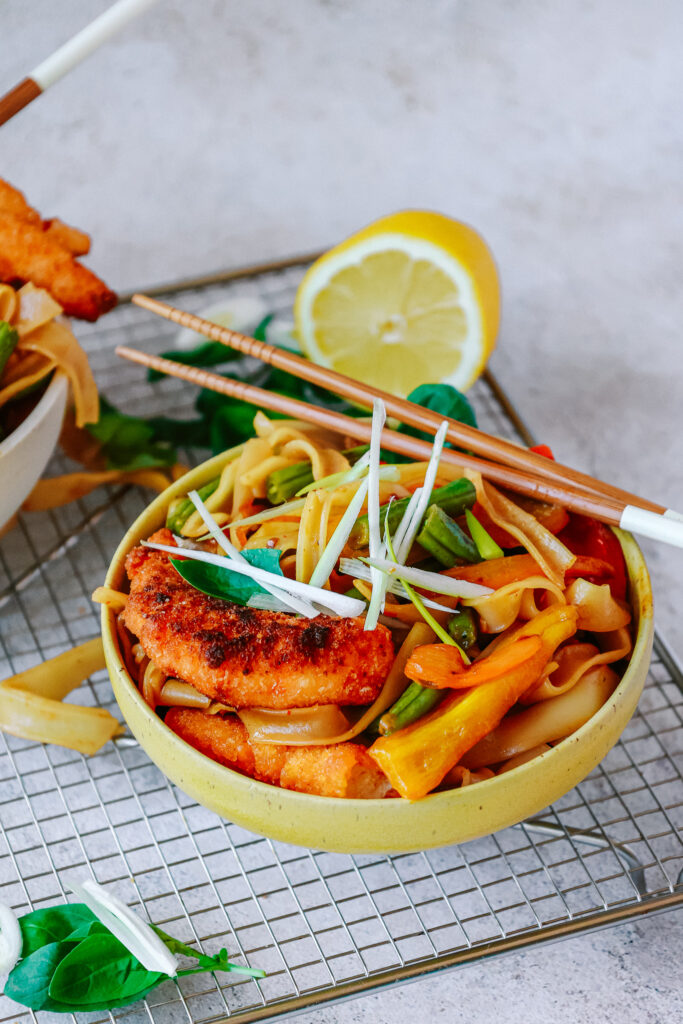
Vegan Lemon-Teriyaki Shrimpz Stir-Fry Noodles w/ Bell Pepper

These neither are your regular Shrimpz, nor is this your regular stir fry. In the recipe the classic Teriyaki sauce is taken next-level with a lemony twist and the Shrimpz are veganized since we are using Vegan Zeastars Shrimpz. A must make for all vegans and non-vegans!

Course bowl, dinner, lunch, Main Course
Cuisine asian, Chinese
Prep Time 10 Minuten
Cook Time 20 Minuten
Total Time 30 Minuten
Servings 3 servings

What you will need

  • 1/2 each red, yellow & orange bell pepper
  • 250 g green beans
  • 250 g rice noodles (glas noodles)
  • 1 clove of garlic
  • 1 thumb-sized piece of ginger
  • 1 tbsp oil
  • one package Vegan Zeastar Lemon Shrimpz
  • oil for frying/ baking

For the teriyaki sauce:

  • 3 tbsp soy sauce
  • 1 tbsp honey or maple
  • 1 tbsp sesame oil
  • juice of 1/2 lemon
  • 2 tsp sriracha or chili sauce

How to

  1. Start by heating up the oven to 225°C. Place the frozen Shrimpz on a baking tray lined with parchment paper and generously drizzle them with oil. Bake them for about 20 minutes, flipping them every 5 minutes.

  2. In the meantime wash and chop the bell peppers into thin strips, cut off the ends of the green beans and half them or chop them into bite-sized pieces. Peel and finely mince the garlic and ginger.

  3. In a pan heat up 2 tbsp of oil and fry the ginger and garlic for about 30 seconds until fragrant before adding in the remaining veggies and sautéing them on high heat for about 2 minutes. Turn down the heat and let them soften for roughly 5-10 minutes.

  4. Bring a pot with water to a boil and prepare the rice noodles according to package instructions. Usually they need to cook around 5 minutes, then drain and rinse them under cold water (so they do not continue to cook).

  5. Mix all ingredients for the sauce and add into the pan with veggies along with the drained noodles and give everything a good mix so it is all combined. Divide onto bowls, top with the prawns and enjoy!

I would love to know how you like this recipe, so feel free to let me know here in the comments or through Intsagram! Have fun cooking!
Enjoy,
Katie // Une Petite Cuisinière

Kategorie: Asian, Chinese, Cuisine, Diet-Specific, Lunch/ Dinner, My favorites, Vegan, Vegetarian Stichworte: 30 minutes, bell peppers, dinner, easy, easy to make, family friendly, healthy, plant based, quick, shrimps, Shrimpz, stir fry, vegan, vegan Zeastar, vegetarian, veggies, versatile

The Ultimate (vegetarian) Bánh Mi Recipe Anyone Will Love (vegan options)

Oktober 15, 2021 by katharina.kuehr Kommentar verfassen

Bánh what? Bánh Mi! This vegetarian/ vegan take on the Vietnamese Classic is nothing you would want to miss! Imagine crispy baguette, with a tangy, satisfying, spicy mayo, some super flavorful tofu, crunchy pickled veggies and a whole bunch of freshness! Doesn‘t that sound like something we would all need to bring some summery happiness into these cloudy days?

What is more, this can easily be prepared beforehand (essentially this means marinating the tofu and pickling the veggies) and then the dish is ready in what – 10 minutes probably! Sounds easy, right? Well, it is! And it is SO good!! When I made this, we devoured it, and finished every last crumb, although we already were super super full and happy 🙂

What is special about this dish?

Traditionally, bánh mi is served with pork sausage, cilantro, pickled carrots, radishes and buttery mayonnaise is a short baguette. However, we want to make it a little bit more nutritious and therefore do a few changes. Instead ig pork sausage, we are using marinated and pan-fried tofu. This not only makes this meal vegetarian (and optionally vegan) but also mire nutrient dense and less heavy in fats. What is more, instead of the buttery mayo, we are lightning it up by mixing in some greek yoghurt (in the following paragraph you can read how this is healthier). If you want to make a vegan version of it, you could decide to go for vegan mayo and for a plant based yoghurt instead.

How healthy is this recipe?

In general it can be said that this dish is pretty nutritious, because of the variety of ingredients. The pickled vegetables, that really account for that typical bánh mi flavor, are high in fibre and vitamins. The carrots for example, are a great source of Vitamin C, which helps boost your immune system – great for the colder season ahead!

Besides, the tofu also is high in protein and does contain all amino acids to make it a complete protein (if you want to read more about why tofu is so good for you, click here). And in comparison to traditional bánh mi, which is served with pork, it is considerably lower in saturated fats and higher in fibre. Since we are adding soy sauce to the marinade, the sodium content is rather high, however, you could use low-sodium soy sauce.

The bread is a great source of carbohydrates, providing you energy. It though is not wholegrain and is a simple carb. For more nutritional value, you can simply use whole grain baguette. This then is a complex carbohydrate, causing your blood sugar levels not to spike and keeping you full for longer due to its fibre.

Last but not least we have the mayo. It can be said that without the Mayo it is not really a bánh mi because it gives it this classic spicy and rich flavor. Nonetheless, mayo contains a lot of fats. They for the most prt are unsaturated, which is great for your brain, but too much also is not ideal. Therefore we are lightning this sauce up by mixing the mayo with greek yoghurt and sriracha. The greek yoghurt comes with a decent amount of protein and does not really change the flavor too much! A great way to lighten things up!

Make it vegan!

In case you want to make a vegan version out of this dish, that is super easy! Instead of traditional mayo and greek yoghurt, just use vegan mayo and a plant based yoghurt alternative. The bread should be vegan anyway and regarding the tofu marinade, you could just use vegan fish sauce or leave it out completely! And there you go and have your vegan version of it!

Is it really that simple to make?

Yes, it is! The only things you need to prepare are the tofu and the pickles. For the tofu, all that needs to be done is mixing the different sauces with garlic and ginger and letting the tofu bath in there for a few hours. The longer the better! If you only have one hour, that works too, just be aware that the flavor will not be that intense.

What else needs to be prepared are the pickles, but also those are easy peasy. Here we add some vinegar, rice wine vinegar, water and a little bit of sugar to a pot, bring it to a boil and then pour it over the slices carrots and radish and also just let them chill in the fridge.

Once the preparation is done, the rest is fairly easy. We just need to fry the tofu in the pan for about 2 minutes on each side and then fill the bread with the mayo, the tofu, the herbs, pickles and veggies! And voilà – there you go!

Seriously, I was not kidding when I say that we devoured this dish! It was sooo incredibly flavorful and satisfying and all the ingredients worked together in such great harmony. I cannot think of a reason for why you should not make this – it is just way too delicious!! In case you try this (which you should), I would love to hear how you like it, so feel free to leave a comment or text me on Instagram!

Print

The Ultimate (vegetarian) Bánh Mi Recipe Anyone Will Love (vegan options)

Step away from your regular sandwich game and take it next level! Crispy baguette filled with spicy, tangy mayo, super flavorful tofu, crunchy pickles and fresh herbs. Every bite is an explosion of flavor in your mouth – plus it is super easy to make!! No excuses not to make it!

Course lunch, Main Course
Cuisine Vietnamese
Prep Time 20 Minuten
Cook Time 10 Minuten
Total Time 30 Minuten
Servings 2 servings

What you will need

  • 1 baguette
  • 2 tbsp mayo
  • 1 tsp sriracha (or more if you wish)
  • 4 tbsp greek yoghurt
  • 1 cucumber
  • cilantro & mint

For the tofu:

  • 200 g tofu
  • 4 tbsp soy sauce
  • 2 tbsp (vegan) fish sauce
  • 1 tbsp sesame oil
  • 1 lime
  • 1 clove garlic
  • 1 thumb-sized piece ginger

Pickles:

  • 1 carrot
  • 1/2 radish
  • 50 ml white wine vinegar
  • 50 ml rice vinegar
  • 50 ml water
  • 1 tsp sugar

How to

  1. To marinate the tofu, finely grate or chop the ginger and garlic and mix with the soy sauce, fish sauce, sesame oil and lime juice. Cut the tofu into about 1/2cm thick and 3x4cm wide pieces, cover in the marinade and let sit for up to 3-4 hours (it also works if you only let them sit for an hour). The longer, the better.

  2. To make the pickles peel carrot and radish and cut into thin sticks. Bring the vinegars, water and sugar to a pot and bring to a boil. Place the carrot and radish in a jar and cover with the vinegar. Let sit for as long as possible – the longer the better.

  3. Once ready to prepare the rest, cut the baguette in two pieces and then cut them in half lengthwise (if you do not cut them through, it is easier to eat them). mix the mayo, greek yoghurt and sriracha and spread the bread with it. Next add the pickles.

  4. Remove the tofu from the marinade and fry it in hot oil for about 2-3 minutes on each side, turn down the heat to medium and pour the remaining sauce over the tofu and let it cook in.

  5. Add the tofu on top of the pickles, next the cucumber and then the herbs. Close the sandwich and enjoy!!

Have fun cooking & enjoy!
Love,
Katie // Une Petite Cuisinière

Kategorie: Asian, Cuisine, Diet-Specific, Lunch/ Dinner, Vegan, Vegetarian, Vietnamese Stichworte: baguette, delicious, easy, family meals, fresh, healthy, meal prep, plant based, quick, sandwich, tofu, vegan, vegetarian, vietnamese

Super Simple Roasted Sage Pumpkin Tagliatelle Aglio e Oglio

Oktober 10, 2021 by katharina.kuehr Kommentar verfassen

To be fair, this name sounds way more complicated than this dish actually is!! It seems fancy, however, it is super easy to make! You have got that soft and warm roasted pumpkin, spiced with sage, the al dente cooked pasta tossed in some olive oil flavored with garlic and then that parmesan cheese on top for some cheesy contrast! All in all: pure comfort heaven! My friend’s mom would make that day in day out during fall and we‘d go to her house and have it in every lunch break. Seriously, it was SO good and we literally could never wait to get there. So, there was no way around making a recipe of this!

What is Aglio e Oglio?

Very good question. Aglio e Oglio is Italian and literally translated means garlic and oil. In Italy Spaghetti Aglio e Oglio is a very typical dish since it is easy to make (you only need pasta, oil, garlic and chili) and is super affordable. If you have never tried it, it may seem a bit boring but when prepared with some good olive and al dente pasta it tastes amazing!! Sometimes the simplest things are the best.

What is special about this dish?

However, we are leveling it up a bit and are creating a fall version of this Italian classic. We are skipping the chili and instead are adding roasted pumpkin to the pasta. The pumpkin is spiced with a little sage and then baked in the oven before it is being added to the pasta since it takes longer to cook than the rest. Also, instead of spaghetti, tagliatelle are used in here. The flat and wider shape of them just works better with the roasted pumpkin! These little changes transform the classic into a seasonal, cozy, delicious meal!

Which pumpkin should be used?

In this dish I prefer to use butternut squash. This is the pear-shaped light orange pumpkin. Contrary to hokkaido squash it has a lighter and buttery taste to it and a little sweet note that is enhanced when baked. In my opinion these flavors work in great harmony with the pasta and give a nice contrast to the sage! However, if you have another pumpkin favorite, feel free to use that!

Is this dish healthy?

First of all, this meal is very healthy for the soul. This cozy, warm, carby goodness is pure comfort food!! Besides, it definitely can be said that it contains a lot of nutritional value. The pumpkin, for example, is a great source of Vitamin A, C and E as well as fibre and iron, which benefits your immune system (great for the cold months ahead) and your digestive system!

What is more, the oil for example is an amazing source of unsaturated, healthy fat. These fats are essential for your brain and many other aspects in your body. The pasta makes a great source of carbohydrates, making sure you stay energized and also comes with a decent amount of protein. If you want to make it even healthier, you could substitute it for wholegrain pasta, although I need to say that the flavor definitely is better with “regular” pasta.

Ready in 25 minutes (max)!

Not only does this dish take very little time to make, but it also is super easy!

To make it, start by removing the peel and seeds from the pumpkin. After, it needs to be chopped into about 1cm sized cubes (makes it easier to toss with the pasta and allows for a reduced cooking time) before being tossed with a little olive oil, salt and finely minced sage. The mix then is baked at 220°C for 15-20 minutes until the pumpkin is nice and golden brown and soft.

In the meantime the pasta can be cooked according to package instructions, the garlic can already be finely sliced and the parmesan can be grated. Just before pumpkin and pasta are done, a little olive oil can be heated up in a pan and the garlic and sage can be fried in there for a minute before taking it off the heat. Now the cooked pasta, pumpkin cubes and parmesan can be added and everything can be tossed. And that already is it! Pretty simple right?

Meal-prep-options:

Pre-making and storing the entire dish, I would not recommend. Reheated pasta just does not taste as good! Instead, you can premake (essentially preroast) the pumpkin and store this, since the pumpkin is what is time consuming. Whenever you then want to make this dish, you solely need to cook the pasta and start from there. This already saved you a bunch of time!

All in all I hope that you will love this dish as much as we do and that you will have lots and lots of cozy fall evenings!!

Print

Super Simple Roasted Sage Pumpkin Tagliatelle Aglio e Oglio

This seasonal twist on the Italian all-time classic takes fall comfort food next level! Roasted sage-pumpkin along with some cheesy, garlicy pasta equals heaven! Plus, it is super easy to make and ready in 25 minutes!

Course dinner, lunch, Main Course, pasta
Cuisine Italian
Prep Time 10 Minuten
Cook Time 15 Minuten
Total Time 25 Minuten
Servings 4 servings

What you will need

  • 500 g tagliatelle
  • 600 g butternut squash
  • 1 tbsp chopped parsley + 6-8 extra leaves
  • 1/4 tsp nutmeg
  • 1/2 tsp sea salt
  • 6-8 tbsp olive oil
  • 50 g finely grated parmesan cheese
  • 2 cloves of garlic

How to

  1. Start by preheating the oven to 220°C. Remove the peel and seeds of the pumpkin and then chop it into about 1cm sized cubes. Toss with nutmeg, salt, sage and about 2 tbsp of the olive oil before placing it on a baking tray and baking it for 15-20 minutes until golden brown and soft.

  2. In the meantime finely slice the garlic and prepare the pasta according to package instructions. Once the pasta is done cooking, drain it and take the pumpkin put of the oven. Only then heat up the oil and fry the garlic and sage leaves in it for about a minute before taking it off the heat and mixing it with the pumpkin cubes, grated parmesan and pasta.

  3. Serve with fresh sage, more parmesan and a drizzle of olive oil and enjoy!

Enjoy,
Katie

Kategorie: Cuisine, Diet-Specific, Fall, Italian, Lunch/ Dinner, My favorites, Season, Vegetarian, Vegetarian Stichworte: aglio e olio, fall, fall food, family friendly, family meals, herbst, kürbis, Kürbisrezept, pasta, pumpkin, pumpkin pasta, sage, salbei, vegetarian, vegetarisch, weekend

Healthy Authentic Italian Eggplant Parmigiana (super easy!)

September 13, 2021 by katharina.kuehr Kommentar verfassen

The end of summer always is a bit emotional, especially when you realize that you are not in Italy anymore and cannot have pasta & parmigiana with a view of the ocean anymore. Bringing the view home is a bit tricky but what we can do is bringing the food home in order to hold on onto the holidays for as long as possible. 

And trust me, this dish is at least as good as in Italy. Soft eggplant with creamy tomato sauce and lots of goey molten cheese. If there is something like (healthy) comfort heaven – it is this recipe!! Perfect for cozy fall evenings when you just want something to comfort you but also perfect as a side when you have got some friends over for lunch! Plus: you can easily prepare it and then only place it in the oven and voilà!

What is Parmigiana?

Parmigiana (alla melanzane) is a very typical Italian dish that originated in the South of Italy (there are several regions claiming to have invented it). Typically it is made with fried slices of eggplant layered with tomato sauce and cheese and then baked in the oven. In Italy you can find it on most menus as a Primi Piatto (first course) or as a contorno (side dish).

What is special about this dish?

This recipe version of it is an easier and a bit healthier one than the original. The main difference is that we do not deep fry the eggplant before layering but only roast them a little in a pan. This does not only make it healthier (because way less fat is used) but it also makes the preparation of this dish much easier and simpler. 

Is this dish healthy?

It definitely can be said that this is a dish providing many nutrients. Both, the tomato sauce and the eggplant are sources of fibre, vitamins, carbohydrates and minerals. The olive oil accounts for a decent dose of healthy fats. The mozzarella and parmesan provide a healthy dose of protein. This though comes with a dose of saturated fats too – which is not the healthiest – but you know what? A little cheese never hurt nobody! 

look at that crisp ?

Perfect side or comfort food!

As previously mentioned, in Italy you can mostly find this dish as an Appetizer and sometimes as a side. Making this as an appetizer is a great idea because you can prepare and layer everything (except for the final cheese layer) and set it aside. Before your guests are coming, you can just sprinkle the remaining mozzarella and parmesan and bake it. Just make sure not to make too much because it is quite filling. In summer we also love making it as a side dish for pur barbecues because it is a great way to have some veggies and also is it a vegetarian choice for all those who do not want to have any meat. 

Finally, which is our preferred way of having it, you can make it as a main dish. Basically like lasagna, just without pasta sheets and a bit different. Place the skillet on the table and let everyone dig into this goodness. It won’t take long until everything is gone! 

Easy as pie

Making this is super easy. All that needs to be done comes down to very few and easy steps. First you need to slice the eggplant into about 0,5-1cm thick slices before frying them in a little olive oil for 2-3 minutes per side. In the meantime you can already make the tomato sauce for which you just need to sauté some finely chopped onions and garlic in hot oil before adding canned, crushed tomatoes. To make it even easier: use a store bought tomato sauce and skip this step!

The last thing you need to prepare is the cheese: grate the parmesan and roughly chop the mozzarella! That already is it with the preparations and now comes the fun part. Start by adding a layer of eggplant slices into a pan or another oven safe dish. On top goes some tomato sauce, a little mozzarella and a little parmesan. Then repeat it (about 1-2x approximately) until you have used everything up. Now into the oven it goes, for about 25-30 minutes and voilà! 


Anyone who likes eggplants and Italian flavours should try this. Like lasagna, just a little bit healthier and vegetarian. A staple in our house and it is soo good!!
If you try it I would love to know how you like it! 

Print

Healthy Authentic Italian Eggplant Parmigiana (super easy!)

A classic Italian dish made in a way that is a bit healthier than the regular one – yet, at least as delicious! Easy, healthy and tasty and soso comforting!

Course Main Course, Side Dish
Cuisine Italian
Prep Time 20 Minuten
Cook Time 40 Minuten
Resting time 30 Minuten
Total Time 1 Stunde 30 Minuten
Servings 4 servings

What you will need

  • 2 eggplants
  • 500 ml canned tomatoes
  • 1 red onion
  • 2 cloves of garlic
  • Italian herbs
  • olive oil
  • 250 g mozzarella cheese
  • 75 g parmesan cheese

How to

  1. Remove the both ends of the eggplant, then slice them into about 0,5-1cm thick slices lengthwise. Place them on a baking tray and sprinkle with salt. Let them sit for about 30 minutes. This will help remove the water from the eggplants. Then take a paper towel, remove the water that has run out and pat them dry.

  2. Preheat the oven to 200°C.

  3. In the meantime peel and finely chop the onion and garlic, either by hand or in a food processor. In a pan heat up some olive oil and fry the onion and garlic in there for about a minute. Add the canned, crushed tomatoes, salt, pepper and Italian herbs and let simmer for about 10 minutes.

  4. While the sauce is simmering the cheese can be prepared. Grate the parmesan cheese and roughly chop the Mozzarella.

  5. Heat up about 2 more tbsp of olive oil in a pan and fry the eggplants for about 2-3 minutes on each side. Take out and set aside.

  6. Take an oven safe dish and place one layer of the fried eggplant at the bottom. Cover with tomato sauce, half of each, the parmesan and the mozzarella cheese on top, then repeat. At the end, it should all be covered with parmesan cheese.

  7. Now, place in the oven for 30-40 minutes until golden brown and crispy on the top.

    Enjoy!

Have fun cooking
Enjoy,
Katie // Une Petite Cuisinière

Kategorie: Cuisine, Diet-Specific, Italian, Lunch/ Dinner, Side, Vegetarian, Vegetarian Stichworte: comfort food, cozy, eggplant, eggßplant recipes, family meals, healthy, italian, lasagna, parmigiana, side dishes, vegetarian, veggie

Nächste Seite »

Footer

What has been happening on my Instagram

Copyright © 2023 Une Petite Cuisinière on the Foodie Pro Theme