• Zur Hauptnavigation springen
  • Skip to main content
  • Zur Fußzeile springen

feel food club

  • Home
  • About me
  • My Recipes
  • Blog
  • Navigation Menu: Social Icons

    • Instagram

healthy recipes

Easy Oriental Baked Pumpkin with Creamy White Bean Hummus

November 13, 2020 by katharina.kuehr Kommentar verfassen

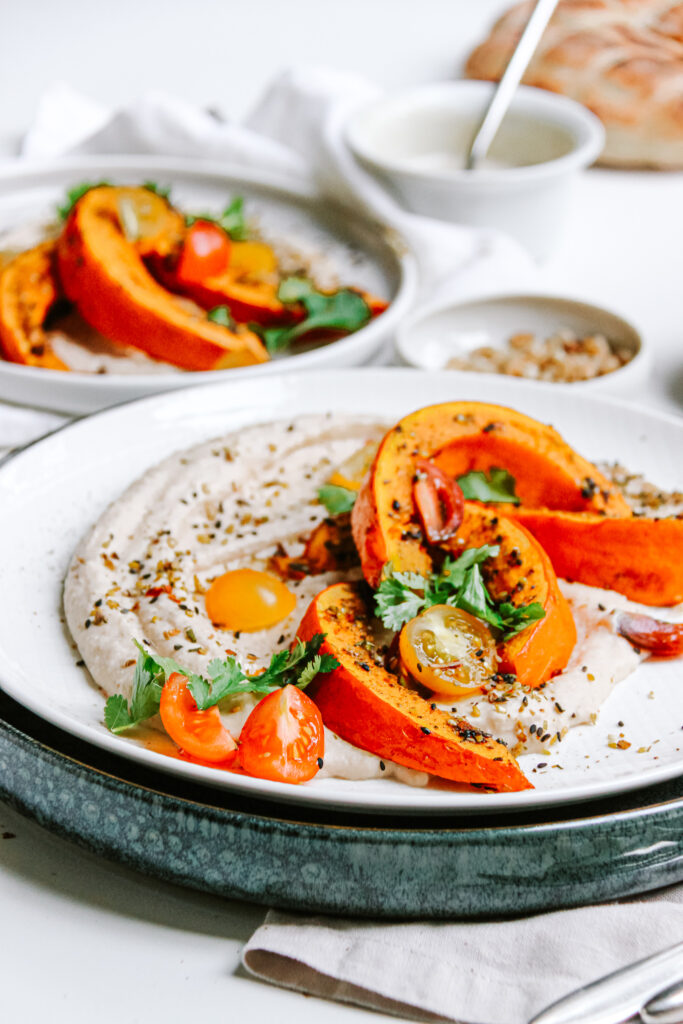
It’s finally the season of our all-beloved veggie! Soups, stews, carving, roasting. No matter when and it which way, pumpkin always is a great idea! But the good same old soup can also get a little boring after a while. So let’s bring some new spices into your kitchen and try out having pumpkin in a different way! Soft roasted pumpkin on a bed of creamy white bean hummus, topped with pine nuts and a good drizzle of olive oil. Perfect fall lunch or dinner and great for meal prep! 

What is special about this dish? 

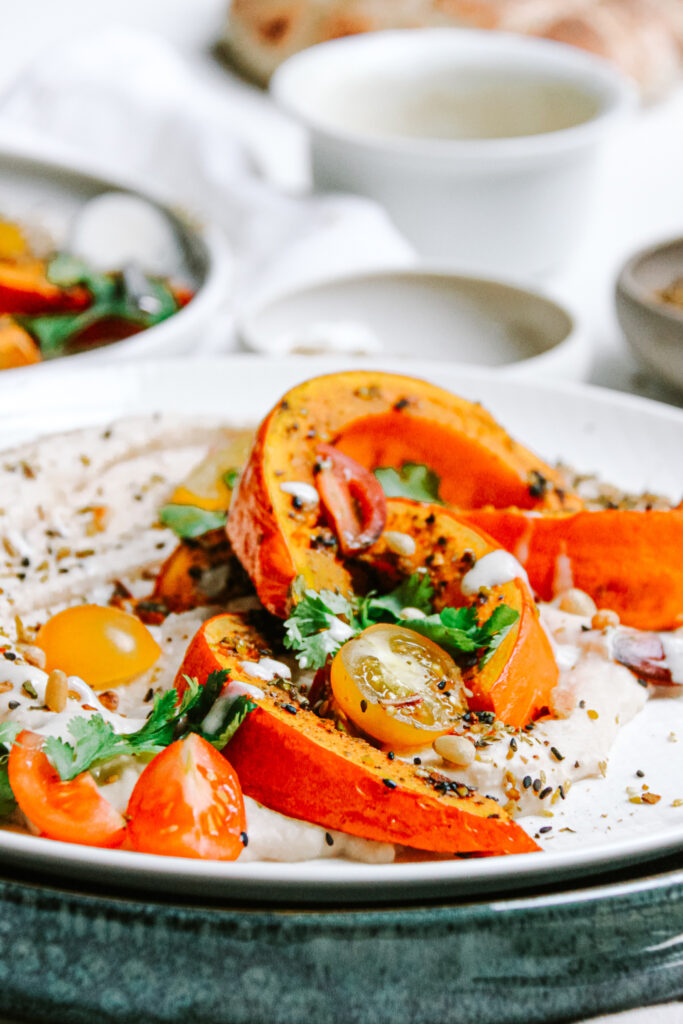
The combination of pumpkin with oriental flavors and the slightly different variation of hummus! Hummus usually is made out of chickpeas, tahin and olive oil. In this recipe, we are using white beans, also called butter beans instead of chickpeas. They make it equally as creamy and taste very similar. The major difference is that compared to chickpeas, white beans have a milder and slightly buttery taste. This goes in great harmony with the roasted pumpkin. This is flavored with an oriental spice mix and then baked. To finish off we are topping it with roasted pine nuts. This gives the final touch and is really delicious! 

Is this dish healthy?

Yes and yes! Let’s start with the white bean hummus. Beans have a great nutritional value. They are an incredibly good source of plant based protein and fibre. Plus, the addition of the olive oil and tahin not only make it super creamy but they also add a decent amount of healthy fats.

Pumpkin, as you can read in my November Top 5 as my food of the month, is also super nutritious. Lots of vitamins such as B1, B2, B6, C and E as well as other minerals. Plus it contains a lot of fibre, which is really beneficial for your digestion. 

Also the pine nuts are really nutritious, as all nuts! Protein, unsaturated fats and minerals. Brainfood at its finest! 

How to make this dish

This actually is super simple. To start, you need to combine the spices with some olive oil and brush the pumpkin with it. Then pop it in the oven for half an hour and that’s all you got to do for the pumpkin! 

Next up, making the hummus. For this you need a food processor or at least a blender! Into this you add the white beans, olive oil, tahin, salt, paprika and garlic powder. And VERY important: you need to add a little splash of vinegar! Sounds a bit unusual at first, but believe me, it makes the difference. The slight acidity makes the hummus so super addicting, I promise, soso good! And last, but not least we also need to add some of the liquid the beans were preserved in. This helps to make it super creamy! 

When and how to best have it

If you are wondering when to best have it, I can only tell you so much: it works at any time of the day! It is a great addition to your brunch, works great as a lunch or a comforting dinner! What is great about this is, that it works amazing for meal prep too! You just need to make the hummus first. This you can store in the fridge for up to a week. The hummus need to be baked and stored separately and can be reheated when you want to eat it! 

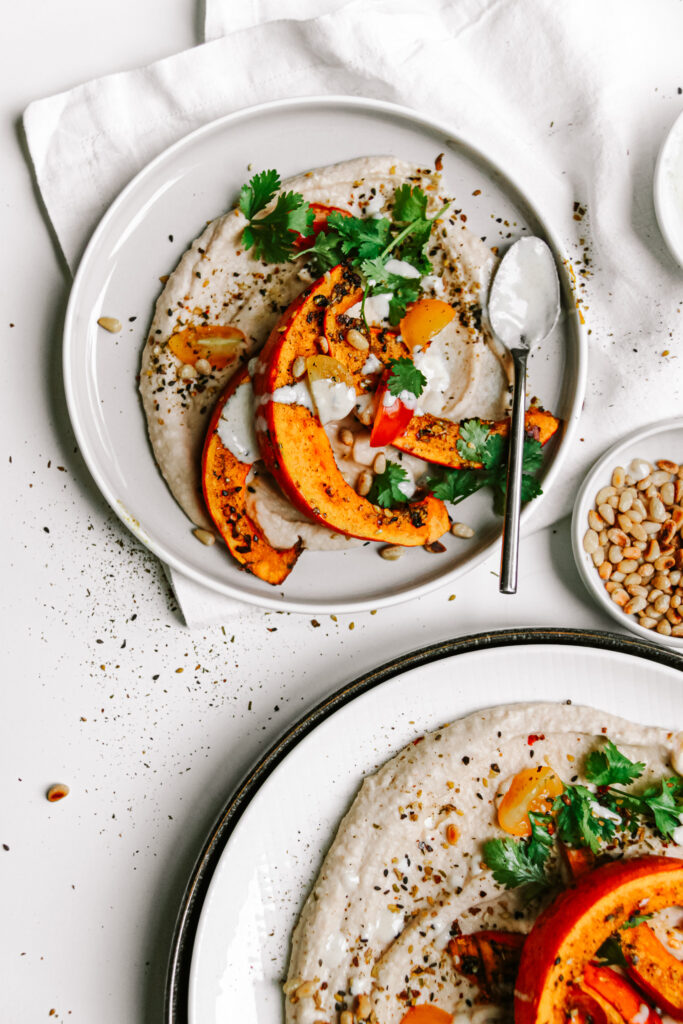
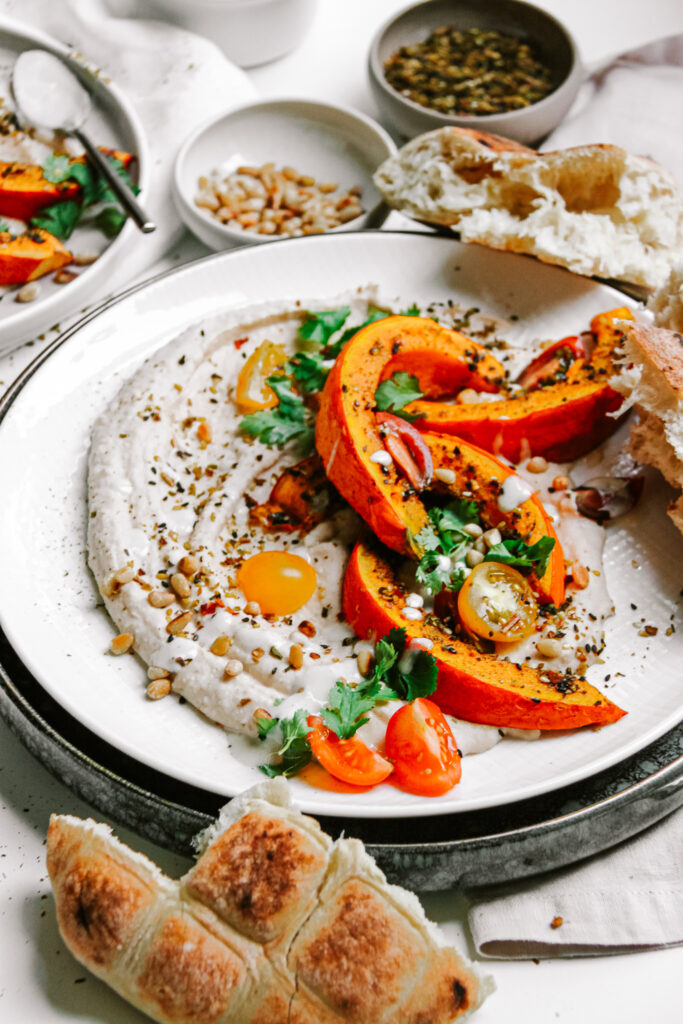
In terms of how to best have it, I recommend serving it either with some kind of bread such as pita bread or with some cooked grain as quinoa! If you are not super hungry, it also works great with a green salad on the side!

Perfect comforting and healthy dish for fall to make use of all of the pumpkins that are in season! Easy and delicious! 

Print

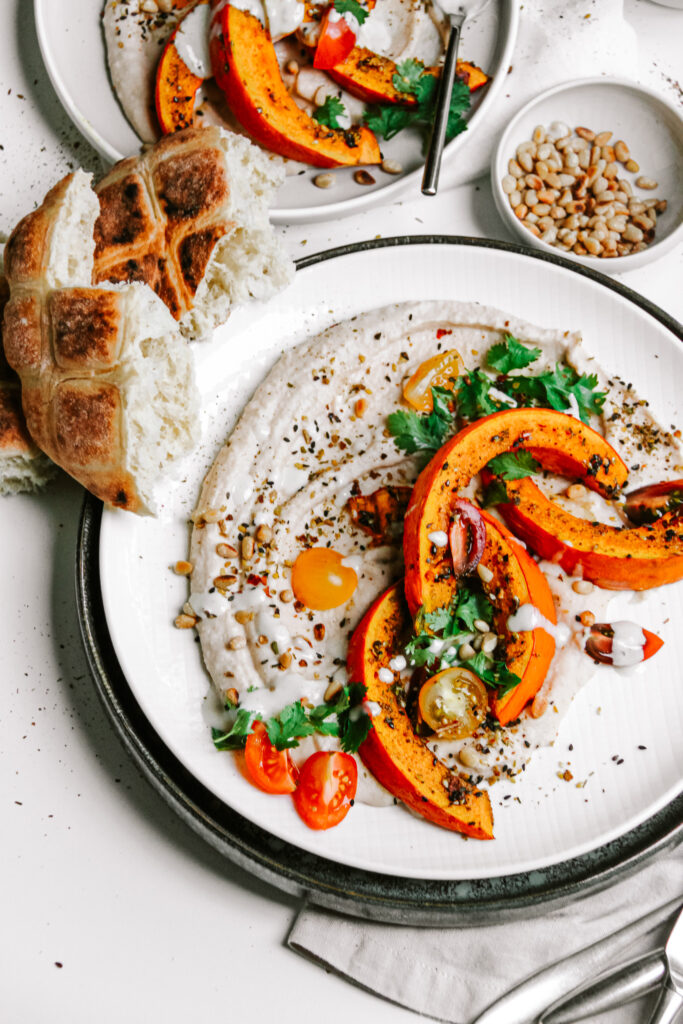
Oriental Spiced Baked Pumpkin with Creamy White Bean Hummus

Creamy, tangy white bean hummus topped with super flavorful, oriental spiced pumpkin and topped with crispy nuts. Fall comfort at its finest.

Course Appetizer, dinner, lunch, Main Course
Cuisine oriental
Prep Time 10 Minuten
Servings 4 servings
Calories 391 kcal

What you will need

For the pumpkin:

  • 1 hokkaido squash
  • 1/2 tsp chili flakes
  • 1/2 tsp salt
  • 1/2 tsp oregano
  • 1/2 tsp cumin
  • 1/2 tsp thyme
  • 2 tsp sesame seeds
  • 2 tbsp olive oil

For the rest:

  • 1 can white beans
  • 1 tbsp tahin (this is a paste made out of sesame seeds. If you do not have this, simply add more olive oil)
  • 2 tbsp olive oil
  • 1 tsp vinegar
  • 1/2 tsp salt
  • 1/4 tsp paprika powder
  • 2-3 tbsp of the liquid the white beans were canned in
  • 2-3 tbsp parsley
  • 2 tbsp pine nuts
  • some PIta bread to serve

How to

  1. Preheat the oven to 200°C. Slice the pumpkin into about 1-2cm thick slices. Lay them out on a baking tray. mix the spices with the olive oil and brush the pumpkin with the mixture. Bake in the oven for 20-30 minutes until soft.

  2. In a food processor combine the drained white beans, tahin, olive oil, salt, paprika, vinegar and the preserved liquid in which the beans have been stored. Blend until creamy. If not creamy enough add more of the liquid or more olive oil.

    Add the pine nuts to a pan and heat them up. Fry them until golden brown, then immediately take them off the heat.

  3. Divide the white bean hummus onto plates. Top with the pumpkin when done. Sprinkle with the pine nuts and parsley. Enjoy!

I hope you will enjoy this recipe!
Happy cooking,
Katie // Une Petite Cuisinière 

Kategorie: Appetizers, Cuisine, Diet-Specific, Fall, Lunch/ Dinner, Oriental, Season, Vegan, Vegetarian Stichworte: easy, easy dinner, fall, fall food, fall vegan, family friendly, healthy lunch, healthy pumpkin recipes, healthy recipes, healthy vegan, hokkaido sqush, lunch, meal prep, plant based, pumpkin, pumpkin recipes, vegan, vegan pumpkin recipe

How to make tomatoes last longer – 3 ways

August 21, 2020 by katharina.kuehr Kommentar verfassen

We all love those sweet, juicy and tangy summer tomatoes, am I right? Especially when they are grown locally and do not have travelled thousands of kilometres! Such a pity that they only are available in summer!! Wait .. no, we don’t want that. We also want that pleasure in winter! But how? I´ll show you three ways how you can make tomatoes last longer!

Just a little intro to my love for tomatoes

I am not joking or exaggerating when I say I LOVE tomatoes and that I am obsessed with them. Since I was I child I had a passion for all foods that were red/ pink – strawberries, cherries, raspberries, and also tomatoes. And I still do have this love. Sometimes we have a like half a kilogram of tomatoes in the kitchen because we want to cook something with them. After a day or two they are gone, but not because we used them for cooking but because I snack on them all. the. time.
So if anyone, then it’s me who knows how hard and annoying it can be to not enjoy those super delicious tomatoes in winter. That’s why we need a delicious and climate friendly solution!

Why not having tomatoes in winter?

To grow, tomatoes need sunlight and heat. Therefore they are fruits (yes, they actually are fruits!!) that are grown in summer. Most of the times they are grown in Spain or Italy, just because the season is longer there but in June, July and August, you can also can local ones in most areas.

As tomatoes need these factors to grow and become tasty, you can imagine that it is hard to grow a tomato in winter in Austria, when it is cold and there is little sun. But this does not mean that tomatoes cannot be grown in winter. They can. But to fulfil these factors and needs, they either are grown far away from Austria, in a different climate or they are treated with chemicals and fertiliser to grow large and juicy.

So we have those two options, of which both are not very climate friendly. When the are grown far abroad, they need to travel a lot to come to Austria, which means a lot of carbon is emitted. When they are grown rather locally, they need to be treated with fertilisers, which both, are unhealthy for our body since they mess up with our digestion, and are unhealthy for the environment because they harm the soil.

To sum up, you can have tomatoes in winter but it neither is healthy for the environment nor is it for our body (in most cases).

So how do you make tomatoes last longer?

  • Tomato Sauce
  • Dired Tomatoes
  • Pickled Tomatoes
  1. Tomato Sauce

We all know the easiest way to have tomatoes in winter. In form of a tomato sauce! We get a pre made tomato sauce in the store all year round. And it has already often been our life saver, hasn’t it? While store bought tomato sauce is alright, when you have made your own homemade one once, you will not want to go back.
Plus, it actually is healthier than store bought one. Oftentimes, the ones that is pre made and ready to use has a lot of sugar and flavour enhancers added. This tastes good, but really is not healthy for you. When you make it yourself, you know exactly what’s in, you can season it to your preference and you can choose the best tomatoes to make it with for the best flavour! Plus, it is way easier than you may think it is!

2. Dried Tomatoes

Most of us also know this one. Dried tomatoes are, as the name suggests dehydrated tomatoes. They usually come soaked in oil and herbs but sometimes also without anything. Dried tomatoes are a little soft but have barely any water in them anymore and are pretty salty in most cases.
They are perfect to add to pasta dishes, salads, bowls or just on top of burrata. They add an incredible amount of flavour although they are so simple. I think, these are the easiest to make from all 3 recipes because they essentially come down to being cut in half, put into the oven and then stored in a jar with oil. Pretty simple right?

3. Pickled tomatoes

I know what your face looks like right now. Like, huh? Don’t you just pickle cucumbers? NO! You can pickle pretty much any vegetable. It makes vegetables last longer while gaining flavour. My favourite pickled thing besides tomatoes, are onions. Red ones, that turn pink but also small white onions, which are pickled as a whole. They are often served in Italy and they are so delicious.
But back to the tomatoes. Pickling them is really easy. You make a brew from vinegar, water and (coconut) sugar, pour that over the tomatoes and let them sit in the fridge. That way they get even sweeter and last pretty long. I love adding them to salads, with burrata, to Buddha/ nourish bowl or serving them with avocado toast or poached eggs. Super super tasty!

Are these things healthy?

Yes, they are. You can take a look at the ingredients and you’ll see that they all are healthy. Tomatoes themselves, also are a very healthy fruit. They are very low in calories but a great source of fibre, vitamin K, C, and Potassium. Let’s take a look at the specific dishes:

Tomato sauce: it is made out of fresh tomatoes, onions, garlic, celery, carrot, olive oil, salt, pepper and herbs, That’s it! To really clean and healthy. Adding the celery and carrot at the beginning does not only account for more flavour but it also is a great way to add some vitamins! I have a detailed blog post on tomato sauce here where you can read a lot about it and how to make it!

Dried tomatoes: The only ingredients here are tomatoes, salt, oregano, onions and olive oil. Again, very simple and very clean. Maybe your question now is, when they are stored in olive oil, are they still healthy? Yes, they are. First of all, oil and olive oil is not unhealthy! It is high in calories, that is true but since we only store them in oil, and do not pour over all of the oil when eating, they still are really healthy.

Pickled tomatoes: what you’ll need for this is vinegar, water, coconut sugar, salt, onions and herbs. Also here, very clean ingredients. Usually pickled tomatoes are made with normal sugar but since we are opting for a healthier choice, we go for coconut sugar. This one is higher in nutrients and lower in actual sugar.

How to best enjoy these tomato dishes:

No we have made them it would be good to know how you can use them. he tomato sauce goes for anything you would use store bought for. This can be as a regular pasta sauce, with meatballs (or no-meatballs), in Shakshuka, in Tikka Masala or in Ratatouille. The dried tomatoes are a great garnish for anything Mediterranean inspired or are a great addition to sauces to add some flavour. I for example love to add them to tomato sauces for extra flavour or to a creamy cashew sauce. Also great in salads! The pickled tomatoes are a great topping for toasts or an amazing and flavourful part of a buddha/ nourish bowl. Also they are great when enjoyed with mozzarella or in breakfast tacos !

Enjoy

I hope that you will enjoy these different ways of having tomatoes in winter and will come back to those when you want tomatoes all year around. They are best to make now, when the tomatoes are in season to have a delicious and sustainable way of enjoying them all year round!

Print

Italian Tomato Sauce (V, SF, S)

This is a very easy recipe for a traditional recipe for our loved tomato sauce. Only a few ingredients and packe with flavor to make use of the delicious red fruits that are in season right now. (Vegan, Sugarfree, Seasonal)

Course Main Course
Cuisine Italian
Prep Time 15 Minuten
Cook Time 15 Minuten
Simmer Time 1 Stunde 30 Minuten
Total Time 2 Stunden
Servings 8 people
Calories 117 kcal

What you will need

  • 1,5 kg tomatoes about 4 medium to big ones
  • 4 tbsp olive oil
  • 2 red onions
  • 4-5 cloves garlic
  • 1 carrot
  • 2 sticks celery
  • 1 tbsp tomato paste
  • 1 tbsp salt at least! Preferably sea salt
  • chili flakes as desired
  • 1/2 tbsp pepper
  • 1 handful oregano
  • 1 handful basil

How to

  1. Start by removing the green stem from the tomatoes. Then turn the tomato around so that the top side, where the stem has been is facing down. Take a sharp knife and carefully slice a small cross into the skin. This will help you later when cooking and peeling.

  2. In a pot bring water to a boil and reduce to a simmer. Place the tomatoes into the pot and let them simmer for about 30-45 seconds. Flip them around and simmer for another 30-45 seconds. Take them out and transfer them into an ice bath so they cool quickly.

  3. While the tomatoes are cooling, finely peel and chop up the onion and the garlic and set them aside. Peel the carrots and chop it up along with the celery. Heat up the olive oil in a big pot. When hot add the onion and garlic and let sweat for about 2 minutes on medium heat.

  4. Take the tomtatoes out of the ice bath and you will notice that the skin has taken off a little where you have cut the tomatoes before. You can now easily peel of the skin, you wont need it anymore. Cut the tomatoes into chunks and add them to the other vegetables in the pot. Let that simmer for about 20-30 minutes.

    When the liquid has reduced and thickend pour the cooked tomato-vegetable mix into a blender. If you prefer to have some tomatoe chunks in you sauce, then reserve some of them and set them aside. Blend the rest until smooth and pour back into the pot along with the chunks if you reserved some. Add the tomato paste, salt, pepper, oregano, and chili.

    Let the sauce simmer at low heat for another 45 minutes at least. The longer the sauce simmers, the more the flavor will come out, this can be simmered for several hours if the time is available.

    A few minutes before chop up the basil and add into the sauce. The sauce can be served with pasta, rice, meatballs or anything you like. The sauce can be stored in the fridge for about 1 1/2 to 2 weeks. It can be kept in the fridge for several months, just thaw before using and heat it up again.

  5. I hope that you will enjoy the recipe!

Print

Dried Tomatoes

Delicious, soft and flavorful homemade dried tomatoes! Very easy and very tasty!

Course Appetizer, Side Dish
Cuisine Italian, Mediterranean
Prep Time 10 Minuten
Cook Time 5 Stunden 30 Minuten
Total Time 5 Stunden 40 Minuten
Servings 1 jar
Calories 24 kcal

What you will need

  • 300-400g g cherry tomatoes
  • 1-2 tsp salt
  • 1 tsp dried oregano
  • 1/2 tsp cracked black pepper
  • 1/2 small red onion
  • some fresh oregano & basil
  • olive oil to store (about 200ml)

How to

  1. Preheat the oven to 100°C. Half the cherry tomatoes and lay them out on a baking tray lined with parchment paper. Season with salt, pepper and oregano. Put in the oven for 2 hours. Turn down the heat to 90°C and dry for another 3,5-4 hours, depending on how soft you like them.

  2. In the meantime dice the red onion very very finely or pulse it in a food processor.

  3. When the tomatoes are done in the oven, transfer them to a jar, add the onion, basil and oregano and cover with oil. Store in the fridge for a few months! Enjoy!

Print

Pickled Tomatoes

A great way to make tomatoes last longer and enjoy them all year round. A little sweet and a little sour, with so much flavor!

Course Appetizer, Side Dish, Snack
Cuisine Italian, Mediterranean
Prep Time 10 Minuten
Total Time 10 Minuten
Servings 2 jars
Calories 29 kcal

What you will need

  • 300 g cherry tomatoes
  • 150 ml vinegar
  • 150 ml water
  • 100 g coconut sugar
  • a splash olive oil
  • fresh basil & oregano
  • 1/2 red onion
  • 2 garlic cloves

How to

  1. Into a pot add the vinegar, water, olive oil and coconut sugar. Bring to a boil and let simmer for about 3 minutes, stirring constantly so the sugar doesn´t burn but dissolve.

  2. In the meantime slice up the onion and garlic very very finely.

  3. Add the tomatoes, onion, garlic and herbs to a jar. When the vinegar-sugar mixture is done, pour it over. Let the tomatoes soak up the vinegar for a week and then it is ready to enoy!

Happy cooking,
Enjoy,
Katie // Une Petite Cuisinière

Kategorie: Uncategorized Stichworte: dried tomatoes, eco cooking, eingelegte tomatoes, getrocknete tomatoes, healthy, healthy dried tomatoes, healthy pickled tomatoes, healthy recipes, Mediterranean, Mediterranean recipes, pickled tomatoes, sustainable, sustainable cooking, Tomatensoße, tomato recipes, tomato sauce, tomatoes, vegan, vegetarian

Summer Rolls with Peanut Tofu

Juli 10, 2020 by katharina.kuehr Kommentar verfassen

Picture summer in a better way than having summer rolls in the sunshine with your loved ones on a picnic, maybe at a lake. Doesn’t this sound like a dream? To me it does. But wait, where’s the catch? Oh yes, maybe to get those summer rolls. I mean, sure you could order them at your favourite Vietnamese restaurant but why not making them yourself? It is so easy and way cheaper.

If you have been a little active in the food scene of instagram you probably have already seen those. I think summer rolls have become very popular a few years ago and have become part of the whole health food industry. Besides that they are super duper tasty. So here we are, and I have made a recipe for you to make them at home. If you are not very familiar with summer rolls here is just a brief introduction!

What are summer rolls?

Summer rolls is a dish popular in Vietnam. They are also called rice paper rolls, or fresh spring rolls. It is believed though, that they originally come from China and only became popular in Vietnam. Anyway, today you can find them in most asian restaurants, even in Japanese or Thai ones.

These cute rolls look very much like spring rolls. Same size and shape. The difference is the filling and the preparation. Spring rolls are mostly filled with pork and vegetables and then deep fried. Summer rolls on the other hand are filled with vegetables, prawn, pork or tofu and oftentimes also rice vermicelli (super thin rice noodles). Also those are not deep-fried or prepared with any oil and they are served at room temperature or cold. Both, spring and summer rolls, come with a sauce on the side.

Are summer rolls healthy?

Definitely! Since the main component are vegetables, they are super healthy. Other than vegetables you often have rice vermicelli, which also are not unhealthy. They are not high in sugar or fat but also not super nutritious. For your source of protein you can use prawns, pork or tofu. They are all great sources of protein. Prawns and they also are not high in fat at all. Pork on the other hand can be high in fat, depending on which part you use.

Summer rolls kn general are not high kn fat because, unlike spring rolls they are not deep fried, and prepared with rarely little fat. The only fat may be used when preparing the protein source or in the sauce.

The sauce is the only thing you should look out for when you have those. They often are served with a sweet chili sauce or lots of soy sauce. Sweet chili sauce mostly has a lot of sugar in it and soy sauce is high in sodium. If you only get a little on the side, that’s more than fine just be aware of that!

so what’s in these summer rolls?

This is a vegetarian (actually vegan) version. I do not use rice vermicelli because I prefer them without (plus it is less work). So, as a base we have a bunch of vegetables. We use a mix of carrots, bell pepper, cucumber, lettuce and radishes. You could also add red cabbage or anything else of your preference.

To not keep it boring we also are adding some fruit. I absolutely love mango in here but papaya also works. But mango is better tbh. And of course avocado. What would a meal be without avocado? (btw, did you know that avocado is a fruit?) And of course, our source of protein, the peanut tofu. It adds a bunch of flavour and is so tasty. But still, it is not so flavourful yet, that’s why we are adding some more peanut sauce and, if you want, also some sriracha or hot sauce.

The rice paper

Rice paper is not such an easy thing to find. You will probably not find it at your regular supermarket but you can find it in pretty much and asian store. It has the form of a circle and is almost see through but a little white-ish. I get mine from Reishunger because it is super good, easy to get and they ship it right to your door!

I think that you will love this recipe for summer and I hope that you will enjoy both, making and eating it.

Print

Summer rolls with peanut tofu

a perfectly fresh and light summer dish for those hot days!

Course Appetizer, dinner, lunch
Cuisine Chinese, Vietnamese
Prep Time 25 Minuten
Cook Time 5 Minuten
Servings 2 servings
Calories 564 kcal

What you will need

  • 10 rice papers
  • 200 g tofu
  • 2 carrots
  • 1/2 cucumber
  • 1 red bell pepper
  • 100 g radishes
  • 1/2 mango
  • 100 g lettuce
  • 1/2 avocado
  • 1 tbsp oil

For the peanut sauce:

  • 150 ml light coconut milk
  • 2 tbsp peanut butter
  • 4 tbsp soy sauce
  • 2 tsp sriracha hot sauce
  • 1/2 lime
  • 1 tbsp coconut sugar or brown sugar
  • 1-2 tbsp water

How to

  1. Combine all the ingredients for the peanut sauce. Slice the tofu into 1 cm thick and about 6-7cm long strips (or hwo ever it works best for you).

    Place them in the peanut sauce and let them marinate for about 1 h or longer if possible.

  2. Peel the carrots and either grate them or slice them into thin strips. Also slice the peper and cucumber into thin strips. Peel the mango and also cut it into bite sized pieces. Finely slice the radishes and chop up the lettuce.

  3. Heat up a pan with the oil. Take the tofu out of the sauce and fry on each side for about 2 minutes. Set it aside.

  4. To assemble prepare the rice paper according to package instructions. It most of the time works best when you take a kitchen towel and make it wet. Lay that on a flat surface. Then run the rice paper under water for about 3-4 seconds. Place them on the wet kitchen towl. Add a little bit of each filling and some of the remaining peanut sauce into the rice paper, rather on th elower end but not on the edge.

    First, fold in the rice paper from the bottom. Then fold in the sides and roll it up, so all of the fillings are in the rice paper and it is tightly closed. This takes a little practice but after a few it will work out.

  5. Pour the remaining sauce in a little conatiner and serve it with the summer rolls! Serve and enjoy!

Happy cooking,
Enjoy,
Katie // Une Petite Cuisinière

Kategorie: Appetizers, Diet-Specific, Lunch/ Dinner, Summer, Vegan, Vegetarian, Vietnamese Stichworte: good food, healthy, healthy food, healthy light dishes, healthy plants, healthy recipes, healthy summer recipes, light dishes, light food, plant based, plants, rice paper, summer food, summer rolls, vegan, vietnamese rolls

Asparagus and Strawberry Salad

Mai 22, 2020 by katharina.kuehr Kommentar verfassen

This salad is like spring in a bowl. So mush freshness, fruitiness but also savoury goodness. Super easy to make, full of vitamins, perfect side dish or light main course. Absolutely in love!

Spring honestly is my favourite season. Everything is starting to bloom and coming back to life. Flowers are so colourful and the markets are full of fresh fruits and vegetables. Including two of my favourites: Asparagus and strawberries.

How we typically eat Asparagus

Asparagus is something very typical in Austria. We usually have it with Risotto, as a side or very very typical with potatoes, ham and molten butter or sauce hollandaise. But while this is good once in a while I feel like it is really heavy and not healthy in the long term. This salad, on the other hand is something very light and refreshing.

Which Asparagus works best?

Definitely a mix! Use some white stalks and some greens because the combination of the slightly different flavours is just super good! If you want, you can also use purple asparagus although I would not necessarily recommend to buy it extra for this. I have tried it out with purple asparagus but it lost its colour while cooking and turned green. So it was a bit of a pity.

How to cook asparagus?

This actually is not as easy as many people think. I mean it is to hard but you just need to know how. Green Asparagus is super easy. You just need to cut off the ends of the stalks and boil it in salted water for about 5-10 minutes, depending on how thick the stalks are. White asparagus is slightly different. It also needs some boiling water, you need to salt it, and add 1 tablespoon of butter and 1 teaspoon of sugar. This takes out the bitterness of the asparagus and makes it really good!

Do you need to peel asparagus?

Depends. Green asparagus does not need to be peeled. Neither does purple one. White one on the other hand needs to be peeled!! Generously! I would recommend to peel it twice. If it is not peeled well it will have strings when eating and that’s not good tbh.

Fruit in salad?

A big YES!!! This is game changing! Especially the combination of strawberries and asparagus is insane! The sweetness of the strawberry pairs perfectly well with the freshness of the asparagus. If you do not have strawberries on hand or do not like them, you can add in raspberries instead, which also must taste really good!

Other add-ins:

Here you can be really creative! What would 100% work well is some kind of cheese like mozzarella, burrata cheese, cottage cheese or feta. Those would make it really good! Also, grilled chicken breast or prawns would take this next level but also hard boiled eggs.

When & how to eat it?

You can have this as a nice side dish and leave it as is or make a little more and add in something like hard boiled eggs for example and enjoy it with some freshly toasted bread or couscous to have it as a filling salad!

I hope that you like this recipe as much as I do and that you will make it many times this spring!

Happy cooking,
Enjoy,
Katie // Une Petite Cuisinière

Print

Asparagus and Strawberry Salad

Not your average asparagus side dish but much better! Sweetness of the strawberries paired with the taste of fresh asparagus is just heaavenly!

Course Appetizer, lunch, Salad, Side Dish
Prep Time 10 Minuten
Cook Time 20 Minuten
Total Time 30 Minuten
Servings 4 sides
Calories 149 kcal

What you will need

  • 500 g white asparagus
  • 500 g asparagus
  • 500 g strawberries
  • 2 spring onions
  • 1 handful mint
  • 1 handful basil
  • 1 handful parsley
  • 1 lemon
  • 1 tbsp olive oil
  • 1 tbsp maple or honey
  • 1 tbsp butter or magarine
  • 1 tsp sugar

How to

  1. Bring a large pot with water to a boil. Peel the white asparagus generously (about 2x). Cut the ends (about 3cm) of both, white and green asparagus and throw them away. Cut the asparagus into about 3-4cm sized pieces.

    Add the butter (or magarine) and sugar into the boiling water and salt it. Add in the white asparagus and cook for about 5 minutes. Then add in the green asparagus and cook for another 5-10 minutes, depending on how thick the stalks are. You can test if they are ready by pieking through them with a fork. If they almost fall off the fork, they are done. Then drain them.

  2. In the meantime remove the green part from the strawberries and half them or cut them into quarters, depending on how big they are. Slice the spring onions and seperate the onion rings from each other.

  3. Roughly chop up the basil, mint and parsley.

  4. Add the asparagus, strawberries, spring onions and herbs into a bowl. In a seperate small bowl combine the olive oil, the juice of 1 lemon and the maple syrup. Toss the salad in the dressing and serve!

    Enjoy!

Notes

If you want to have it as a main dish just make more (about half more, so 6 servings for 4 people). You can then also add in other things like hard boiled eggs, feta or mozzarella cheese, grilled chicken breast or prawns! 

Kategorie: Appetizers, Diet-Specific, Salad, Salads, Season, Side, spring, Vegan, Vegetarian Stichworte: asparagus, asparagus recipes, fancy salad, healthy, healthy asparagus recipes, healthy recipes, healthy salads, healthy spring, plant based, salad, side dish, side salad, spring, spring food, strawberries, strawberry season, vegan, vegan asparagus recipes, vegan recipes, vegan salads, vegan spring food

Footer

What has been happening on my Instagram

Copyright © 2024 Une Petite Cuisinière on the Foodie Pro Theme