• Zur Hauptnavigation springen
  • Skip to main content
  • Zur Fußzeile springen

feel food club

  • Home
  • About me
  • My Recipes
  • Blog
  • Navigation Menu: Social Icons

    • Instagram

Lunch/ Dinner

Savory French Toast

Februar 22, 2020 by katharina.kuehr Kommentar verfassen

If you have been following me on the blog for a while, you will have probably noticed that I am more on the savory breakfast side. Not that Avo toast and poached egg could ever become boring, but sometimes it is nice to switch things up, or to try out something different whenever you have a little time. This savory French toast is the perfect example for that.

Yes, savory French toast. No that’s not the one that is covered in a liter of maple syrup and a ton of sugar but that one that is covered with cheese and sprinkled with chives and topped with a poached egg. So. Much. Better. Honk breakfast sandwich but with a twist, which takes it next level.

When to have?

I would not have this everyday, because therefore it is a little rich but you can have it every now and then after a sleepin or as a hangover cure. Or make it for brunch when you have friends over or even as a breakfast for dinner because that is a decent option! It does not take long to make, as almost all of my recipes because who likes to wait a n hour when your tummy is growling? No one, right. 

What’s it made of?

Very few ingredients. First up; bread. Here I like to use dark or whole grain bread because it has a more intense flavor then white bread I believe, and it is a little healthier, which can never hurt! Next; eggs. Ken for the dipping batter and one poached one on top, which will be super yolk porn with that runny inside. Other than that we need some milk of your choice, grated Parmesan cheese, sea salt, herbs and black pepper for the batter.

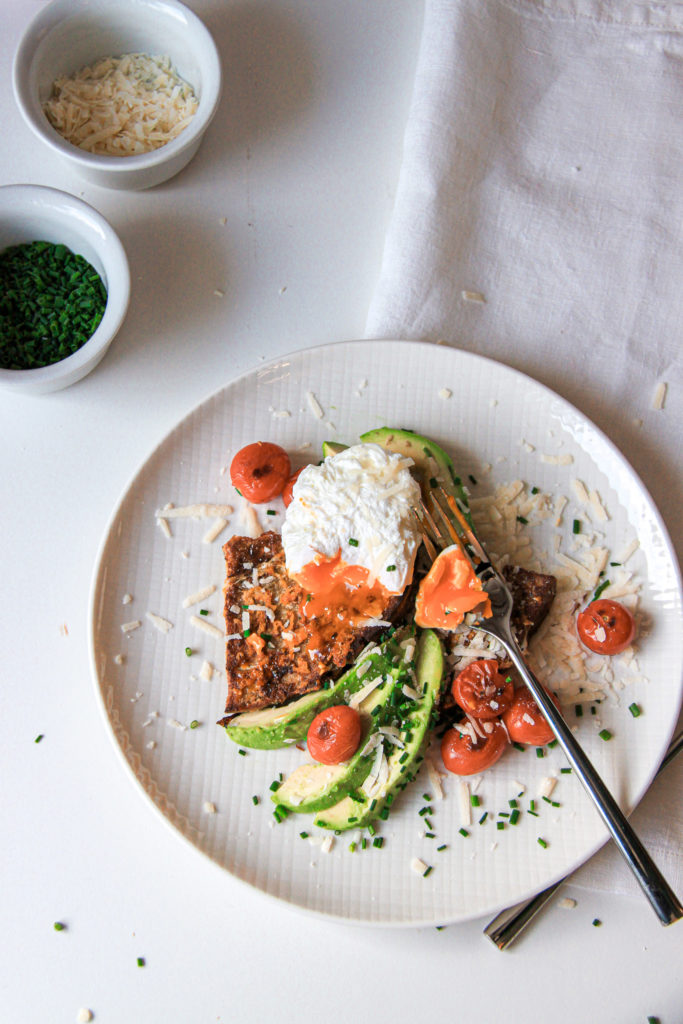
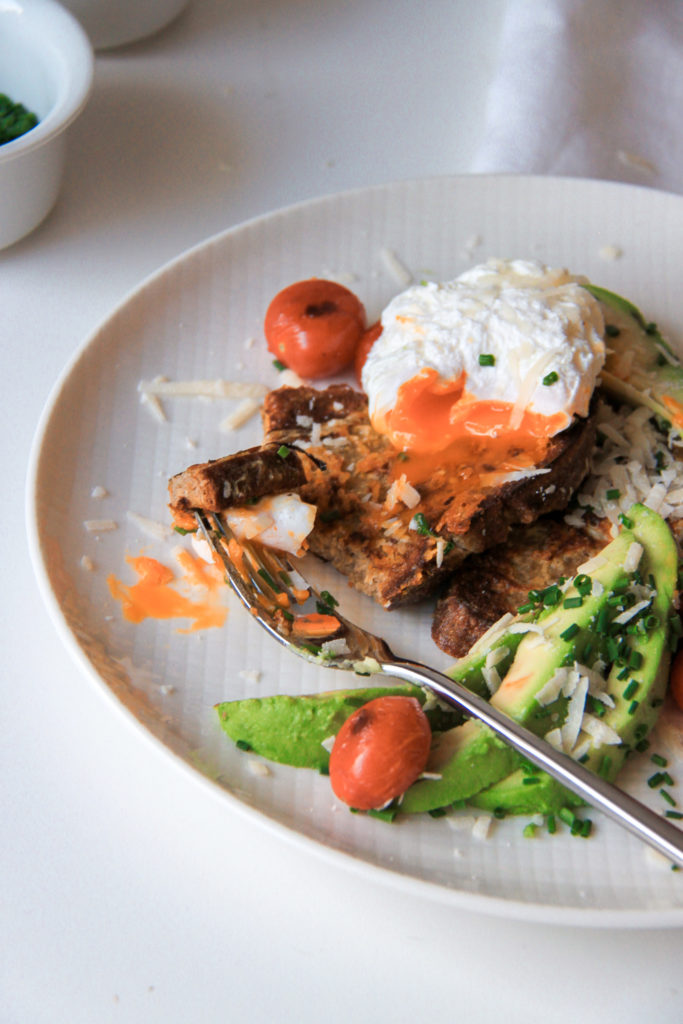
As for the toppings, it is really up to you. I can’t leave out on Avocado of course (what’s a break my without?), and poached egg. Some more cheese and some super flavorful sautéed cherry tomatoes for that color touch and more flavor. I finished of with a sprinkle of chives. If you wanna do bacon, do bacon, if you are all the way down for hummus, you can top it with that! Really it is up to you. With such a delicious base you can’t really fail with the toppings! 

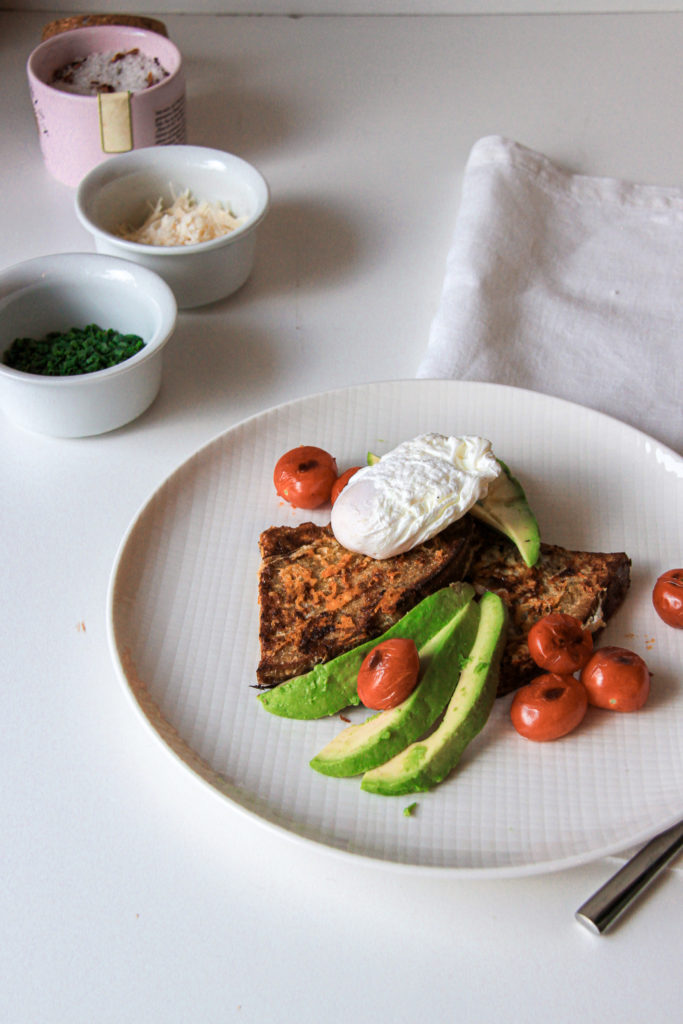
This recipe will make you look like a perfect chef at the next dinner party because it is so good. And super simple and versatile.

Print

Savory French Toast

Brunch, Hangover cure or breakfast for dinner. This is the pefect dish. Crispy and soaked bread with tangy cheese, runny yolk and creamy avocado = perfection.

Course Breakfast, brunch, Main Course
Prep Time 5 Minuten
Cook Time 10 Minuten
Total Time 15 Minuten
Servings 2 serving
Calories 407 kcal

What you will need

  • 2 slices bread (whole grain is best)
  • 3 eggs
  • 100 ml milk of choice
  • a pinch of salt
  • some pepper
  • 1 tsp italian herbs
  • 30 g parmesan cheese grated
  • 1 tbsp oil
  • 2 tbsp vinegar
  • a handful cherry tomatoes
  • 1/2 avocado

How to

That is how it works:

  1. In a bowl crack one egg. Add the milk, salt, pepper and herbs and mix everxthing. Add in about a third of the cheese and dip the bread into it.

  2. Bring a pot with water to a boil and heat up the oil in a pan. Once the water boils add in the vinegar. Take a cooking spoon and make a swirl in the water. crack the two eggs into two seperate bowls. Reduce the heat until the water only simmers anymore. Take one and carefully and slowly let it slide into the water until it has set a little, then take the next one.

  3. Meanwhile place the bread slices into the oil and sprinkle with half of the remaining cheese. fry for about 2 miuntes on each side on high heat.

  4. In a seperate pan quickly stir fry the tomatoes until soft, if you decide to use some. Cut the avocado into slices.

  5. Take the bread out of the pan and place it onto plates. top with teh avocado and tomatoes. Take the eggs out of the water after 3-4 minutes and lay them on a paper towel to let the excess water drip of. Add on top and finish with a sprinkle of chives and the remaining cheese.

    Serve & enjoy!

Kategorie: Breakfast, Diet-Specific, Lunch/ Dinner, Vegetarian, Vegetarian, Vegetarian Stichworte: 20 minute, avocado, break, breakfast, breakfast for dinner, brunch, cheese, dinner, egg, eggs, eggs for breakfast, Eva, fresh, healthy breakfast, parmesan cheese, quick, savory, savorybreakfast, Sunday brunch, warm, weekend, weekend breakfast

Oven Baked Lemon Honey Feta

Februar 17, 2020 by katharina.kuehr Kommentar verfassen

Crispy and creamy cheese, lemony twist, honey tomatoes and tangy capers. Maybe with some baguette to dip everything up? Sounds pretty good – at least to me! 20 minutes, perfect for anyone, vegetarian, and pretty healthy too! This makes a perfect light lunch or a decent and quick weeknight dinner.  

I am a huge fan of feta cheese. I think it is a great addition to so many things such as pasta, eggs, on top of salads or bowl, or whatever. It just adds the finishing touch and takes everything next level. Especially in summer it is such an amazing food because it is a little fresh so it adds a summer twist to every dish. 

What is it like?

In summer when my uncle goes to Greece every year he always brings me a giant block of feta and it is like a dream. Then we´ll have Greek salads pretty much every day. They are just so simple in summer and take literally 10 minutes to make. This dish is pretty similar. Think Greek salad but baked. And without cucumber. It has very similar ingredients, tomatoes, feta, olives, herbs, olive oil. It is just a little different as it does not contain cucumbers (because baked cucumbers? I don’t know) and some lemon zest, which is like the best thing ever here. Plus some honey ad breadcrumbs to make it crispy and tangy. 

When you bake it and soak up the remaining sauce after with a baguette it just tastes sooo good! It is fresh, sweet, just super good. But my fvorite part of this dish is that the feta is turned into a creamy cheese but with a crispy crumble top and you just put a piece of it on some bread and have that creaminess and sweetness and crispyness all together in your mouth. 

But how do you actually make it?

Really easy – you take the feta cheese and place it in a baking dish. Throw some cherry tomatoes, olives and capers in and some grated lemon zest. You sprinkle some breadcrumbs on top and drizzle honey, olive oil and lemon juice. Place in the oven for 10 minutes and voila – there you go, done! This is how simple it is. That is so great! That simple but so flavorful! Honestly so good. 

When and for who?

This dish also is great for people with intolerances because you can use gluten free breadcrumbs if you can´t have gluten and feta cheese is not made out of cow´s milk but out of sheep’s milk, which means even people with intolerances can enjoy that. I would not recommend it for meal prep because then you loose the creaminess and crisp but I do not believe that this is necessary because it only takes 15 minutes!

I hope that you will make and enjoy this dish whenever you want! It is as good in winter as it is in summer so it really is up to you when you make it!

Happy cooking!

Katie // Une Petite Cuisinière

5 von 1 Bewertung
Print

Oven Baked Lemon Honey Feta

15 minute, tangy, sweet and fresh baked feta with a crispy crust and sweet tomatoes. Ideal dish for a light lunch or a quick dinner.

Course dinner, lunch, Main Course
Cuisine greek, Italian
Prep Time 5 Minuten
Cook Time 10 Minuten
Total Time 15 Minuten
Servings 2 servings
Calories 325 kcal

What you will need

That is what you will need:

  • 1 block Feta Cheese (150g)
  • 1 handful cherry tomatoes
  • 1 tbsp olives
  • 1 tbsp capers
  • zest of half lemon
  • juice of half lemon
  • 1-2 tbsp breadcrumbs
  • 1 tbsp olive oil
  • 1 tbsp honey
  • some thyme
  • some rosemary
  • some sea salt
  • some baguette and salad to serve with

How to

That is how it works:

  1. Preheat the oven to 240C or Grill.

  2. Place the feta on a baking tray or into a baking dish. Add the cherry tomatoes, capers and olives. Sprinkle the breadcrumbs, lemon zest and some sea salt on top.

  3. Drizzle to olive oil, honey and lemon juice and place the herbs on top.

  4. Put in the oven and bake for 10 minutes.

  5. Serve with some fresh beguette and some salad.

    Enjoy!

Kategorie: Appetizers, Greek, Lunch/ Dinner, Salad, Vegetarian, Vegetarian Stichworte: 15 minute, 20 minute, baked, baked feta, dinner, feta, feta cheese, fresh, greek, healthy, healthy lunch, honey, lemon, light lunch, oven baked feta, oven baked lemon feta#, quick, quick dinner, simple, tangy feta, tomato, unchaining, weeknight dinner

Creamy Lentil Dhal

Februar 8, 2020 by katharina.kuehr Kommentar verfassen

This is honestly one of the best things I‘ve ever made. I really really enjoy that on chilly winter days when you want a hot bowl of something but also on warmer days because it also tastes great when it is enjoyed cold and it actually enhances the flavor when kept in the fridge overnight or for several days. This makes it super meal prep friendly. You can just store it and take it to work, school, or Uni whenever you need it. It is like that with every curry or heavily spiced dish, it only gains flavor when left for a day or a few.


So what is dhal?
Dhal is an Indian term that refers to split pulses, such as beans, peas and lentils. These legumes, how you call them in English, are staple foods in Indian cuisine. But dhak is also used to name several dishes, mostly soups. Traditionally there are tomatoes and onions as well as several other spices added. In Asia it usually is eaten with some flatbread or rice. 

Is it good for me?
I love curries. So much. But sometimes you just feel like having something heartier with more substance. Like this lentil dhal. Lentils are packed with protein and fiber but also lots of other vitamins. Plus there’s a good amount of spices in here which makes everything super flavorful. The veggies and potatoes add some more taste and the toppings take it next level. 


What is in this recipe?
So, I am not a traditional Indian, surprise, surprise, so I took a traditional dhal and added a few things.The star of the dish are red lentils. If you really do not like those, I would recommend using split peas. Besides that we have some onion, garlic, ginger, graham masala, curry powder, turmeric, cumin, paprika powder, bell pepper, carrot as a base. We sautée everything and then add vegetable stock. We add in some potatoes that are peeled and cut. I do not think that it is very traditional to add potatoes but I believe that they add an incredible comforting feeling to it and make everything more filling. Plus they add some nice texture. You could also opt for sweet potatoes instead if you prefer but yellow potatoes work a bit better. 

Next come the lentils. I do not pre soak mine or pre cook them because red lentils cook pretty fast. So we add them in after a while and let everything simmer. Once the lentils are soft, in goes some coconut milk. The coconut milk is essential. I would use full fat one since we have a lot of broth and with low fat ones, you won´t be able to achieve that creaminess. While everything simmers for a little, the flavors of the spices will get deeper into the curry and the lentils become a little bit mushy, which tastes so great. 

So that basically is the dhal, but what would it be without toppings? Let´s be honest, toppings take everything next level. We are cutting up a lime, of which we will squeeze the juice on the dhal after serving, garnish the dish with a little (plant based) yoghurt or more coconut milk, some fresh cilantro, sliced up spring onions and if wanted (but really good) some cashews or peanuts for extra crunch and extra tastiness. 

I would recommend to serve it over some rice or with naan bread. With either one you can soak up the liquid and it tastes super delicious!

Is it family friendly?

Yes! It definitely is! Not only that it is very versatile, as you can add in some ground chicken when stir frying the veggies or some grilled prawns on top, when including some animal products but it also it can be made more or less spicy, depending on who eats it. Moreover, it can be kept in the fridge for several days, so every member of the family can take it to school or work. 

I hope that you will enjoy making and eating this dish, and that you will love it as much as I do! It is such a great dish to enjoy all throughout the year, is super healthy and packed with tons of flavors!

Enjoy, 

Katie // Une Petite Cuisinière

Print

Creamy Lentil Dhal

A super flavorful and warming dinner, that is super easy to make and incredibly delicious and healthy!

Course bowl, dinner, lunch, Main Course
Cuisine Indian
Prep Time 15 Minuten
Cook Time 30 Minuten
Total Time 45 Minuten
Servings 4 servings
Calories 434 kcal

What you will need

Thats what you will need:

For the base:

  • 2 tbsp oil
  • 1 yellow onion
  • 4 cm ginger
  • 2 garlic cloves
  • 1 tbsp graham massala
  • 2 tsp curry powder
  • 1 tsp turmeric
  • 1 tsp paprika powder
  • 1/2 tsp cumin
  • 1 red bell pepper
  • 1 carrot

The rest:

  • 500 g potatoes
  • 200 g lentils
  • 500 ml vegetable broth
  • 200 ml coconut milk

For servings:

  • some rice
  • some cilantro
  • cut up spring onions
  • yoghurt (plant based)
  • some nuts

How to

That is how it works:

  1. Finely dice uo the onion, garlic and ginger. In a pan heat up the oil. Once hot add the cut up veggies in. Sautee them for 2 minutes and then add the spices and sautee for another 2 minutes.

  2. Peel the carrot. Finely dine it and the bell pepper aswell. Add them to the pot and sautee for 2 minutes. Add the vegetable broth.

  3. Peel the potatoes and cout them into about 2 cm chunks. Once the broth boild, add the potatoes in and let everything cook for 10 minutes. Then add in the lentils and let everything boil for another 10 minutes.

  4. Next pour in the coconut milk and let everything simmer for another 5 minutes.

  5. Once ready, put it into bowls. Garnish with some yoghurt, cilantro, spring onions and cilantro.

  6. Serve and enjoy!

Kategorie: Cuisine, Diet-Specific, Indian, Lunch/ Dinner, Soups, Vegan, Vegetarian Stichworte: bowl, coconut, coconut milk, curry, dhal, dinner, family, family food, healthy, healthy vegan, India, Indian food, lentil, lentils, plant based, red lentils, Soup, vegan, vegan curry, warming

Miso Sweet Potato w/ Coconut Rice

Januar 30, 2020 by katharina.kuehr Kommentar verfassen

Is so incredibly addicting and satisfying, which is crazy! It’s just like miso black cod or anything sticky and sweet, just that it covers sweet potatoes. Plus, there is a curry vibe because we have some steamed coconut rice, aka rice boiled in coconut milk. Place both of these things in a bowl, sprinkle some nuts, and you will never wanna order takeout ever again.

No, I am serious, it really is good. I absolutely love miso, like a lot. I have always liked it, but then I went to a restaurant over Christmas break and had that black miso yuzu cod, and let me tell you, this was out of this world. So. Fricking. Good. I tried marking something similar to the miso at home for the sweet potatoes and I have to say that it did not turn out terribly, no definitely not. Although it is not quite the same, because I don’t know how the chef there made it, this was incredible, it is super delicious!

So before you ask yourself ‘what even is miso?’ I am going to give you a little information. Miso actually is a fermented soy pasta. You can buy it at most super markets or Asian markets. It is available in black and white. For this recipe, I used the black miso paste, but I am sure that the white one will work as well. Miso is mostly eaten in Japan, where also the popular miso soup is from. So, in this recipe we are using the same miso as in the soup, but prepare it differently.

To make the miso glazed sweet potatoes, we do not need a lot of things. Sweet potatoes, of course, cut into slices, some miso pasta, soy sauce, some sriracha or hot sauce, rice wine vinegar, agave or honey, a little lime juice, and if not vegan some fish sauce. This adds an extra touch but is not necessary. We combine all the ingredients for the sauce in a bowl and let the sweet potatoes marinate in there for about 30min-1h. If you do not have that time, then leave it out but I would still recommend you to do it. Once they are marinated, we grill them on a grill or you can also pan-fry them or even bake in the oven. Just do whatever sounds best to you.

So we have the main star of the show but we still need something to serve it with. And this something is coconut rice. Honestly, this is life changing. This coconut rice goes so incredibly well with anything, be it curry, stir fry, just some steamed vegetables or some chicken skewers. Anything Asian is perfect to be served with this. We make this rice by simply adding it to a pot. Next we add a mixture out of coconut milk and water and a generous pinch of salt. Bring it to a boil, reduce to very low heat and let simmer for about 10 minutes. Here you go, super easy but so much flavor. Honestly you will never skip this when making your next curry.

For serving, I like to put everything in a bowl, sprinkle with some cashews or peanuts, some fresh cilantro, some shredded coconut, and a lime wedge for decoration. This dish honestly is super good, and a great weeknight dinner. You can also meal prep it very well. For example make the sweet potatoes ahead of time and add them to salads or stir frys throughout the week.

I hope that you like this recipe and will enjoy making it!

Love Katie || Une Petite Cuisiniere

Print

Miso Sweet Potato with Coconut Rice

An addictively good twist on regular sweet potatoes served with steemed coconut rice on which you never want to miss out ever again. So good.

Course bowl, dinner, lunch
Cuisine asian, Japanese
Prep Time 10 Minuten
Cook Time 20 Minuten
Total Time 1 Stunde
Servings 4 servings
Calories 546 kcal

What you will need

For the Miso Sweet Potatoes:

  • 2 medium sweet potatoes
  • 2 tbsp miso paste
  • 1 tbsp soy sauce
  • 1/2 Lime juiced
  • 2 tsp sriracha
  • 2 tsp rice wine vinegar
  • 1/2 tbsp honey or maple
  • 1-2 tbsp water
  • 1/2 tbsp sesame oil

For the Coconut Rice:

  • 250 g Rice
  • 200 ml Coconut Milk
  • 300 ml water
  • 1 tsp salt

For Garnish:

  • 2 handful greens can be any greens of your choice, I would recommend using fresh spinach or a salad mix
  • some cilantro
  • a few cashews or peanuts
  • lime wedges
  • coconut flakes.

How to

That’s how it works:

  1. Wash and peel the sweet potato if not having bought organic ones. In a Bowl mix all the ingredients for the sauce. Slice up the sweet potatoes into about 1cm thick slices. Place them in a bowl and pour over the sauce. Let marinate for about 30-60 minutes. If you do not have the time to do that, then pour over the sauce when grilling or cooking. 

    Meanwhile add the rice to a pot along with the coconut milk, water and a generous pinch of salt. Bring to a boil, then reduce to very low heat, cover and let simmer for about 10-12 minutes. 

    Heat up a pan with a little sesame oil, or heat a grill brushed with olive oil, or preheat the oven to 200*C. If making in the pan or grill, fry on each side for about a minutes at medium to high heat. In the oven bake for about 15-20 minutes, flipping halfway through. 

    Separate the rice on the bowls. Add the fresh greens, top with the sweet potato and add some cilantro, cashews or peanuts, some more shredded coconut (optional) and a lime wedge to garnish. Serve and enjoy!


Kategorie: Cuisine, Japanese, Lunch/ Dinner, Vegetarian Stichworte: asian, coconut, coconut milk, coconut rice, dinner, healthy, healthy vegan, healthy vegan dinner, Japanese, lunch, meal prep, miso, miso sweet potato, plant based, rice, Sweet potato, vegan, vegan dinner

« Vorherige Seite
Nächste Seite »

Footer

What has been happening on my Instagram

Copyright © 2024 Une Petite Cuisinière on the Foodie Pro Theme