• Zur Hauptnavigation springen
  • Skip to main content
  • Zur Fußzeile springen

feel food club

  • Home
  • About me
  • My Recipes
  • Blog
  • Navigation Menu: Social Icons

    • Instagram

lunch

Easy to make Sweet and Salty Maple Pumpkin Pancakes

November 21, 2021 by katharina.kuehr Kommentar verfassen

This is not just something that is eaten in Netflix Series, nops, it is an actual dish. To be honest, an incredibly delicious brunch!! The mix of salty and sweet, unexpectedly,just works in such great harmony. If you have never tried this cross of sweet and salty, then it is high time – and this recipe is perfect to do so!

What is special about this dish?

Well, first of all that there is pumpkin in pancakes. Usually pumpkin would not be the first ingredient I would add to pumpkins but this time we are doing things differently. And really, it is not so odd if you think about it: you would also add apple sauce to pancakes – and after all, pumpkin also is sweet, so why not adding it?

And then, secondly what is not quite usual is the mix of savory and sweet. I get it if you are slightly skeptical towards a fried egg along with maple syrup, but trust me – it unexpectedly is really good! While pumpkin, egg and maple syrup may not be too common, a cross of sweet and salty is. Just think about chocolate with sea salt or fruits in salads or even about fried chicken and waffles.

how healthy is this dish?

Contrary to regular pancakes, these are very much packed with nutrients! Where should we start? Let‘s start at the very base: the pancake batter! It is made out of eggs (high in protein), pumpkin (packed with vitamins, carbs and fibre), wholewheat flour (more carbs and fibre), maple syrup or honey (yep, still a lot of sugar but with a few nutrients), cinnamon, salt & baking powder as well as (plant based) yoghurt (contains probiotics and protein!). It definitely can be said that despite the sugar, the pancakes still are quite nutritious and definitely better for you than regular pancakes!

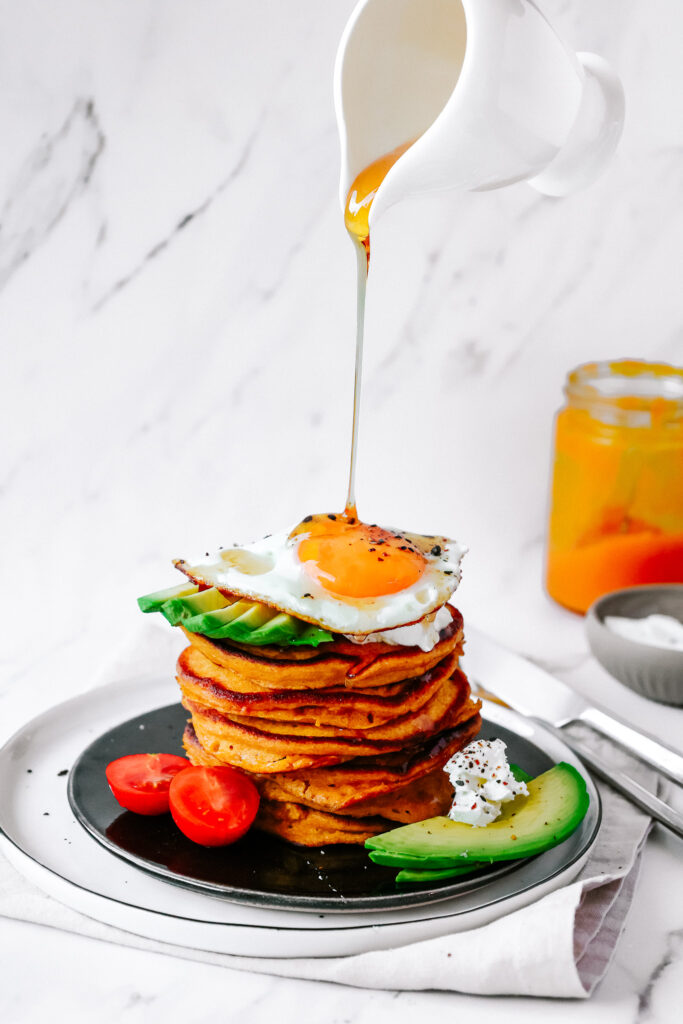
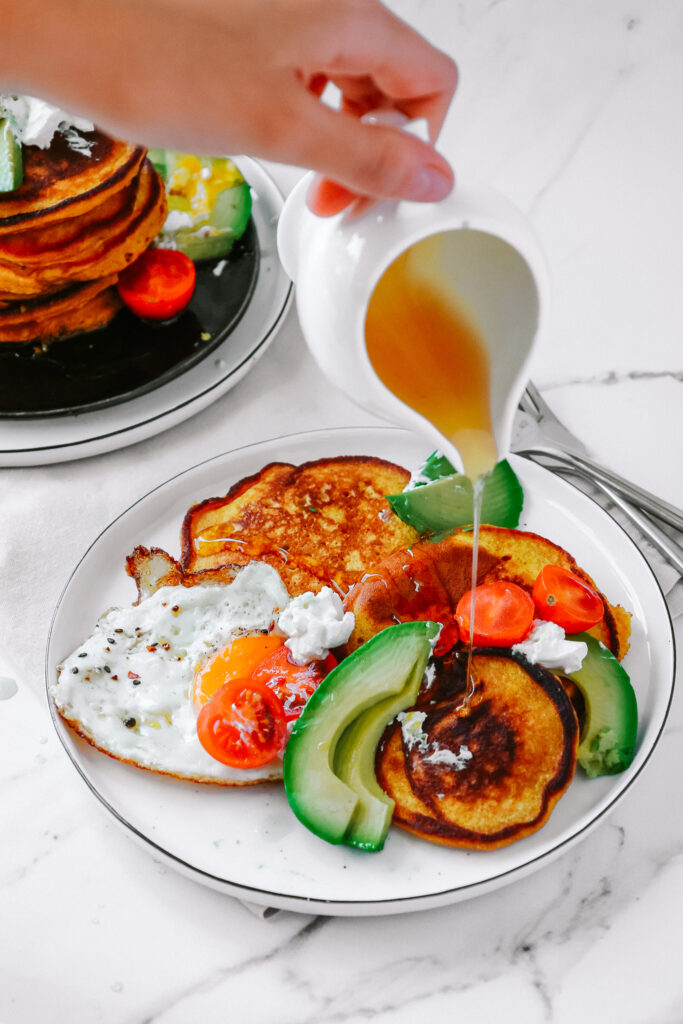
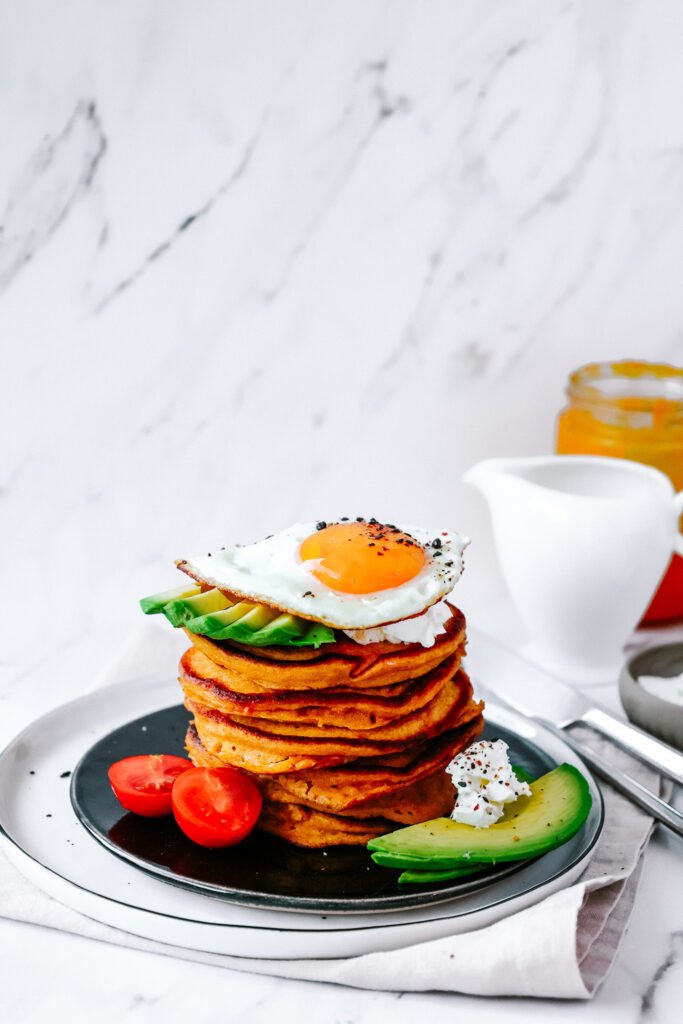
What else? The toppings! Here it really is up to you what you are adding on top, you can choose to go for savory to have a fun and different experience (which tastes amazing, really!) or you can also go for sweet if you want something more classic. Depending on what you choose, the nutrients will vary. If you, as in this recipe, go for goat’s cheese, avocado and fried egg, you‘ll have a great combo of protein, healthy fats and vitamins. Those will also contribute to satisfying you and making you feel full. And of course we cannot skip that maple on top of pancakes 🙂 and that is good for your soul!

Are they prepared differently from regular pancakes?

No, they are not different. What it really comes down to is mixing eggs with honey, (plant based) yoghurt, pumpkin purée, cinnamon and salt until combined. Now we mix in the flour and baking powder with a whisk until a batter forms where there are no lumps left. This batter will now sit for 5 minutes while we prepare the toppings (slice avocado, prep cheese and prepare the egg). Now the batter has to be fried in hot butter, margarine or oil. It is best to measure out the amount with an ice cream scoop and add it into the pan on medium heat. They will now cook and once you see bubbles forming in the batter, it is time to flip them and cook them on the other side for about 3 minutes until golden brown.

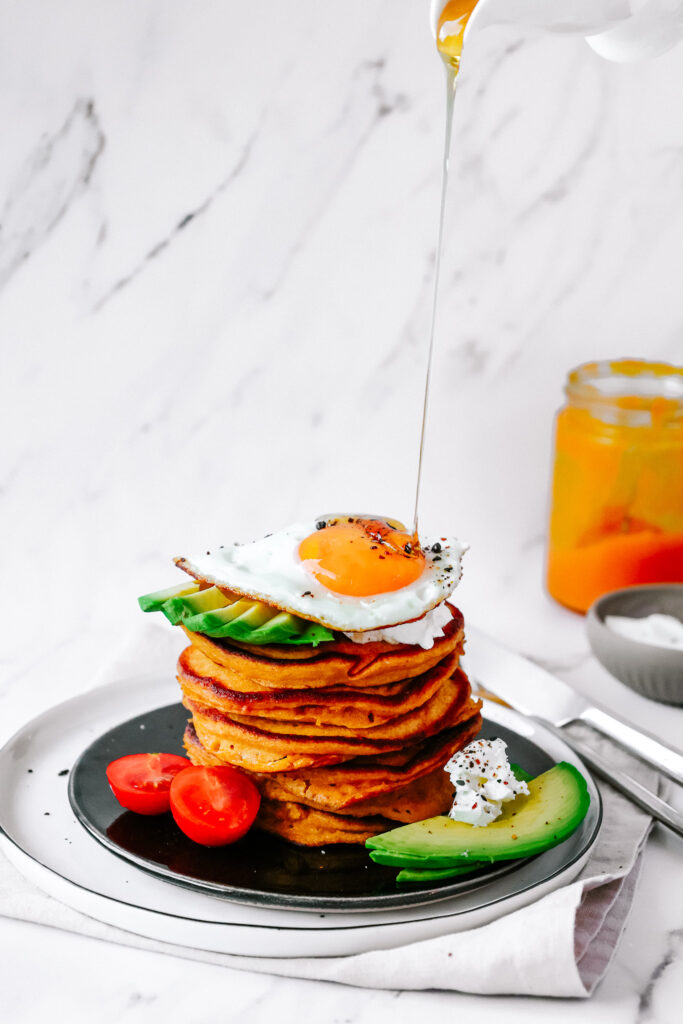
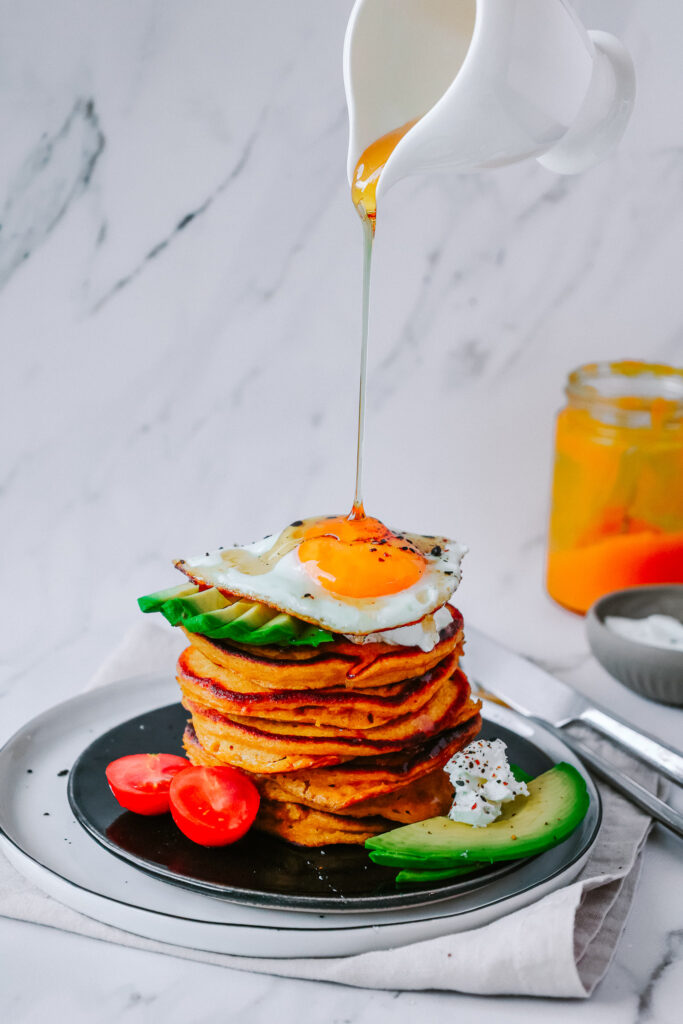
To make the cooked ones stay warm while the rest is cooking, it is best to place them in the oven with a cover at like 60°C. Since they are covered, they will not dry out and they‘ll also stay warm. Well now just fry the remaining ones, fry the egg, stack them onto a plate, top with the avo, cheese, egg and a gooood drizzle of maple syrup! That‘s it!

What about the pumpkin purée? Where do I get it?

So the first option is to make it yourself. That really is super easy – I even have an instruction video for this on my Instagram (find it here). All that needs to be done is steaming the pumpkin and mashing it into purée with either a mixer, a blender or a hand blender.

The other option would be to buy it at the store. Depending on where you live, this may be easier or more difficult. I know in Austria you can find it at the baby-food section and sometimes even next to the canned goods in the super market. However, making it yourself is really no big deal!

Freeze them for a 5-minute breakfast!

The great thing about making pancakes is the fact that you can batch make and store them. Whenever I make pancakes, it is a challenge to eat them all at once. So what I do is freezing them (first on a tray/ plate (so they do not stick together as they would if you’d place them in a bag right away) and then in a bag). Whenever I crave one for breakfast, I just heat it up in the toaster or the microwave and have a ready to go breakfast! You can perfectly do so with these pancakes!

All in all it can be said that this really is a brunch dish worth trying. In my family they are much loved! Yep, even my grandma loved them and asked for more!! So, grab a pumpkin and get into the kitchen to make your perfect Sunday brunch!

Print

Sweet and Salty Maple Pumpkin Pancakes with Goat‘s Cheese and Fried Egg

sweet and savory pumpkin pancakes? whaaat?! just saying – yes!! this crossover of fluffy sweet pancakes with savory toppings and maple syrup is an explosion of flavors in your mouth. one you do not want to miss out on! Step away from your regular pancakes and start making those!

Course Breakfast, brunch, lunch
Prep Time 10 Minuten
Cook Time 10 Minuten
Total Time 20 Minuten
Servings 8 pancakes

What you will need

  • 150 g pumpkin purée
  • 100 g honey or maple syrup
  • 100 g (plant based) yoghurt
  • 50 ml plant based milk
  • 1/2 tsp vanilla extract
  • 150 g whole wheat flour
  • 1 tsp baking powder
  • 1/2 avocado
  • 2 eggs
  • more honey or maple syrup to top

How to

  1. Mix the egg, yoghurt, honey, plant based milk, cinnamon and salt until well combined. Mix the flour with the baking powder, then mix into the liquid batter with a whisk until there are no lumps left. Let sit for 5 minutes.

  2. In the meantime slice the avocado and crack the eggs into a bowl.

  3. In a large pan heat up some margarine or butter on medium-high heat. Turk down to medium heat and add about 2-3tbsp of the batter at a time into the pan (it is easiest to do so with an ice cream scoop). Fry them for about 3 minutes until bubbles start to form in the batter. Then flip them and cook for another 3-4 minutes until golden brown and cooked through. Take them aside and keep them warm in the oven (see notes). Repeat with the rest.

  4. Heat up more oil in another pan and fry the eggs on medium high heat.

    Once everything is cooked, stack the pancakes on a plate, top with the goat‘s cream cheese, avocado slices, fried eggs, a sprinkle of salt and maple syrup! Enjoy!!!

Have fun cooking,
Enjoy,
Katie // Une Petite Cuisinière

Kategorie: Uncategorized Stichworte: breakfast, brunch, easy, family, kürbis, lunch, meal prep, pancakes, pfannkuchen, pumpkin, savory pancakes, vegetarian, weekend brunch

Better than takeout Crispy Sweet Chilli Tofu

September 21, 2021 by katharina.kuehr Kommentar verfassen

After having tried this recipe, you will never again think that tofu is boring. Crispy tofu tossed in that addicting, spicy, tangy, sweet chilli sauce served on a bed of fluffy rice. You will not want to go back to takeout and will want to start stocking up your fridge with tofu. A must try for all vegans and all non-vegans! 

What is special about this dish?

It is normal to think that tofu is boring and tastes like nothing. Because it really can. But if you know how to prepare it the right way, you‘ll be convinced differently! Just as in this recipe. Here the tofu is first tossed in flour and then baked. This makes it really crispy on the outside and provides a great texture. Personally, I think that the texture maters a lot when preparing tofu. It just is a completely different experience whether you have a crispy bite or a soggy pulp in your mouth. 

And then comes the sauce. The sauce is suuuper important! Since tofu itself is quite flavor neutral, the sauce it is toss in really matters! And this sauce is a slightly healthier twist on the conventional sweet chili sauce. Plus it is homemade, so it automatically tastes better and is fresher. 

Moreover, all of this is really easy to prepare and does not take very long either. Ot is perfect if you just want a quick dinner after an exhausting day or just a tasty lunch! 

Is this dish healthy? 

Tofu itself actually is really nourishing. It is high in protein and therefore a favorable ingredient in plant based diets. Plus, tofu contains a wide range of amino acids, vitamins and minerals, all essential for your body. A serving of tofu also comes with a small amount of carbs and fibre, making it a really nutritious addition to meals. 

Sweet chili sauces in general are not very nutritious. In order to achieve the addictive sweet flavor, a lot of sugar is needed. Usually, refined, white sugar is needed, which really has no benefit for your body. In this version we are substituting the white refined sugar for honey. Honey still contains sugar (without it would not have the sweet flavor) but also comes with other minerals, vitamins and health promoting features. Switching the refined sugar for honey does not drastically reduce the amount if sugar but it adds some nutritional value.

Plus, we are adding some greens on top, so we also get a decent amount of fibre and even more vitamins. And since we are serving it with some rice we also have a bunch of carbohydrates that will keep us energized! 

How to make this dish? 

The first thing that needs to be taken care off is the tofu because it takes the longest. Here it is essential that firm tofu is used and that we press it (placing it inbetween kitchen towels and letting something (rather) heavy sit on top). This way all the excess liquid is running out and it will turn out crispy. After is has being pressed for about 10 minutes, we can already chop it into about 1 cm sized cubes, which are then tossed in flour. The flour on the one hand binds the remaining liquid, and on the other hand forms a crust. Once they are placed on a baking tray, they can be drizzled with a little oil and baked in the oven until crispy.

That is it for the tofu. Now we can focus on the rest. First on the list is the rice. This can actually already be prepared while the tofu is pressing, since we only need to add rice, water and salt to a pot, bring it to a boil and reduce the heat. So what really still needs to be done is the sauce, for which we combine water, honey, vinegar, chili flakes and sambal olek in a pot and also bring that to a boil. In the meantime we also mix a little cornstarch with water and also mix it in. Also this can be turned down and simmer. The simmering will cause the honey to melt into the rest and everything to combine well, while at the same time the cornstarch helps to bind and thicken everything! After its time in the oven, the tofu can be taken out and tossed in the sauce and that already is it! 

Varieties of the dish

You can either enjoy it with some rice and broccoli, as described here but you can also enjoy the sweet chili sauce in several other ways. 

For example could you make a tofu stir fry out of it, by frying some veggies in hot oil and then adding the baked tofu and sweet chili sauce to it and mixing it. Also, you could add this tofu onto bowls or into wraps or even onto salads! 

If you are not that hyped for that much tofu, why not just make the chili sauce and keep it in the fridge? You can then use it for several different dishes and with several different ingredients. Make sweet chili noodles or sweet chili prawns! Add it to soups, to salad dressings or as a dip! There really are plenty ways of using it! 

This recipe is a great and easy way of making the kitchen staple a little lot healthier! And in combination with the tofu it is unbeatable!! Definitely something worth trying! 

I genuinely hope that you will enjoy this recipe and make it on repeat! If you do so, I would highly appreciate it if you leave a comment or send me a pic of your remake!! 

Print

Better than takeout Crispy Sweet Chilli Tofu

Whoever says tofu is boring, has not trued this dish. Spicy, sweet, addictive goodness that is super easy to make and will convince everyone of how delicious tofu can be! 

Course dinner, lunch, Main Course
Prep Time 10 Minuten
Cook Time 20 Minuten
Total Time 30 Minuten
Servings 4 servings

What you will need

For the sauce:

  • 100 ml water
  • 100 g honey
  • 40 g vinegar
  • 1 tbsp sambal olek
  • 1 tsp chili flakes
  • 1 tbsp cornstarch
  • oil

For the rest:

  • 400 g tofu
  • wholegrain flour (about 5 tbsp)
  • 400 g (brown) rice
  • 500 g broccoli

How to

  1. Preheat the oven to 200°C. 

  2. Place the tofu inbetween a kitchen towel or kitchen paper and add a (relatively) heavy object on top. Let it sit for 5-10 minutes. This will press the tofu and remove any liquid that is inside of it. Then cut it into about 1cm sized cubes, toss them in the flour, so they are evenly coated and lay on a baking tray. Drizzle with oil and bake for about 25 minutes until crispy and golden brown.

  3. To a pot add the rice along with twice the amount of water and a pinch of salt. Bring to a boil, reduce to a simmer at medium heat and let simmer until all water has been absorbed. Turn down to low heat and let sit for another 5-10 minutes until soft and fluffy.

  4. In the meantime add the honey, vinegar, sambal olek, chili flakes and water, except for 2 tbsp to a pot and bring to a boil, stirring constantly. In the meantime combine the cornstarch with the remaining water until there are no lumps left, then stir into the remaining sauce. Turn down to medium heat and let simmer for 10-15 minutes, storing occasionally until it thickens. Then reduce the heat to very low.

  5. In the meantime break the broccoli into florets and steam it in a pot with boiling, salted water for about 4 minutes, then drain. Once the tofu is done baking, add it into the sauce and make sure it is all covered. 

  6. Divide the rice, broccoli and tofu onto bowls and garnish with some fresh cilantro. Enjoy!

Have fun cooking! 
Enjoy,
Katie // Une Petite Cuisinière 

Kategorie: Diet-Specific, Lunch/ Dinner, Vegan, Vegetarian Stichworte: Chili, dinner, easy, family friendly, healthier, healthy, healthy vegan, lunch, plant based, plant based dinner, staples, sweet chili, tofu, vegan, vegetarian

Super Quick, Family-Approved, Herby Prawn and Avocado Salad

Juni 21, 2021 by katharina.kuehr Kommentar verfassen

Summer season = salad season. We all know that. When it’s hot outside (which it hopefully is soon) and the sun is shining we neither want to spend hours in the kitchen, nor can anyone really eat something warm. So salads are the perfect dish to eat. They are quick to make, healthy and mostly. But they can be boring so easily.

They definitely can, but they don’t necessarily have to be. If you only make the same one over and over again, I agree, this would be boring. If you switch it up though, and add basically an entire herb garden and make the best garlic prawns ever, and still only spend 15 minutes making it, then it is a really good kind a salad. And yep, it is very delicious too (my brother ate the entire bowl so it‘s got to be delicious!)!

What is special about this dish? 

Well, it definitely is not your average salad! Its not just greens & dressing & maybe some veggies – no; it is way more delicious!! To make it taste a bit more like summer and a bit fresher, we are adding a whole brunch of herbs. Mint, basil, parsley, really, whatever you have on hand. 

And also the dressing is really really fresh, since we‘re adding some lemon and even more herbs to it, but also some honey. It‘s sweetness balanced the sourness of the lemon out perfectly. And not to forget about the prawns. They are SO. good. They are fried in olive oil with fresh garlic. While it probably is not the best recipe for a date, it definitely is the most delicious way to cook prawns!! The combo of garlic and prawns simply is unbeatable! 

Is this dish healthy? 

It definitely is! There are a whole lot of greens in here. All the herbs and also the salad are packed with different nutrient and vitamins and also a lot of fibre. Adding herbs to dishes is such an easy and flavorful way to add vitamins and fibre. We also get a decent amount of essential nutrients, and also a lot of water, from the cucumber. 

The prawns account for the right amount of protein and the olive oil makes sure we are not lacking those unsaturated fats. The lemon keeps our immune system strong with its Vitamin C. The only thing that is not directly included in the salad is a source of carbohydrates. But here you could just have some whole grain bread on the side or add some quinoa or couscous in the salad. 

How to make this dish?

There are three things that need to be done. 1. prepping the veggies; therefore we need to wash the salad, slice the cucumber and peel and chop the avocado into cubes. 2. making the dressing; here we need to mix some olive oil, lemon juice, honey and the finelly chopped herbs. And 3. we need to make the prawns; that really only comes down to finely slicing some garlic, frying it in hot oil for about 30 seconds and then adding the prawns and cooking them on each side for about 3 minutes. And voilà! 

In case the prawns are frozen

just add them to a bowl with some hot water (not boiling one, just warm one) and let them stand for about 30 minutes, changing the water every 10 minutes to let them thaw without cooking. Then just pat them dry with a kitchen towel and cook as the recipe says! 

This salad is amazing for those hot summer days or for whenever you are craving something light and healthy and fresh. It anyway is very easy to make and a must try! 

Print

Super Quick, Family-Approved, Herby Prawn and Avocado Salad

Salads in summer are simply perfect. But always having the same one over and over again also can be veryyyy boring. That’s why we need to switch things up and make this delicious goodie.

Course lunch, Salad
Prep Time 10 Minuten
Cook Time 10 Minuten
Total Time 20 Minuten
Servings 4 servings

What you will need

For the prawns:

  • 800 g prawns*
  • 1 tbsp butter
  • 1 tbsp olive oil
  • 2 cloves garlic

For the salad:

  • 1 head of salad
  • 1 avocado
  • 6 tbsp olive oil
  • 1 lemon (only the juice)
  • 1 tsp mustard
  • 2 tsp honey
  • 1/2 tbsp chopped mint
  • 1/2 tbsp chopped parsley
  • 1/2 tbsp chopped dill

How to

  1. Peel and finely dice the garlic. Heat up the olive oil and butter in a pan and sauté the garlic in the hot oil for about 30 seconds, then add in the prawns. Fry them on each side for about 3 minutes until pink and cooked through. 

  2. In the meantime finely chop the herbs and mix them with the olive oil, lemon juice, mustard and honey. 

  3. Wash and tear the salad into bite sized pieces. Half the avocado, remove the pit and scoop it out with a spoon. Then cut into about 1cm sized chunks. Also add this to the salad. 

  4. Mix with the dressing and divide onto the bowls. Top with the prawns and garnish with fresh dill. Serve and enjoy!

Notes

*if the prawns are frozen, add them to a bowl and cover them with warm water. Let stand for about 5 minutes, then drain and repeat until they have thawed. Then lay them onto a kitchen towel and tap them dry. 

I genuinely hope that you‘ll enjoy it! 
Love,
Katie // Une Petite Cuisinière 

Kategorie: Fish & Seafood, Lunch/ Dinner, Salad, Summer Stichworte: avocado, easy, easy to make, family friendly, garlic, healthy lunch, light meals, lunch, pescetarian, prawns, quick, quick meals, salad, salad season, salads, seafood, spring

The Easiest (10 Minute) Strawberry & Chickpea Caprese

Mai 21, 2021 by katharina.kuehr Kommentar verfassen

If there is one dish that embodies summer, it definitely is caprese. The Italian vibes, the freshness, the lightness of summer, and all the goodness. All of that not only is summer but can also be found in caprese. Not to mention how delicious it is! Still, as good as the classic one is, once in a while it is fun to switch things up and take them next level. Just as we are doing here.

Caprese actually is one of my favorite, if not my favorite dishes ever. When in Italy I have it at least once a day, in whichever form. Undoubtedly, the combo of tomatoes and burrata or mozzarella is unbeatable. I thought so at least before having tried this. And let me tell you, strawberry and mozzarella does not quite beat tomatoes an mozzarella but it definitely is at least as delicious!! 

Where does Caprese come from?

Maybe you have already noticed; the colours in Caprese, green (from the basil), white (from the mozzarella) and red (from the tomatoes), are identical with the ones in the Italian flag. A coincidence? I don’t know but I don’t think so. The dish also has its name from an Italian island, Capri. There the dish was first served and still is a must serve. If you are a Caprese lover, Capri definitely should be on your food bucket list! 

What’s special about this? 

As mentioned above, this is not your average Caprese. We‘re still keeping the colors, but we‘re changing up the flavors. Instead of tomatoes we are using strawberries and we also are adding some herbed chickpeas to it. You may wonder whether a fruit would taste good in a savory dish, and really, it does (tomato btw is a fruit to, so it‘s not too big of a change). Tomatoes are a bit sweet, and so are strawberries. They definitely do have a quite different flavor, yet the sweetness works in great harmony with the tanginess of the mozzarella.

Plus, the chickpeas are not typical. To all Italian out there, please don’t judge before you try! They add some extra texture and flavor and keep you full for longer due to their fibre. And mozzarella and chickpeas taste really delicious when combined. 

Mozzarella, Burrata, Mozzarella di Bufola? 

Before we are jumping to the health part of the dish, we need to clarify which kind of Mozzarella works best here. What even is the difference? 

So Mozzarella is the regular one. Depending on where you live and from where you buy the mozzarella, it can be harder of softer, yet it already has the typical mozzarella flavor. This one works great for anything that is being baked, like pizza or pasta gratins. Mozzarella di Buffola, is already way softer and higher quality mozzarella. It has a milder flavor and is way creamier than the regular one. Thus, it also is more expensive. This is the one you usually are served in Italy. 

And then there is burrata. I need to warn you though, once you try burrata, you‘ll habe a hard time returning to mozzarella di Buffola or even regular mozzarella. Burrata kind of is the queen of all mozzarella, and well deserved. It comes from Puglia, in the south of italy, and is made from a day old mozzarella and cream. And the result. Oh my goodness. Unreal. Such a creamy and tangy center, you cannot get enough of it. It just is unreal. Burrata usually is served with either caprese or on top of pasta for example.

So which one works best for this dish? 

I would say mozzarella di bufola. Burrata would taste amazing but since it is so creamy, the salad would turn into a (delicious) mess.

What about the chickpeas?

It wouldn’t do the mozzarella justice if we chose an A-level mozzarella but then some regular canned chickpeas – would it? So the chickpeas also have to be next level. Just like the ones from NENI. They actually are simply PERFECT for this dish. Why? They are precooked and prepackaged, so you can just grab them in your supermarket and make this dish even quicker. And they are ore spiced with ultra tasty Mediterranean spices and herbs. These herbs work perfectly together with the mozzarella and strawberries. These spiced chickpeas make this dish 10x more delicious and even healthier, because you get so many nutrients from them. If you somehow have access to getting those chickpeas, you definitely should! 

Is this dish healthy?

We can definitely say so. As a base we have the strawberries, which are loaded with vitamins and fibre and nutrients. (Btw, did you know, you could eat the green part of the strawberries? It still blows my mind). Then we have got the chickpeas, which also are an amazing source of protein and fibre. So they‘ll keep you full and happy and help your digestion. And then, not to forget about the mozzarella; it is rather high in fat, that needs to be said, but also in protein. The olive oil accounts for some unsaturated, healthy fats and the basil for some extra nutrients. All in all, pretty healthy! 

How to make this dish? 

This is beyond easy. Really. All we need to do is wash and slice the strawberries, chop the mozzarella and toss with the chickpeas, basil, oil and vinegar. Yup, that’s all. Then we only need to pack it for our picnic 🙂

Meal prep friendly?

Definitely! Otherwise it would not be a great picnic dish would it? You can store it in the fridge – even for a day if you want. This actually intensifies the flavors because the juices of the strawberries will run out and combine with the mozzarella.

This definitely is one of the easiest and most delicious meals you could make. It is amazing for those hot summer days when you just want a quick lunch, but also for warm and sunny picnics in the park! I hope you‘ll really enjoy this and have an amazing time picnicing! 

Print

The Easiest 10 Minute Strawberry and Chickpea Caprese

Easy to make, super quick, super refreshing and super delicious! Really, this is next level and not your average caprese (much better!). The strawberries and an amazing sweet-summery twist to it and all in all it is super delicious! A must make!

Course Appetizer, picnic, Salad
Prep Time 10 Minuten
Total Time 10 Minuten

What you will need

  • 1 package NENI Kichererbsen Salat mit frischen Kräutern
  • 250 g strawberries
  • 1 Package mozzarella cheese (around 120-150g)
  • 1 tbsp basil
  • 1 handful greens (such as baby spinach)
  • 2 tbsp olive oil
  • 1/2 tbsp balsamic vinegar

How to

  1. Wash the strawberries and cut them into bite-sized pieces. Add them to a bowl along with the chickpeas, the mozzarella, the olive oil and the finely chopped basil. Give it a good mix, then divide onto bowls.

  2. Drizzle some balsamic vinegar and serve with fresh basil! Enjoy!

Love,
Katie // Une Petite Cuisinière 

Kategorie: Diet-Specific, Picnic, Salad, Season, spring, Summer, Vegetarian Stichworte: burrata, caprese, chickpeas, einfach, erdbeeren, Kichererbsen, lunch, mozarelly, Neni, picknick, picnic, quick, salad, schnell, strawberry, summer food, vegetarian, vegetarisch

Nächste Seite »

Footer

What has been happening on my Instagram

Copyright © 2024 Une Petite Cuisinière on the Foodie Pro Theme