• Zur Hauptnavigation springen
  • Skip to main content
  • Zur Fußzeile springen

feel food club

  • Home
  • About me
  • My Recipes
  • Blog
  • Navigation Menu: Social Icons

    • Instagram

spring

Family Favourite Easy Pea(sy) and Mint Risotto

Juni 13, 2021 by katharina.kuehr Kommentar verfassen

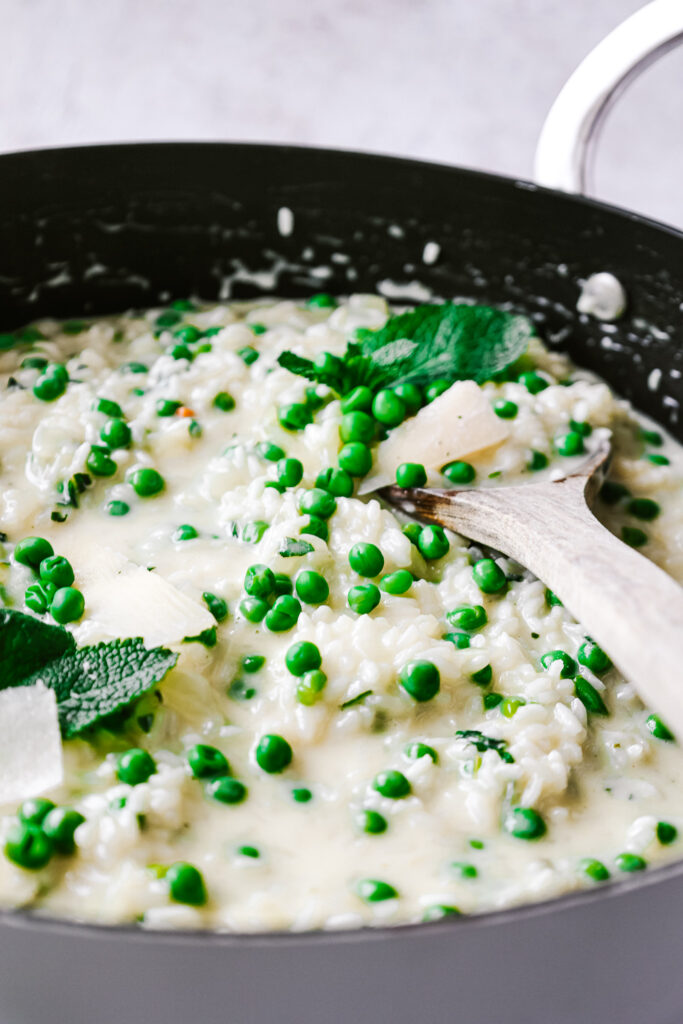
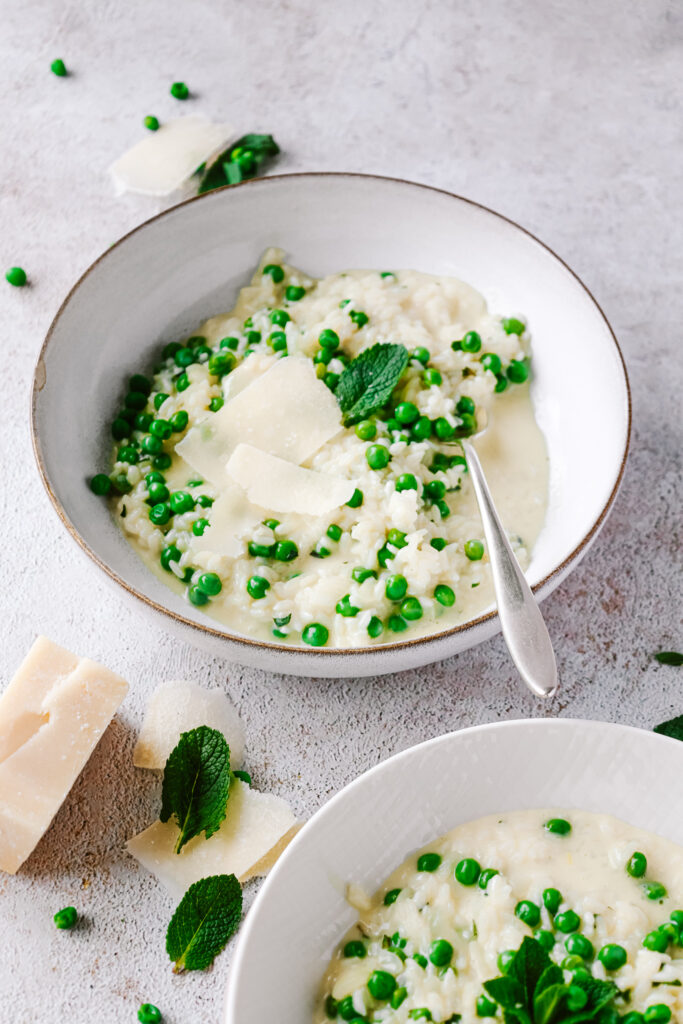
Risotto always is a good choice. Everyone loves it. And the best part about it (besides it being ultra delicious); it is so versatile! You can make it with anything and everything, try different combos, make it seasonal and make it as you like it! Just like we’re doing it with this one. To make it fresher and more summery, we are throwing in some greens & herbs and just taking it next level!

What is special about this dish?

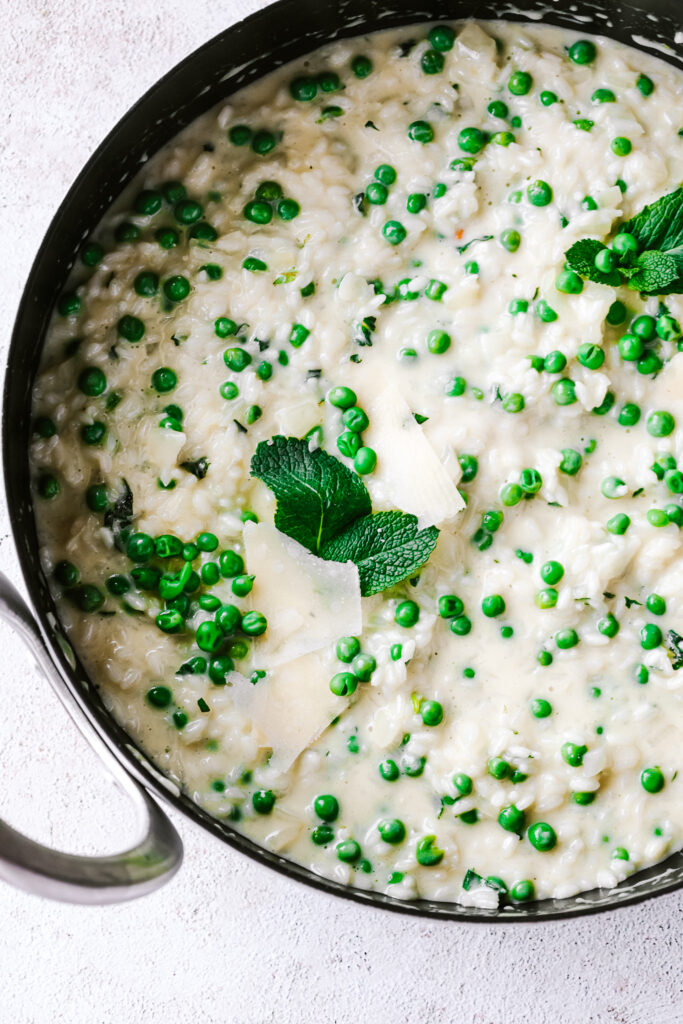
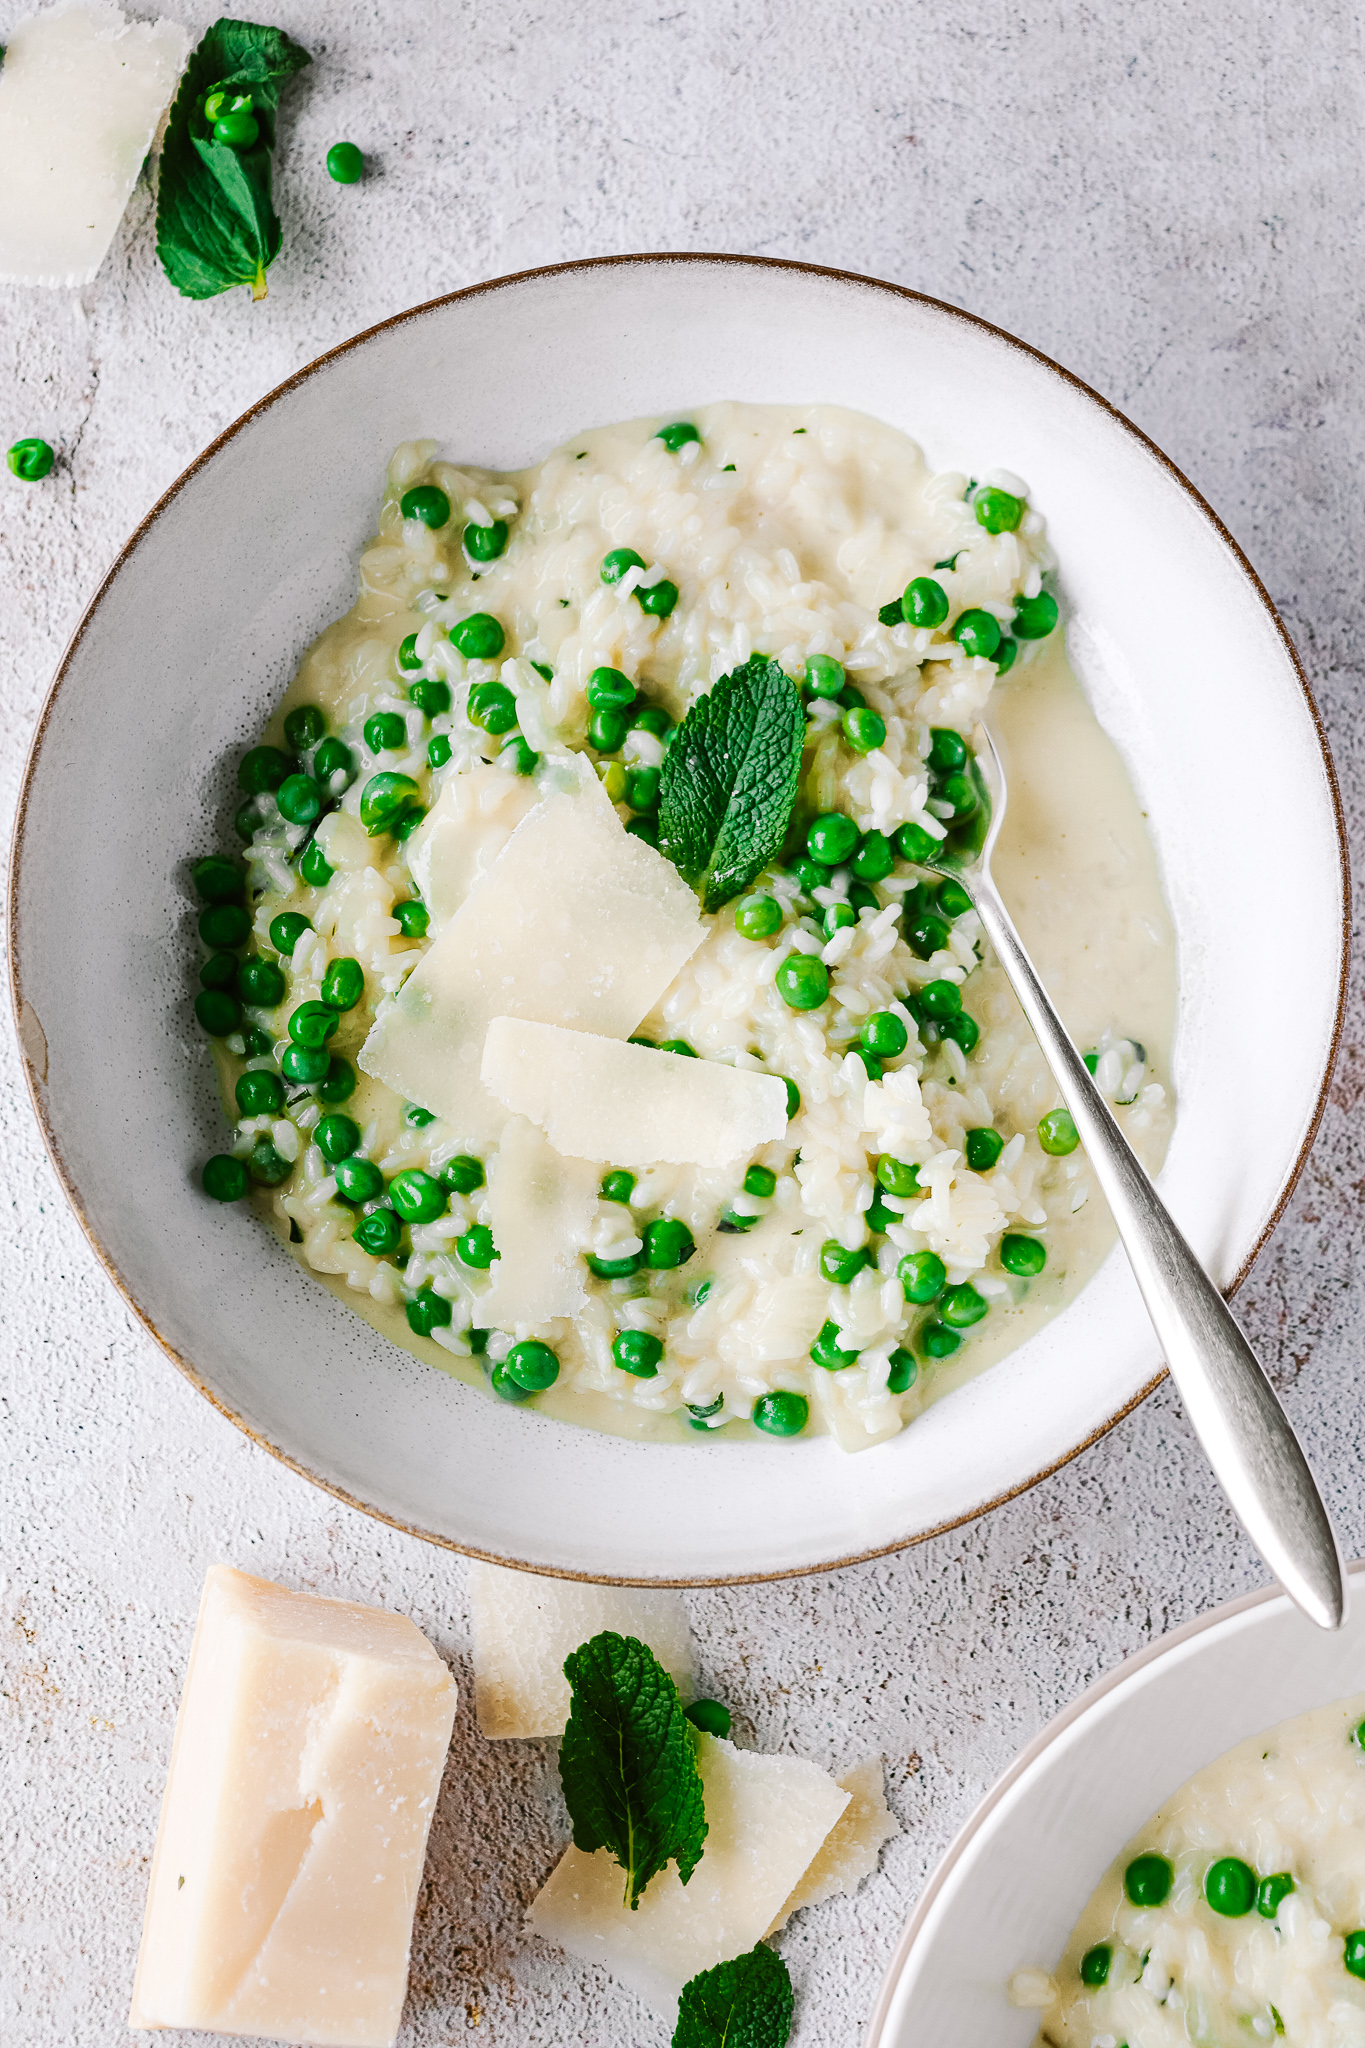
The combination! Mint and pea is a combo that we (unfortunately) do not find very often. Yet, it is so ultra tasty! The peas add a buttery, soft taste to the risotto and the mint accounts for a fresh taste, which you would usually not expect in risotto, but is really, really good. If you want some more risotto recipes, you can check out the wild garlic risotto or the creamy, green vegan risotto!

A little risotto story

Actually, it is quite surprising that I still like risotto as of today since I have a little history with it. As a kid (and still now), when eating out, I’ve always loved trying every single dish on the table. So when we went out to eat, I’d pick up my fork and walk around the table to try the dish my brother ordered, my mom had and my dad ate. I simply loved exploring new flavours.
So once during our holidays in Italy we went out to eat. I was very little, something like 6 or 7 years, and ordered a risotto. My parents‘ and my brother’s dish had arrived before mine did, so I took my fork and walked around the table. Not surprisingly, I could then not finish my risotto, because I have already had quite a bunch of food before I even started eating mine.
My dad, teased me and said (it was well obvious that it was a joke) I should finish or I can never try his meal before mine again. So I, as a little defiant and stubborn kid, knew it was a joke but because I was so stubborn I finished it anyways. My mom and my brother had a lot of fun watching me and my dad and I was so full afterwards that I couldn’t have even looked at more food. Well, anyways, the chef then came out of the kitchen and asked everyone how they liked the meal. You can probably imagine how my family bursted into laughter when he came to ask me.
Although this was (a teeny tiny bit) unpleasant for me, I did not learn my lesson (because I did not want to) and up to this day try everyone else’s dishes.
And, despite all of this, I still love risotto.

Is risotto healthy?

Back to the more important things. While risotto is incredibly nourishing for the soul and the happiness, it is not quite as nourishing for our bodies. Why? In order for it to taste this delicious, it is packed with many saturated fats from the cheese and butter, which are not so great for us. Nevertheless, there are a few things we can change to make it more delicious.

For example, instead of using butter only, we are using a mix of cream cheese and butter. This makes it a bit lighter in terms of fats. Then also, we are adding some peas, for extra fibre and vitamins and mint for extra nutrients. Justa. few swaps, and they do make a difference.

How to make this dish?

Risotto making really is not difficult but it is a workout. It takes some time and effort because you constantly need to stir. We start by frying the finely chopped onions in some olive oil. This adds a really delicious flavour to the entire dish. Then, we add the rice and fry it too before we deglaze it with some white wine. Now the fun part starts. A scoop at a time, we are adding some vegetable broth and letting it simmer (while stirring) until the rice has absorbed it. Then we add another scoop, and another, and so on until the rice is ready to eat. Shortly before that, we’ll add the peas.

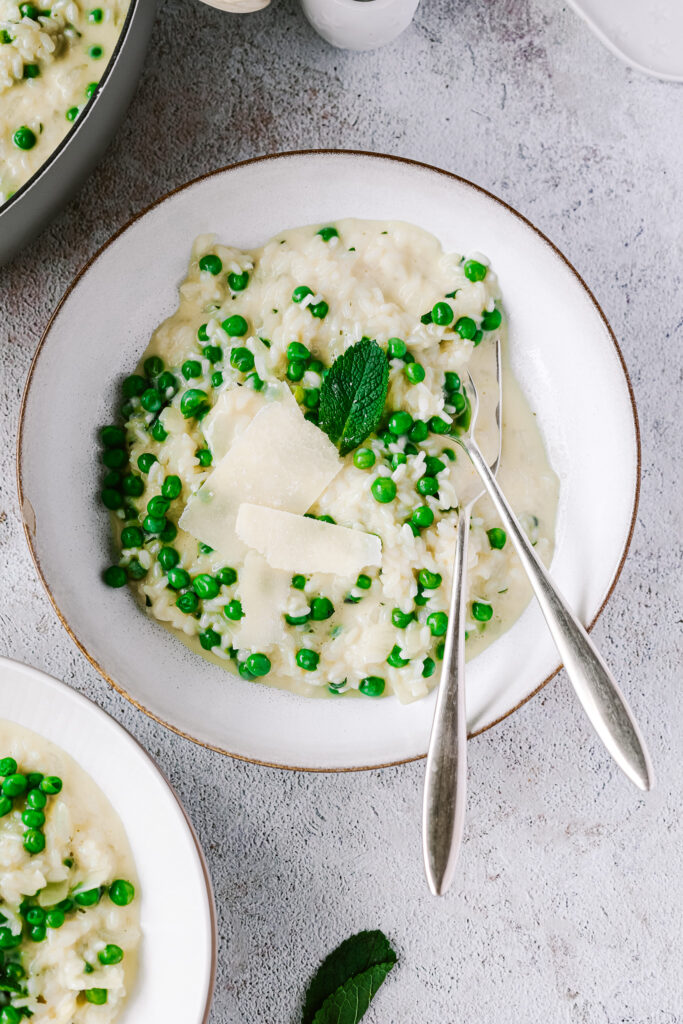
As soon as the rice is done and the liquid is absorbed (it really should be very well absorbed because otherwise it’ll be too runny), we can stir in the chopped mint, butter, cream cheese and parmesan. And that already is it! If you want, you could add something on top like grilled zucchini, prawns or anything else, or just enjoy it as is!

This, as the name already suggests, is a real family favourite. And really, you can barely go wrong with it. Very easy to make, and very, very delicious!

Print

Family Favourite, Easy, Pea(sy) & Mint Risotto

Not your average risotto. Much more fun, a bit healthier and SO much flavour. The combination of peas and mint is just outrageous and perfect for spring and summer. An absolute family favourite!

Course Main Course
Cuisine Italian
Prep Time 5 Minuten
Cook Time 25 Minuten
Total Time 30 Minuten
Servings 4 people

What you will need

  • 1,5 l vegetable broth
  • 320 g risotto rice
  • 1 tbsp olive oil
  • 1 white onion
  • a splash white wine
  • 400 g peas
  • 1 handful mint
  • 25 g butter
  • 45 g cream cheese
  • 80 g parmesan cheese

How to

  1. Finely dice the onion. Heat up the oil and sautée the onion in it until it is glassy. Add the rice and gently stir through until everything is combined and slightly covered with the oil. Deglaze it with the splash of white wine after about a minute. Reduce the heat to medium-high and add a scoop of the vegetable broth. Constantly stir everything until the vegetable broth has fully been absorbed by the rice, then add the next scoop.

  2. Repeat until the rice is cooked through, for about 15-20 minutes.

  3. In the meantime grate the parmesan, measure out the other ingredients and finely chop the mint.

  4. Once the rice is almost done cooking (after about 20 minutes), add in the peas. When done, take it off the heat and stir in cheeses, butter and mint.

  5. Once everything is well combined, plate it and garnish with some extra parmesan cheese and mint.

Have fun making (and especially eating) it!
Love,
Katie // Une Petite Cuisinière

Kategorie: Diet-Specific, Lunch/ Dinner, Season, spring, Vegetarian Stichworte: Erbsen, family favourite, family meals, healthy, healthy spring, italy, mint, minze, pea, Risotto, spring, vegetarian, vegetarisch, weeknight dinner

The Easiest (10 Minute) Strawberry & Chickpea Caprese

Mai 21, 2021 by katharina.kuehr Kommentar verfassen

If there is one dish that embodies summer, it definitely is caprese. The Italian vibes, the freshness, the lightness of summer, and all the goodness. All of that not only is summer but can also be found in caprese. Not to mention how delicious it is! Still, as good as the classic one is, once in a while it is fun to switch things up and take them next level. Just as we are doing here.

Caprese actually is one of my favorite, if not my favorite dishes ever. When in Italy I have it at least once a day, in whichever form. Undoubtedly, the combo of tomatoes and burrata or mozzarella is unbeatable. I thought so at least before having tried this. And let me tell you, strawberry and mozzarella does not quite beat tomatoes an mozzarella but it definitely is at least as delicious!! 

Where does Caprese come from?

Maybe you have already noticed; the colours in Caprese, green (from the basil), white (from the mozzarella) and red (from the tomatoes), are identical with the ones in the Italian flag. A coincidence? I don’t know but I don’t think so. The dish also has its name from an Italian island, Capri. There the dish was first served and still is a must serve. If you are a Caprese lover, Capri definitely should be on your food bucket list! 

What’s special about this? 

As mentioned above, this is not your average Caprese. We‘re still keeping the colors, but we‘re changing up the flavors. Instead of tomatoes we are using strawberries and we also are adding some herbed chickpeas to it. You may wonder whether a fruit would taste good in a savory dish, and really, it does (tomato btw is a fruit to, so it‘s not too big of a change). Tomatoes are a bit sweet, and so are strawberries. They definitely do have a quite different flavor, yet the sweetness works in great harmony with the tanginess of the mozzarella.

Plus, the chickpeas are not typical. To all Italian out there, please don’t judge before you try! They add some extra texture and flavor and keep you full for longer due to their fibre. And mozzarella and chickpeas taste really delicious when combined. 

Mozzarella, Burrata, Mozzarella di Bufola? 

Before we are jumping to the health part of the dish, we need to clarify which kind of Mozzarella works best here. What even is the difference? 

So Mozzarella is the regular one. Depending on where you live and from where you buy the mozzarella, it can be harder of softer, yet it already has the typical mozzarella flavor. This one works great for anything that is being baked, like pizza or pasta gratins. Mozzarella di Buffola, is already way softer and higher quality mozzarella. It has a milder flavor and is way creamier than the regular one. Thus, it also is more expensive. This is the one you usually are served in Italy. 

And then there is burrata. I need to warn you though, once you try burrata, you‘ll habe a hard time returning to mozzarella di Buffola or even regular mozzarella. Burrata kind of is the queen of all mozzarella, and well deserved. It comes from Puglia, in the south of italy, and is made from a day old mozzarella and cream. And the result. Oh my goodness. Unreal. Such a creamy and tangy center, you cannot get enough of it. It just is unreal. Burrata usually is served with either caprese or on top of pasta for example.

So which one works best for this dish? 

I would say mozzarella di bufola. Burrata would taste amazing but since it is so creamy, the salad would turn into a (delicious) mess.

What about the chickpeas?

It wouldn’t do the mozzarella justice if we chose an A-level mozzarella but then some regular canned chickpeas – would it? So the chickpeas also have to be next level. Just like the ones from NENI. They actually are simply PERFECT for this dish. Why? They are precooked and prepackaged, so you can just grab them in your supermarket and make this dish even quicker. And they are ore spiced with ultra tasty Mediterranean spices and herbs. These herbs work perfectly together with the mozzarella and strawberries. These spiced chickpeas make this dish 10x more delicious and even healthier, because you get so many nutrients from them. If you somehow have access to getting those chickpeas, you definitely should! 

Is this dish healthy?

We can definitely say so. As a base we have the strawberries, which are loaded with vitamins and fibre and nutrients. (Btw, did you know, you could eat the green part of the strawberries? It still blows my mind). Then we have got the chickpeas, which also are an amazing source of protein and fibre. So they‘ll keep you full and happy and help your digestion. And then, not to forget about the mozzarella; it is rather high in fat, that needs to be said, but also in protein. The olive oil accounts for some unsaturated, healthy fats and the basil for some extra nutrients. All in all, pretty healthy! 

How to make this dish? 

This is beyond easy. Really. All we need to do is wash and slice the strawberries, chop the mozzarella and toss with the chickpeas, basil, oil and vinegar. Yup, that’s all. Then we only need to pack it for our picnic 🙂

Meal prep friendly?

Definitely! Otherwise it would not be a great picnic dish would it? You can store it in the fridge – even for a day if you want. This actually intensifies the flavors because the juices of the strawberries will run out and combine with the mozzarella.

This definitely is one of the easiest and most delicious meals you could make. It is amazing for those hot summer days when you just want a quick lunch, but also for warm and sunny picnics in the park! I hope you‘ll really enjoy this and have an amazing time picnicing! 

Print

The Easiest 10 Minute Strawberry and Chickpea Caprese

Easy to make, super quick, super refreshing and super delicious! Really, this is next level and not your average caprese (much better!). The strawberries and an amazing sweet-summery twist to it and all in all it is super delicious! A must make!

Course Appetizer, picnic, Salad
Prep Time 10 Minuten
Total Time 10 Minuten

What you will need

  • 1 package NENI Kichererbsen Salat mit frischen Kräutern
  • 250 g strawberries
  • 1 Package mozzarella cheese (around 120-150g)
  • 1 tbsp basil
  • 1 handful greens (such as baby spinach)
  • 2 tbsp olive oil
  • 1/2 tbsp balsamic vinegar

How to

  1. Wash the strawberries and cut them into bite-sized pieces. Add them to a bowl along with the chickpeas, the mozzarella, the olive oil and the finely chopped basil. Give it a good mix, then divide onto bowls.

  2. Drizzle some balsamic vinegar and serve with fresh basil! Enjoy!

Love,
Katie // Une Petite Cuisinière 

Kategorie: Diet-Specific, Picnic, Salad, Season, spring, Summer, Vegetarian Stichworte: burrata, caprese, chickpeas, einfach, erdbeeren, Kichererbsen, lunch, mozarelly, Neni, picknick, picnic, quick, salad, schnell, strawberry, summer food, vegetarian, vegetarisch

20-minute (vegan) Peanut Tofu & Greens Spring Sushirrito

Mai 12, 2021 by katharina.kuehr Kommentar verfassen

Sushiwhat? Sushi + Burrito = Sushirrito! Still no idea what this is supposed to be? Well, basically a sushi roll (like maki) just so giant that you roll it up like a burrito and can eat it holding in your hands. Pretty genius invention right? Sushi to-go basically.

Biting into this is like biting into soft (and sushi flavoured) rice, fried & salty peanut tofu, crunchy cucumber & aspragus, soft avocado and creamy sriracha sauce. An explosion of flavours in your mouth and it really is ultra delicious! Plus, it actually is not too difficult to make.

What is special about this dish?

First of all, it is vegan. Vegan sushi with tofu is not very traditional in Japan. Usually it is prepared with raw fish like salmon or tuna or with fresh veggies or fruits like avocado (yep, avocado is a fruit) and cucumber. Or sometimes tempura (vegan) vegetables or prawns. You see, nl tofu in here. Nevertheless this is not a reason for us not to add tofu into this dish.

And secondly, well a gigantic sushi wrap is not quite normal. Yeah, it kinda is like an ultra thick maki, just one you can take bites from. This shape is very untypical because you (obv) cannot eat this with chopsticks, at least it is a challenge. It is more like street-style, meal prep, on the go sushi. Still, is tastes at least as good!

Is this healthy?

Damn yep. The amazing thing about this is that you can add any veggies you like into these rolls. Whatever you think would taste good in combination with the tofu & rice. I love cucumber, asparagus, avocado and spring onions but you could also add sweet potato or carrots or whatever you love. Adding all these kinds of different veggies makes this really incredibly nutritious. And obviously, depending on which veggies you choose, you‘ll have different nutrients! 

Besides the veggies we also have the tofu. Tofu is a great source of plant based protein and fibre. Together with the peanut sauce is also serves as a source of healthy and essential, unsaturated fat. Not to forget about the rice. This itself is not too nutrient dense, yet it provides many carbohydrates to keep you energized. If you also wanted some fibre and minerals, you could swap it for brown rice instead.

How to make this dish?

If you are a professional sushi-chef, you probably have got this ready in 5 minutes. If you are not (just like most people including myself) it‘ll probably take you 20 minutes – if even. And what takes the longest is cooking the rice. Therefore that‘s also what we‘re starting with. Here we‘re using sushi rice just because it has this special sushi flavor and texture. You can either find that at the supermarket or an asian store. This we just boil with twice the amount of water and then we mix it with a mix of vinegar and maple. This combination really adds the flavor we want.

Then we also need to marinate the tofu. This essentially is done by combining a few ingredients including peanut butter, soy sauce and lime juice. The longer this can marinate, the better. While the rice is cooking, the tofu is frying in hot oil until crispy. In the meantime we can also finely chop or slice the veggies. 

Then comes the fun and challenging part; rolling (or more like folding) it up. For this we need to divide the rice into the amount of sandwiches we make. If we make two sandwiches we divide it into two. And then we need to half it again (so we have rice for the top and the bottom). We start by adding one half of it into the middle of a nori sheet and pressing this into a square or rectangle. Then we add the veggies, whichever you like, and tofu, then the sauce, more veggies and the other half of the rice. We need to make sure to keep everything in this square or rectangular form. Then we take a second nori sheet and lay it on top. Now we take a small bwol with water and dip our fingers into it to wetten the sides of the nori and then fold the sides in and roll the rest like a burrito. It is important to really keep everything very tight here so the burrito does not fall apart when eating. And that’s it!

Meal prep friendly?

Yes! Definitely! That is the great thing here – it is not only great to be eaten the next day, it also is amazing to be eaten on the go, or in the park because you do not need cutlery or chopsticks or anything. It probably lasts 2-3 days in the fridge, so you’ll have a delicious meal for several days!

Print

20-minute (vegan) Peanut Tofu & Greens Spring Sushirrito

Like Sushi, just with Tofu and rolled up like a Burrito, so you can easilyyy eat it! An explosion of flavours and not difficult to make.

Course dinner, lunch
Cuisine Japanese
Prep Time 10 Minuten
Cook Time 15 Minuten
Total Time 25 Minuten
Servings 2 servings

What you will need

For the tofu:

  • 200 g tofu
  • 2 tbsp peanut butter
  • 5 tbsp soy sauce
  • 1 lime
  • 1 tbsp maple syrup
  • 1/2 tsp garlic & ginger (dried or fresh)
  • 1 tbsp sesame oil
  • 1 tbsp oil

For the rest:

  • 120 g Sushi Rice (you can find that either at your super market or asian store – alternatively you could go for basmati rice)
  • 1/4 cucumber
  • 2 tso vinegar
  • 1 tsp maple syrup
  • 1/2 avocado
  • 100 g green asparagus

For the sriracha sauce

  • 1 tbsp sriracha
  • 2 tsp mayo
  • 2 tbsp greek yoghurt
  • 4 nori sheets

How to

  1. First mix all the ingredients for the tofu marinade. Then cut the tofu into two equally sized (about 1cm thick) blocks and let them marinate for as long as possible.

  2. Add the sushi rice, along with twice the amount of water and some salt, to a pot and bring to a boil. Reduce to a simmer and let simmer until all water is absorbed. Then turn down to very low heat and let sit until fluffy and soft.

  3. In the meantime mix all the ingredients for the sriracha sauce. Finely slice the cucumber, avocado and asparagus. Fry the asparagus in some oil for about 3-4 minutes until soft.

  4. When the sushi rice is done, combine the vinegar and maple and mix it with the rice. Then divide the rice into however many burritos you are making.

    Then add half of each portion into the middle of a nori sheet and press it into a flat and tight rectangle or square. Now layer some veggies and the tofu on top. To with the sriracha mayo and the remaining rice. Press everything together so it sticks well and does not fall apart. Top with another Nori sheet. Then fold in the edges and drizzle a bit of water on the sides, so they'll stick. Then tightly roll in the burrito and fold in the remaining edges.

  5. That's it! Serve with some soy saue and enjoy!

I really, genuinely hope that you’ll enjoy this as much as we do and that you’ll have a great time cooking this!

All the best,
Love,
Katie

Kategorie: Cuisine, Diet-Specific, Japanese, Season, spring, Vegan Stichworte: 20 minutes, asparagus, burrito, easy, easy sushi, green, healthy, lunch, meal prep, peanut, plant based, satay, spring, sushi, sushirrito, tofu, vegan, vegan sushi, wrap

Not You Average (much better) Hummus and Falafel Picnic Bagel

Mai 7, 2021 by katharina.kuehr Kommentar verfassen

The name says it all. Definitely not your average bagel. This is something so much better, I promise. Recipe 2 of the picnic series, and it only is getting better, although it is hard to top the beluga lentil salad an curry hummus stuffed pita. Yet, we managed to do so. Slightly sweet and crispy bagel with creamy hummus, fresh greens and radishes, crunchy falafel and soft and salty avocado. Oh my. If I were you, I would be running to the store right now.

Bagels are just amazing by themselves already. We really need to take a moment and thank the inventor of thebagel (who by the way was Austrian!!!) for this amazing creation. Invented by accident, probably the best accident ever, and now a staple around the world. And really, cream cheese and salmon bagels are amazing, no need to doubt that, yet there are so many other combos that just taste unreal in a bagel, which you need to try out – just like this one!

Where to get good bagels?

This is really important, because if the bagel itself does not taste amazing, the entire dish only tastes half as good. So, in Vienna there are 2 places I love to get my bagels from. The first one is Budapäst Bagels – they have been the (much deserved) restaurant of the month in march and definitely have amazing bagels. You can just grab some plain bagels there and fill them at home! The other place that never lets you down is Joseph Brot. They have several shops in Vienna, so you can just choose one that is close to you. The only disadvantage here – they are sold out so quickly always! So you got to get up early for your bagels.

What’s special about this dish?

It is a mix of the traditional bagel and a falafel pita or sandwich and an avo toast. So, really the best of everything combined! Instead of spreading a bagel with cream cheese, we are spreading it with hummus. And filling it with falafel. Yep, it gets quite thick and tastes amazing. Plus, we have some springy goodness with the fresh veggies and sprouts. This bagel combo really is (not exaggerating here) life changing.

Plus, also this recipe is part of the NENI x Une Petite Cuisinière picnic series! Which means, you can use the (super delicious) Neni am Tisch products to make this. In other words, you get some healthy deliciousness in no time.

Is this dish healthy?

We got to be honest, it probably it not the most nutrient dense dish ever. It though, also is not unhealthy. The thing is that most of the time bagels themselves are not highly nutritious. To achieve their slightly sweet flavour, there often is sugar in them and they rarely are made with whole-wheat products. They do provide you with a bunch of carbs though, yet not many complex ones and not much fibre.

Nevertheless the fillings are nutritious. We have a lot of chickpeas in here – in form of hummus and in form of falafel. Chickpeas are high in protein and fibre and therefore a great plant-based food. Plus, we have some greens & radishes, meaning more vitamins and some avocado for healthy fats and deliciousness (what even is a bagel without avocado?).

How to make this dish?

This probably is one of the easiest things you’ve ever made. All you need to do is pop the falafel into the oven (this is no must, popping them into the oven just really lets them crisp up again and makes them taste much better). In the meantime we are toasting the bagel, slicing the radishes and cutting the avo.

When falafel and bagel are done, we spread some of the (best) Hummus onto the lower half of the bagel, add the falafel, the radishes, some cress or sprouts and top it with the avo. Now we got to sprinkle it with some sea salt, close it with the top and take it onto our picnic. A perfect dish for a perfect picnic!

What about meal prep and picnic?

Obviously the bagel won’t be crispy anymore when it has been stored in the fridge or in a container to be taken onto a picnic, nevertheless, it still is as delicious! If you just leave it like that, it will be a bit of a mess to eat though. To avoid that, it is best if you cut it in half and then take some parchment paper, cut a strip off it, wrap it around the bagel-half and then fix it with a string. That way everything holds together and you can eat without everything falling apart.

If you wanted to bagel to be a bit more crispy, you could also toast it beforehand and bake the falafel, then put both into a bag (not air tight!!) and take the avocado, sprouts, radishes and hummus in a separate container and fill the bagel at your picnic spot! This makes it all a bit fresher!

Print

Not your average (much better) Hummus & Falafel Picnic Bagel

crispy bagel with creamy hummus, crispy falafel and creamy avocado. This is the bagel combo you have been misisng out on all your life, I promise. It is so good that you will want to have it every day and take it on every picnic.

Course Breakfast, brunch, lunch, picnic
Prep Time 5 Minuten
Cook Time 15 Minuten
Total Time 20 Minuten

What you will need

  • 1 bagel
  • 5 NENI am Tisch Falafel
  • 2-3 tbsp NENI am Tisch Hummus
  • 1/2 avocado
  • a few radishes
  • sprouts/ cress

How to

  1. Preheat the oven to 200°C. Place the falafel onto a baking tray and bake them for 10-15 minutes to get them crispy again.

  2. Slice the bagel in half and toast it.

  3. In the meantime slice the radishes and avocado and chop the cress.

  4. When the falafel are done, spread the bagel with the hummus, add the falafel, radishes and sprouts, and lay the sliced avocado on top. Sprinkle with some sea salt, close the bagel with the top and enjoy!

Regardless or which way you choose to take you bagel to the picnic, it’ll be delicious and I hope that you will also find it to be delicious and enjoy it!

Have a wonderful picnic,
Love,
Katie

Kategorie: Diet-Specific, Picnic, spring, Summer, Vegan Stichworte: 20 minutes, avocado, bagel, brunch, delicious, easy, einfach, falafel, gesund, healthy, hummus, hummus recipes, lunch, Neni, NENI am Tisch, picknick, picnic, plant based, quick, schnell, summer, vegan

Nächste Seite »

Footer

What has been happening on my Instagram

Copyright © 2024 Une Petite Cuisinière on the Foodie Pro Theme