• Zur Hauptnavigation springen
  • Skip to main content
  • Zur Fußzeile springen

feel food club

  • Home
  • About me
  • My Recipes
  • Blog
  • Navigation Menu: Social Icons

    • Instagram

Poultry & Meat

Shrimp, Carrot & Aubergine Mushroom Dumplings

März 27, 2020 by katharina.kuehr Kommentar verfassen

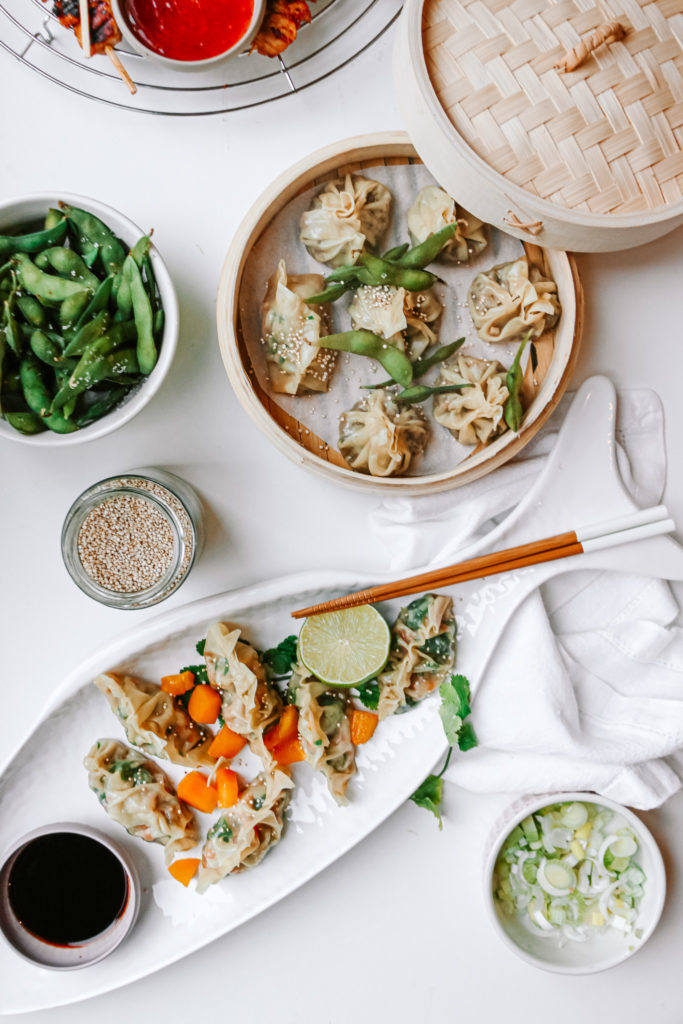
Dumplings are one of my absolutely favourite things to have. I always order them when going out to Chinese or Japanese restaurant but I have never dared to make them at home because I thought it was super complicated to make them. Wrong! They are not complicated at all, just require a little work, which is a lot of fun when doing it with someone else.

I do not know if anyone else loves the mix of textures and flavours or a decently spiced filling and a soft and doughy outer shell as much as I do. The combination always gets me and I believe that it is the perfect comforting and still healthy food. The great thing is that you can switch up the fillings and get so creative. There is nothing you cannot put into those cute, little dumplings.

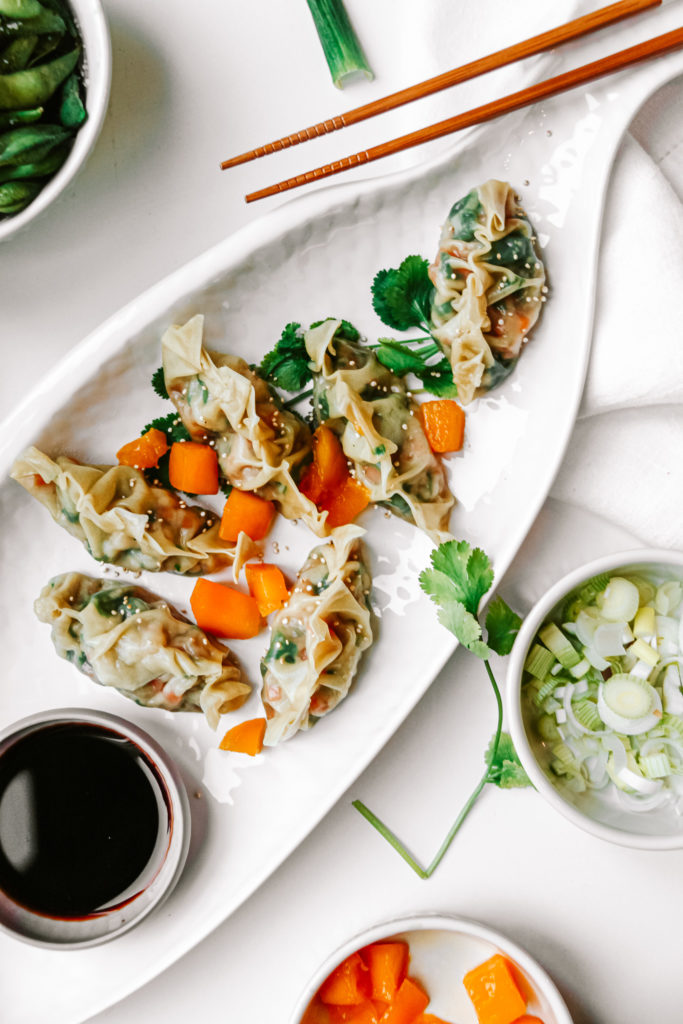
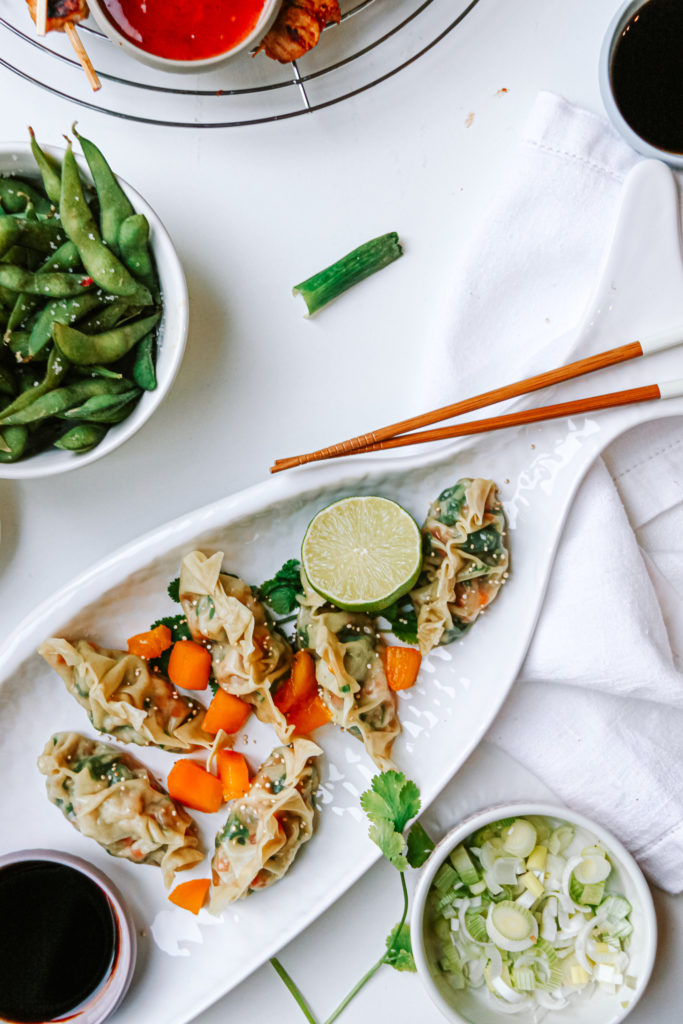
Since everyone has different taste buds, I created 2 versions for this first dumpling blog post. A vegetarian (vegan actually) and one with seafood. They both are incredibly delicious. For the vegetarian I combined some super finely chopped eggplant and some super finally chopped mushrooms. The chopping really takes time but making it that small just changes the taste so much because it almost feels like ground meat, texture wise, and you have both veggies in one bite. This mixture is sautéed just for a minute or so and then tossed with a teriyaki sauce. The sauce really adds a lot of flavour and makes it so addictingly good.

The shrimp dumpling is even easier. I use frozen shrimps simply because they are easiest to get and to store. Before preparing them, they need to be defrosted, which you can either do by taking them out of the freezer a few hours before cooking or if you forgot to do that, you can place them in a bowl with warm water and let them defrost that way. The shrimps are also finely chopped. The other 2 ingredients are carrots, which are peeled and also chopped up really finely and wild garlic. I love to use wild garlic at this time of the year but if you do not have that on hand you can use normal garlic cloves instead. This mixture does not have to be pre cooked, because the shrimps I use are already cooked before frozen. If yours are not you can quickly pan fry them or you just cook them when steaming.

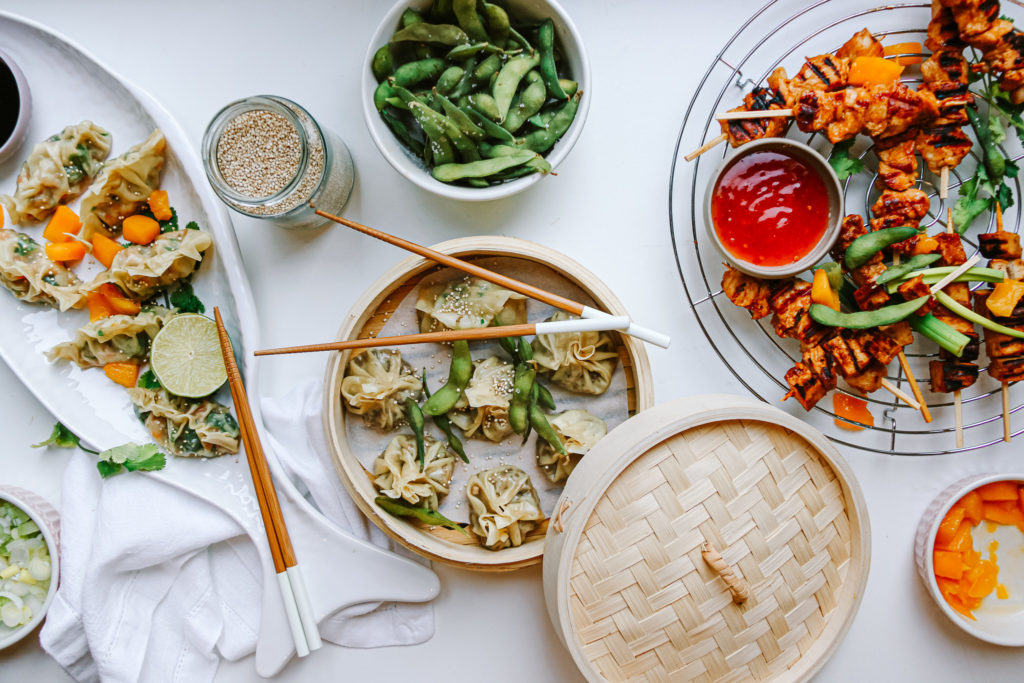
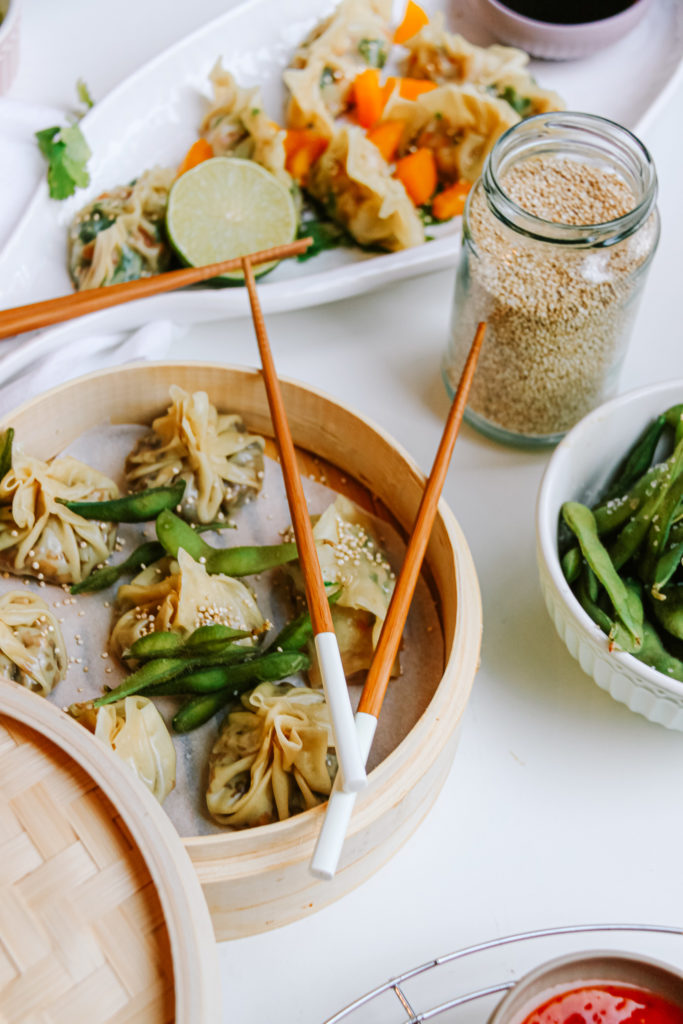
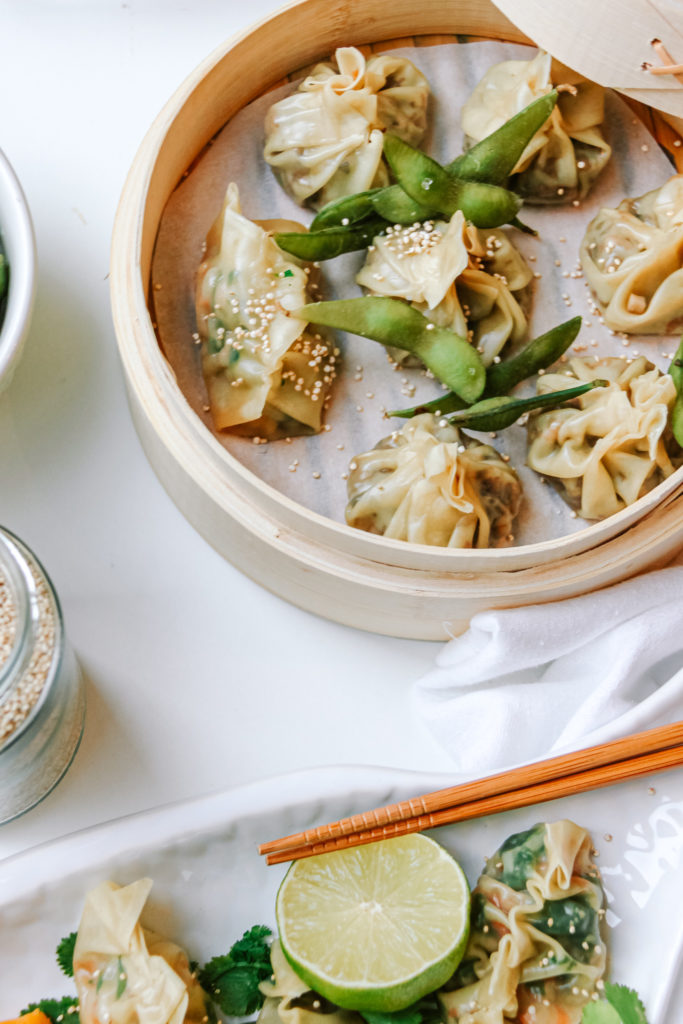
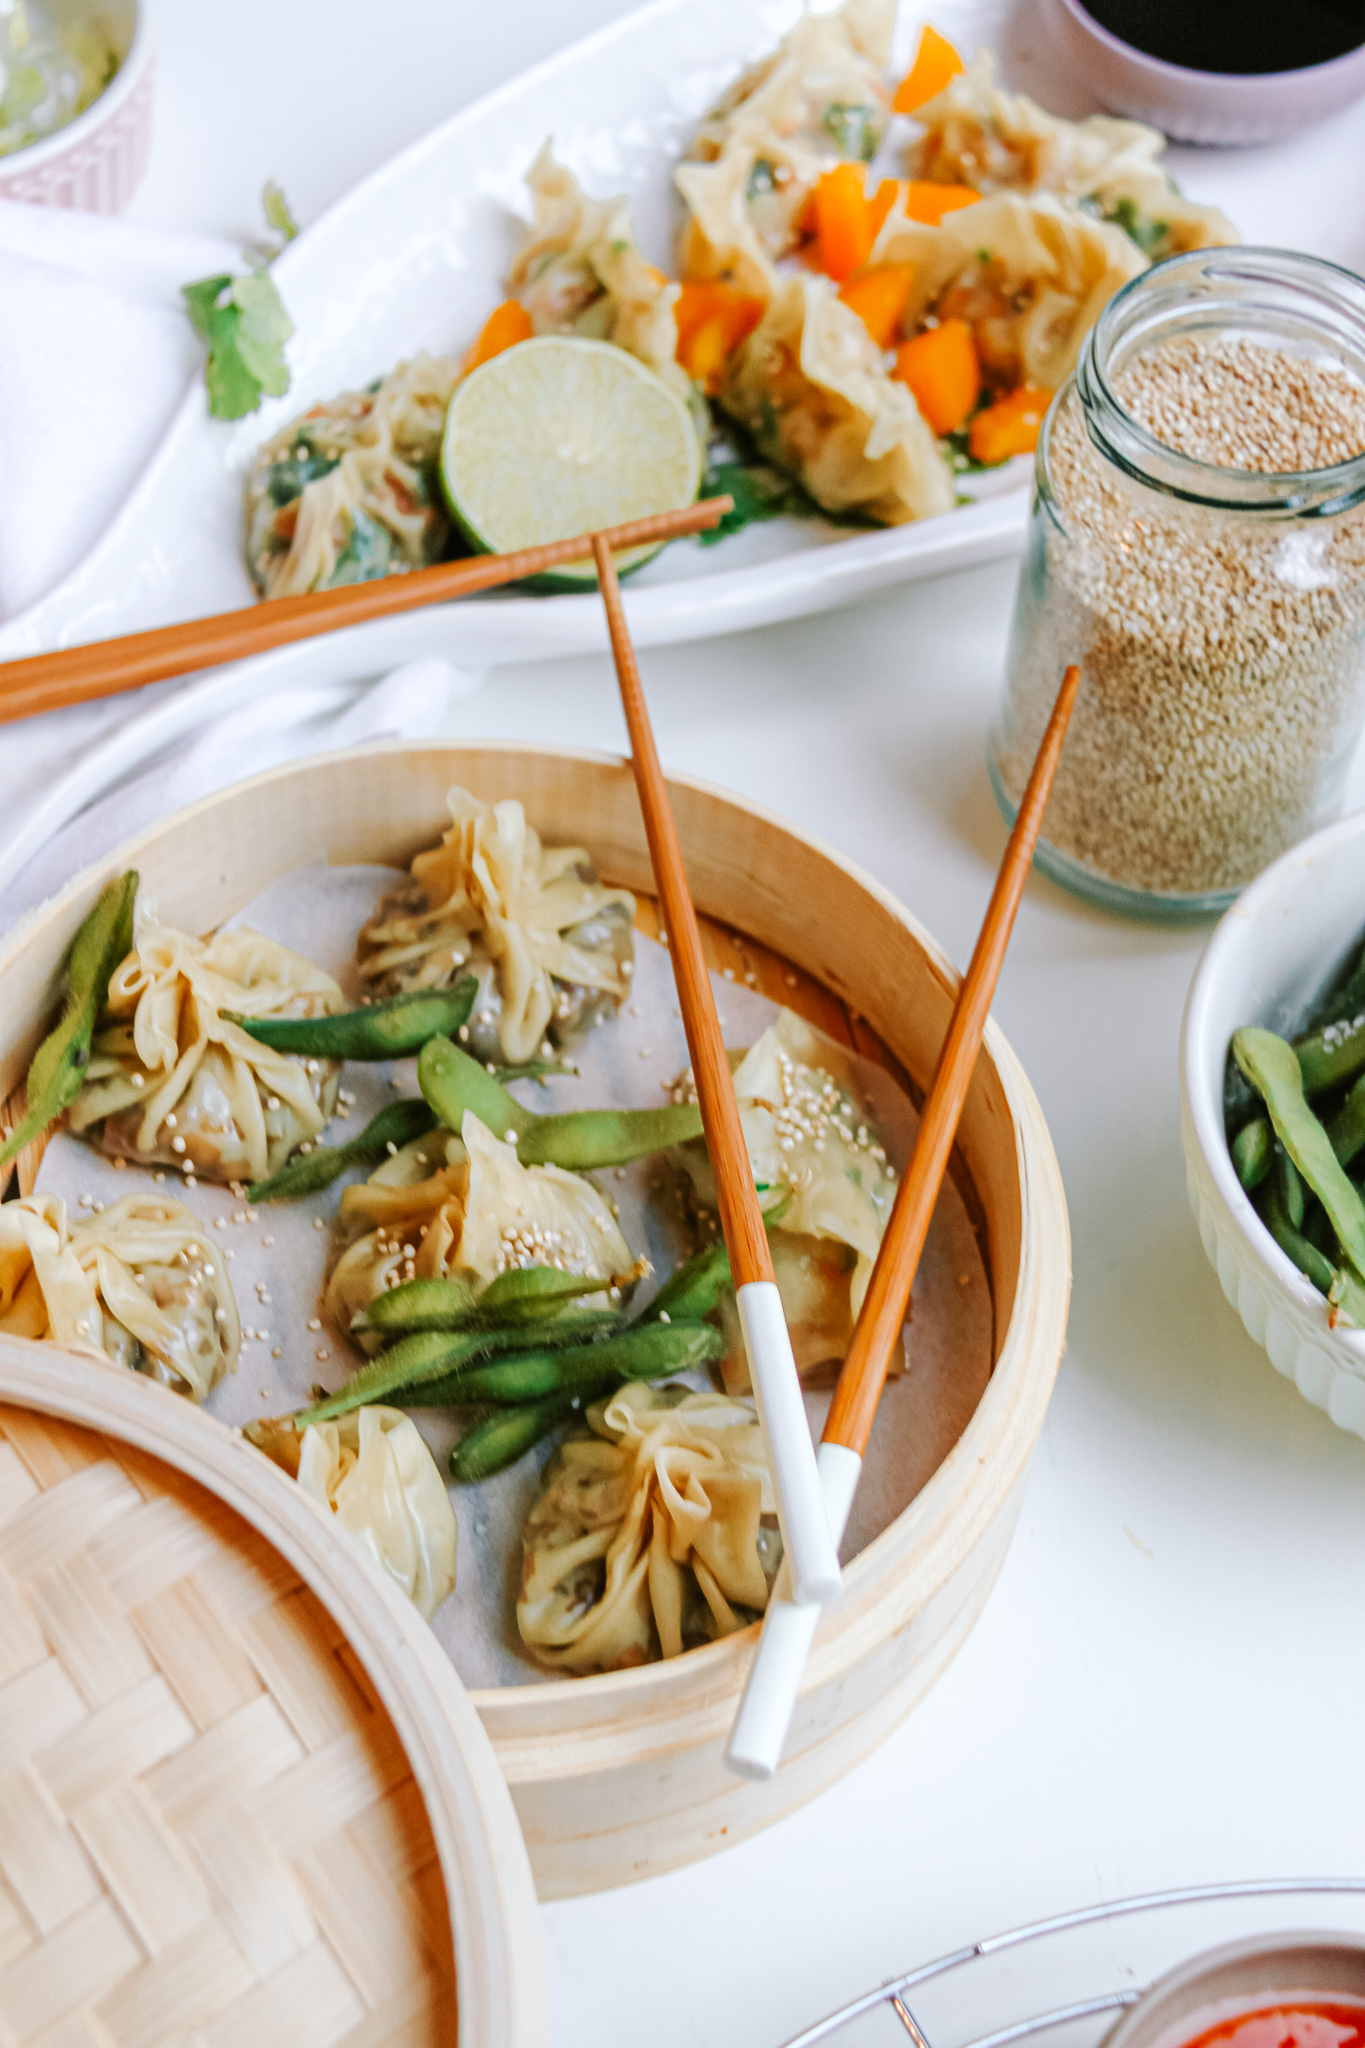
As for the outside dough, in this recipe we are using wonton wrappers. You can get those frozen at any asian market and sometimes even in supermarkets or speciality stores. Those are the same ones you would use for spring rolls. So you can deep fry, pan fry or steam them. Same with those dumplings. I am 100% down for steaming, simply because I believe they taste best and the flavours come out most, but you can also crisp them up in a pan. I would not recommend deep-frying them tough.

Here I decided to close them differently and bring them into diverse shapes but if this is too much work for you, leaving it with one is absolutely fine. The filling and shaping does take some time, because each wrapper is a bite, so it takes a while until you have gotten them all read but it is so worth it.

You can serve them as an appetiser when friends are over, or also if not, or just prepare more and make an asian spread for lunch or dinner (maybe with the satay skewers, which are coming up on the blog next week?). This recipe is totally family approved, not only everyone likes eating them, but the making them together part is. a lot of fun too!

When you serve them, then do so with some soy, teriyaki, chilli or peanut sauce to dip in!

I hope that you will love this recipe as much as I do!

Have fun cooking,

Katie // Une Petite Cuisinière

Print

Shrimp and Carrot Dumplings

Light, easy and super tasty. Crunchy carrot, soft prawns and fresh wild garlic, the result, an absoltue amazing dish!

Course Appetizer, dinner, lunch, Side Dish
Cuisine asian, Chinese
Prep Time 27 Minuten
Cook Time 8 Minuten
Total Time 35 Minuten
Servings 15 dumplings
Calories 48 kcal

What you will need

That is what you need:

  • 15 wonton wrappers
  • 3 carrots
  • 300 g prawns frozen and thawed
  • 1 handful wild garlic
  • 1 tbsp soy sauce
  • some sesame seeds

How to

This is how it works:

  1. Peel the carrot. Slice and cube it into mini chunks, about 2 mm large. The smaller you get them, the better they are. Or, grate them with a grater.

  2. Defrost the prawns and chop them very small too. Take the wild garlic, wash it and also cut this one into small sizes.

  3. Place all of those ingredients in a bowl and mix them together with the soy sauce.

  4. Take one wrapper at a time and place a teaspoon of the filling into the middle. Brush the edges of the wraper with some water and fold two diagonal edges together. Close the dumpling up by pressing the open sides to each other so they close.

  5. If you want to, you can make a small pattern by taking one end of the triangle and folding it towards the other side. The part of the wrapper where the dough has been folded over, now folds over in the same direction. Continue doing this until you have reached the other side of the wrapper.

  6. Repeat that with the remaining wrappers until the filling is used up.

    Bring some water to a boil in a pot. Take a steamer, a bamboo steamer preferably, and place the dumplings in it on top of some parchment paper to prevent them from sticking.

    Steam them for about 5-8 minutes until the dough is soft. Serve them with some sauces like soy sauce, chili sauce or peanut sauce, a sprinkle of sesame seeds and some fresh cilantro.

    Enjoy!

Print

Aubergine and Mushroom Dumplings

A vegan version of the best asian comfort food. Soft and tangy aubergine mushroom mix tossed in soft wrappers. INcredibly good.

Course Appetizer, dinner, lunch, Side Dish
Prep Time 27 Minuten
Cook Time 8 Minuten
Total Time 35 Minuten
Servings 15 wrappers
Calories 39 kcal

What you will need

That is what you need:

  • 15 wonton wrappers
  • 1/2 eggplant
  • 1 tbsp oil
  • 200 g mushrooms you can use champignons or oyster mushrooms
  • 2 tbsp teriyaki sauce can be substituted for 1 tbsp soy sauce and 1 tbsp honey
  • sesame seeds
  • fresh cilantro
  • 1 garlic clove
  • 3 cm ginger

How to

That is how it works:

  1. Finely chop the ginger, garlic, mushrooms and eggplant into about 2mm sized cubes. The smaller the better.

    In a pan heat up the oil. Sautée the veggies for about 2 minutes. Take them off the heat and stir in the teriyaki sauce.

    Take one wrapper at a time and place one teaspoon of the mixture in the middle. Brush all edges with some water. Take the four edges and pull them up to the center and press them together. Take the remaing open sides and also press those together so the dumpling is fully closed.

  2. Repeat that with the remaining wrappers until the filling is used up. 

    Bring some water to a boil in a pot. Take a steamer, a bamboo steamer preferably, and place the dumplings in it on top of some parchment paper to prevent them from sticking.

    Steam them for about 5-8 minutes until the dough is soft. Serve them with some sauces like soy sauce, chili sauce or peanut sauce, a sprinkle of sesame seeds and some fresh cilantro. 

    Enjoy!

Kategorie: Appetizers, Asian, Cuisine, Diet-Specific, Fish & Seafood, Japanese, Lunch/ Dinner, Poultry & Meat, Side, Vegan, Vegetarian, Vegetarian Stichworte: appetiser, asian, asian appetiser, asian food, Carrot, comfort food, dumplings, eggplant, family food, family friendly, family meal, healthy, healthy dumplings, healthy lunch, light lunch, prawns, teriyaki

Italian Meatball Sub

November 27, 2019 by katharina.kuehr Kommentar verfassen

This is the perfect combination of the traditional Italian meatballs and the American sub! Juicy, light and delicious meatballs in a super good tomato sauce paired with crispy baguette and freshly grated Parmesan cheese! Comfort food all the way! 

I have actually never really eaten meatballs before I had gone to the USA the first time! I have been to Italy multiple times before but I have never seen it at least never noticed pasta with meatballs before! They only have pasta with ragù (aka Bolognese Sauce) or Poletti (meatballs) without pasta! So, I ate them the first time when I was in the US because there they are a real thing there and I fell in love! 

I really like the texture and the combination with the tomato sauce. But there is a big difference between American meatballs and Italian ones! The Italian ones are traditionally made with ground veal while the American ones are often made with pork or a mix of pork and beef! I personally prefer the veal ones, because of the flavor but also, they are lighter. The only issue is that veal meat is kind of expensive, so I would recommend using ground turkey or chicken instead for a little less pricey option. 

In my recipe I decided to add an egg and ricotta to the base of the meatballs because ethos makes them super juicy and good! Ricotta is the key for creamy and tangy dishes in the Italian cuisine! It is like an Allrounder you should always have on hand. The egg helps to bind the entire texture and the breadcrumbs help to hold it all together. For seasoning it I would always recommend using fresh herbs over using dried ones because I believe that they have way more flavor! I use parsley and sage but basil would also work great in here. But honestly if you make them, the sage is a MUST! It is sooo good in here, not to top! 

The great thing about this dish is that it comes together in 20 minutes, which makes it the perfect weeknight dinner! Also, it is something that the entire family will love. If not during the week, I love this recipe as a Sunday night dinner. Sunday night is always Italian in our house! What about you? Of course, you can eat pasta with this such as spaghetti or tagliatelle but the fresh baguette adds a good amount of crunch from the outside and it is soo good when the inside is soaked with all the good tomato sauce! 

For the sauce I would recommend using my homemade tomato sauce because it is just sooo good! If you don’t have it on hand or have the time to make it, you can also use any store-bought sauce or canned tomatoes and season them yourself. Also, for the Parmesan in top, I would recommend using freshly grated one and not store bought grated because the flavor is just so different! 

Anyway, for whichever occasion you decide to make this you are going to win the hearts of the people you are cooking for! I hope that you will love it as much as I do. If you recreate it be sure to tag me on Instagram with @uneptcuisiniere or with #unepettecuisiniere and leave a comment here on the blog! 

Enjoy! 

Katie

Print

Italian Meatball Sub

The perfect mix of the Italian Meatballs and American Subs! A great weeknigt dinner and so delicious!

Course dinner, lunch, Main Course
Cuisine American, Italian
Prep Time 10 Minuten
Cook Time 10 Minuten
Total Time 20 Minuten
Servings 4 servings
Calories 586 kcal

What you will need

  • 1 Baguette
  • 600 g ground veal or chicken
  • 1 egg
  • 1 tbsp Ricotta
  • 1 tbsp Parsley
  • 1 tbsp sage
  • 2 tbsp breadcrumbs
  • 2 tbsp Olive Oil
  • 4 servings tomatoe sauce can also use storebought (about 400ml)
  • 30 g Parmesan Cheese
  • 1 smal red onion
  • 2 garlic cloves

How to

That is how it works:

  1. Into a food processer add the onion and garlic or mince finely with a knife. Into a bowl add the ground meat, crack the egg, the ricotta, the finely chopped herbs, salt, pepper, and the breadcrumbs. Combine and knead, best by hand.

    Take an ice cream scoop or a tablespoon in order to size the balls. Roll them in your hand in order to form them and set them aside.

  2. In a pan heat up the olive oil. Once hot add the meatballs and fry on each side for about 1 minute on high heat, then turn down to medium-low heat and let them cook for another 3 minutes. Add in the tomato sauce and let simmer for about 10 minutes.

  3. Take the baguette and cut it into four. Slice each piece in half lenghwise and add the meatballs into the middle. Top with some freshly grated parmesan and serve!

Kategorie: American, Cuisine, Italian, Lunch/ Dinner, Poultry & Meat Stichworte: 20minute, dinner, familydinner, healthy, lunch, meat, meatball, tomato, tomatosauce, turkey, Veal, weeknightdinner

Breakfast Quinoa 2 Ways

November 10, 2019 by katharina.kuehr 1 Kommentar

This recipe is for all of the breakfast lovers out there who want to switch up their usual morning game. With these breakfast quinoa recipes you can add a healthy twist to the absolutely best meal of the day, which, with no doubt is breakfast! If you do not know what breakfast is so important you can go check out my Ultimate Breakfast Tacos Blog Post. 

Ok, I get it, you know how important this meal is but still do not want to spend a lot of time in the mornings cooking your meal because sleep?! Well, no problem! I got you. These recipes are super quick and come together in under 10 minutes in the morning, which is so amazing! This also works great if you are the type of person, which I am, who eats breakfast food for every meal of the day, no matter what time it is, because these meals are perfectly balanced meals with great nutritional value. The contain carbohydrates, protein, fibre, vitamins, and fats. So what do you want more? Delicious, quick, healthy, and super nutritious!

Although I rather am the savory type of person, I know that not all of you are so I decided to make both, a version for the sweet tooth, and one for hearty lovers. And honestly, I could not say, which one I like more. They are both super delicious and can be adapted to whichever season it is if you want. 

The sweet breakfast bowl is made with frozen fruit to sweeten it up and give it flavor, which I love because if you buy frozen fruit you 1) can be sure it is fresh because it is frozen directly after being harvested and 2) it does not vary depending on the season, which means you can have berries in winter, since they have been grown and frozen in summer. The frozen berries are mixed with the pre cooked Quinoa, the sweetener of your choice and the Almond milk when the grain is reheated. This actually is great because you do not have to heat them up separately! 

Once this mixture is heated up it can be transferred into a bowl and topped with whichever toppings are at your preference. Here you can totally decide on what you like most and be creative. I like to top mine with some plant based yoghurt, some fresh fruits such as bananas or other seasonal fruits, nuts and nut butters and some granola for that extra sweetness and crunch. That’s it is what you are thinking? Yes! It is as simple as that. And with such little effort you just created a super delicious and nutritious breakfast. Amazing, no?

The savory option is not much more complicated but you do need one more pan than for the sweet one (but it actually is not necessary). So first you fry up the bacon in a pan to get it nice and crispy. When it is done, you take it out of the pan and lay it out onto a kitchen paper to let any excess fat drip off. The bacon grease that remains in the pan does not have to wasted because we can use this to fry up an egg if you want to. I personally prefer poached eggs over fried ones so I would use the bacon grease if I wanted to add some more sautéed vegetables, but this is optional. 

So if you want to poach an egg you have to bring a small pot with water to a boil. Once it boil, add about 1 – 2 tablespoons of vinegar to it and reduce it until it barely simmers. Crack a room temperatured egg into a small bowl and let it slide into the hot water slowly and carefully. The whites will set around the yolk and the egg can be taken out of the pot after 3-6 minutes depending on how soft you want the yolk to be. Place it on a kitchen paper to let any water that is still on it drain off. Meanwhile reheat the quinoa in a small frying pan with some fat. Here you can use olive oil, butter, or even the bacon fat. When I made this I actually had some truffle butter leftover in the fridge and heated it up in this and it was heavenly. You can also find truffle oil in any supermarket which will totally bring this to the next level for your upcoming Sunday brunch. Once this is reheated you can assemble everything. The quinoa on the bottom, topped with the egg, bacon, some fresh greens, and some sliced up avocado. If you feel like doing it, add some hot sauce on top or sprinkle some grated cheese. This is a perfectly balanced meal which is so decadent and delicious while still being healthy!

I hope that you will really like these recipes and if you do so be sure to show me if you recreate them and tag me with @unptcuisiniere or #unepetitecuisiniere! 

Enjoy!

5 von 1 Bewertung
Print

Sweet breakfast Quinoa (Vegan)

This breakfast recipe is a new way to switch up your breakfast game with adding some more nutrients into your first meal, plus making it super delicious!

Course bowl, Breakfast, brunch, Dessert
Prep Time 4 Minuten
Cook Time 6 Minuten
Total Time 10 Minuten
Servings 2
Calories 310 kcal

What you will need

For the base:

  • 250 g cooked quinoa equals 100g raw
  • 140 g frozen blueberries can be substituted for other frozen fruit
  • 150 ml almond milk
  • 2 tsp cinnamon
  • 1 tbsp agave or sweetener of choice

For the toppings:

  • 3 tsp nut butter
  • 4 tbsp plant based yoghurt
  • some fresh fruit & nuts

How to

That is how it works:

  1. Into a small pot add the pre cooked quinoa, the frozen fruits, almond milk, cinnamon, and sweetener of choice. Bring it to a boil. Once hot transfer it into two bowls.

  2. Add the yoghurt and nut butter and whichever topping you desire. I really love fresh fruit such as banana as well as granola on top!

    Serve and enjoy!

5 von 1 Bewertung
Print

Savoury breakfast Quinoa

This is my savoury twist on the breakfast quinoa recipe. It is perfect for all those who love something hearty in the morning but healthy, plus it comes together in only 10 minutes!

Course Breakfast, brunch, lunch
Prep Time 3 Minuten
Cook Time 7 Minuten
Total Time 10 Minuten
Servings 2 servings
Calories 355 kcal

What you will need

  • 250 g Cooked Quinoa equals 100g raw
  • 2 eggs
  • 1/2 avocado
  • 1 handful greens
  • 4 thin strips of bacon
  • 2 tsp oil

How to

That is how it works:

  1. Heat up the bacon in a pan until crispy on both sides for about 4 minutes.Tka it out of the pan and place it on some kitchen paper so the remaining fat can drip off.

    Meanwhile bring a pot with water to a boil. Once it is at a boil add in the vinegar and reduce the heat so it barely simmers. Crack two room temperature eggs into two seperat bowl and gently slide one after the other into the hot water. allow the first egg to set a little bit before adding the second. Let them simmer in the water for abou 3-6 minutes depending on how soft you want to yolk to be. Then take them out and place them on a kitchen paper so the excess water can drip off.

  2. If this is too much work for you you can also simply fry up an egg or use a soft boiled one.

  3. In the meantime heat up the oil in a pan or simply use the dripped off fat from the bacon. Once hot, add the quinoa into it and stir it around until it is reheated and a little crispy.

  4. Seperate the quinoa onto 2 bowls. Top with the eggs, the bacon strips, the fresh greens, the sliced up avocado and a generous pinch of sea salt. Serve and enjoy!

Kategorie: Breakfast, Desserts, Lunch/ Dinner, Poultry & Meat, Sugar Free, Vegan, Vegetarian, Vegetarian Stichworte: avocado, bacon, berries, berry, blueberry, breakfast, breaky, eggs, healthy, healthy breakfast, healthy-ish, nut, nutbutter, nuts, omnivore, quinoa, rasberry, strawberries, vegan

Harvest Buddha Bowl with Apple Chicken

November 6, 2019 by katharina.kuehr Kommentar verfassen

When the weather is getting cold outside we are very likely to crave some hearty comfort foods! Unfortunately these foods mostly are not the healthiest as there are simply not as many colorful vegetables as in spring for example. BUT there still are some! So there actually is no excuse to eat a healthy, utrient-packed, hearty meal in fall. I know that it is a little harder since there are not too many vegetables in season but still quite some. To make it easier for you, I decided to share a recipe with you for a Fall Harvest Buddha Bowl!

Buddha Bowls are bowls which are made up of several different ingredients, which are cooked, baked, and raw, and a dressing. They are packed with every nutrient group and make a perfect balanced meal. In order for you to experiment a little with creating such bowls, I have a little Buddha Bowl Guide for you here:

1.The base

The base usually consists of some type of carbohydrate. It gives structure, fills you up and provides you with energy. Best is using a cooked whole grain such as

  • Brown Rice
  • Quinoa
  • Bulgur
  • Couscous
  • Buckwheat

If you are low-carb, simply substitute the cooked grain with some greens. 

2. Greens:

The greens here add some color and a bunch of nutrients. Here you are totally free and can use whichever you prefer/ like the most! Depending on what you have chosen, you can either add it raw, cooked, or steamed. For example:

  • Kale
  • Spinach
  • Swiss Chard
  • Lambs lettuce
  • Lettuce

3. Vegetables:

3.1: Baked/ Pan Fried Vegetables: The baked vegetables add some heartiness to the dish, as well as some texture. Simple drizzle them with some oil and spices and pop them into the oven. Here I like to use:

  • Sweet Potato
  • Pumpkin
  • Brussel Sprouts
  • Cauliflower
  • Mushrooms
  • Zucchini
  • Bell Peppers

3.2: Boiled/ Steamed vegetables

For the Boiled/ Steamed vegetables I like to use vegetables of which I prefer the taste when being boiled or steamed. If you do not want to use and extra pot, you can also go ahead and add them to the baking tray or eat them raw. Vegetables that I prefer to steam/ boil are

  • Beets
  • Broccoli 
  • Green Beans
  • Asparagus
  • Corn
  • Peas

3.3: Raw vegetables:

Adding raw vegetables to your Buddha Bowl is important. They add some crunch, and they (mostly) contain more vitamins than heated ones. Plus, they also add some extra crunch and freshness, which works great in combination with the remaining ingredients. The best ones here are:

  • Tomatoes
  • Carrots
  • Celery
  • Cucumber
  • Bell Peppers
  • Radishes

4. Protein

A source of protein is essential when building a Buddha Bowl! It makes the dish a complete meal as it adds nutrients. Also here you can be really creative and add whatever you like! Some options are:

  • Chicken
  • Tofu
  • Prawns
  • Tempeh
  • Edamame
  • Beef
  • Lentils
  • Beans

5. Fruits:

I know, adding fruits into your meal may sound a little bit weird but in this case, it definitely is not. The combination of adding something sweet with the savory is incredibly delicious and fruits also add a great freshness. In most cases it is best to use them raw, but with some fruits it works if they have been cooked too (I cooked my apples with the chicken, and this tasted really good too!). Here you can use

  • Grapes
  • Apples
  • Berries
  • Mango
  • Pomegranate Seeds
  • Stone fruits
  • Literally, everything available

6. Dressing

The dressing is maybe the most important ingredient of the dish because it packs everything together and combines the flavors. It coats the entire dish, which means that if you dressing doesn’t take amazing, your entire dish will be rather bad. Here you can use your favorite salad dressing or get a little more creative. If you want something thicker, to dip your bowl-ingredients into, that works great too! Examples are..

  • Balsamic Vinaigrette
  • Hummus
  • Mashed Avocado
  • Tahini Sauce
  • Yoghurt Dressing

7. Topping:

This is the last, but definitely not least ingredient in this dish. Here you have the last option to add some healthy fats and crunch. I like to top this with some nuts or some chopped up vegetables like

  • Walnuts
  • Spring onions
  • Coconut chips
  • Sunflower seeds
  • Pepitas
  • Nori

For this bowl I used one or two ingredients from every group. I used Bulgur (Carbohydrate), Kale (as a green), Sweet Potato (as a roasted vegetable), mushrooms (sautéed vegetables), beetroot (steamed vegetable), Carrots (raw vegetable), chicken (protein), Grapes & apple (fruits), Dijon-Tahini-Sauce (dressing), and walnuts (topping). 

This together makes an awesome combination off several super delicious and nutritios fall ingredients into one bowl. The flavors work really great together. If you tend to ave prepared some of those ingredients ahead of time and store them in the fridge, which a lot of people have, then this bowl comes together really quick. This meal is a great way to enjoy all the fall ingredients, I hope you like it!

If you decide to recreate this recipe, share it with me on intsagram with @uneptcuisiniere or #unepetitecuisiniere and be sure to leave a comment, thank would mean a lot to me!

Enjoy!

Print

Fall Harvest Buddha Bowl

A delicious meal that packs all the delicious fall ingredients. A perfectly balanced meal with all the food groups. Super delicious and comforting!

Course bowl, dinner, lunch, Main Course, Salad
Servings 2 bowls
Calories 586 kcal

What you will need

For the Chicken

  • 150 g Chicken
  • 0.5 tbsp Oil
  • 1/2 apple
  • 100 ml white wine
  • 2 tbsp apple sauce
  • 100 ml water

For the remaining bowl:

  • 60 g Bulgur
  • 150 g Sweet Potato about 1/2
  • 1/2 tsp cinnamon
  • 1/2 tsp paprika powder
  • 100 g mushrooms
  • 1 cooked beetroot
  • 1 carrot
  • 2 handful kale
  • 1 tbsp lemon juice
  • 1 tbsp Oil
  • a few seedless grapes
  • 10 g walnuts

For the dressing:

  • 1 tbsp Tahin
  • 2 tbsp orange juice
  • 1 tbsp white wine vinegar
  • 2 tsp Dijon Mustard
  • 1 tsp Honey

How to

Thats how it works:

  1. Preheat the oven to 180C. Cut the sweet potatoes into 1cm sized chunks. Coat them with the tbsp of oil, the paprika powder, and the cinnamon. Place it on a baking tray and bake it for 10 minutes. Take it out, add the mushrooms, stir it all around and bake it for another 15 minutes.

  2. Meanwhile prepare the bulgur according to the package instructions.

  3. In a pan heat up the oil for the chicken. Chop the apple into small cubes. Once hot, add the apple into it and sautee it for 2 minutes. If using one chicken breast cut it in half, so it is thinner and will cook faster. Add the chicken breast to the apple and fry it on both sides for about one minute. Add the wine, apple sauce and water and let it simmer for 8-10 minutes.

  4. Massage the kale with the lemon juice and set aside. Grate the carrots and slice up the beetroots. Half the grapes and chop up the walnuts.

  5. For the dressing add all the ingredients into a food prosessor and blend until smooth. If too thick, add some more water.

  6. By now the sweet potato and bulgur should be done too and it is time to assemble.

  7. Seperate the ingredients onto two bowls. Drizzle the dressing over everything, serve & enjoy!

Kategorie: Fall, Fish & Seafood, Lunch/ Dinner, Poultry & Meat, Season, Vegetarian Stichworte: Apple, appleseason, beetroot, bowl, bowlfood, buddha, buddhabowl, bulgur, chicken, fall, fallfood, grapes, healthy, healthy bowl, healthyfall, kale, nourrishbowl, nourrishing, nuts, Sweet potato

« Vorherige Seite
Nächste Seite »

Footer

What has been happening on my Instagram

Copyright © 2024 Une Petite Cuisinière on the Foodie Pro Theme