• Zur Hauptnavigation springen
  • Skip to main content
  • Zur Fußzeile springen

feel food club

  • Home
  • About me
  • My Recipes
  • Blog
  • Navigation Menu: Social Icons

    • Instagram

Snack

Double Blueberry Breakfast Parfaits with Easy 10-minute stove-top Granola

September 24, 2020 by katharina.kuehr 1 Kommentar

In the mornings it has to be quick. But still delicious, nourishing and filling. A lot of criteria to fit. A challenge, but not impossible. Double Blueberry Breakfast Parfaits with 10-minute Stove Top Granola is one of the best things you could have in the morning. Prepare the night before, enjoy in the morning. Literally, just take it out of the fridge, and there you go!

What’s special about this recipe?

The combination of the textures and flavours from the jelly-like chia pudding, the softened blueberries, the creamy yoghurt and the crispy granola. Not only the different textures work in great harmony together but also the flavours are amazing in combination.

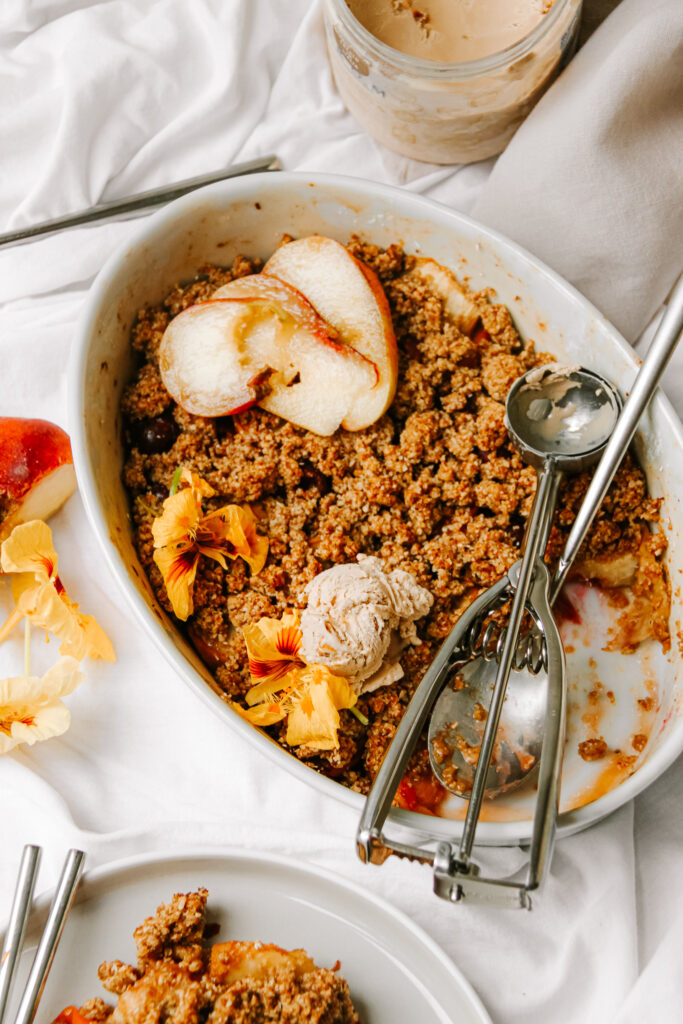
Also we are not using your regular granola from the oven but a really simple one, that is made on the stove top. Ready in 10 minutes, super crispy, super delicious.

What are parfaits and what’s in it?

Parfaits are a dessert/ snack or breakfast that is usually served in a glass or a jar. Depending on the meal you have it for it usually is yoghurt or a dessert cream paired with fruits and layered up in a jar. The different layers make it more fun to eat and combines the flavours perfectly.

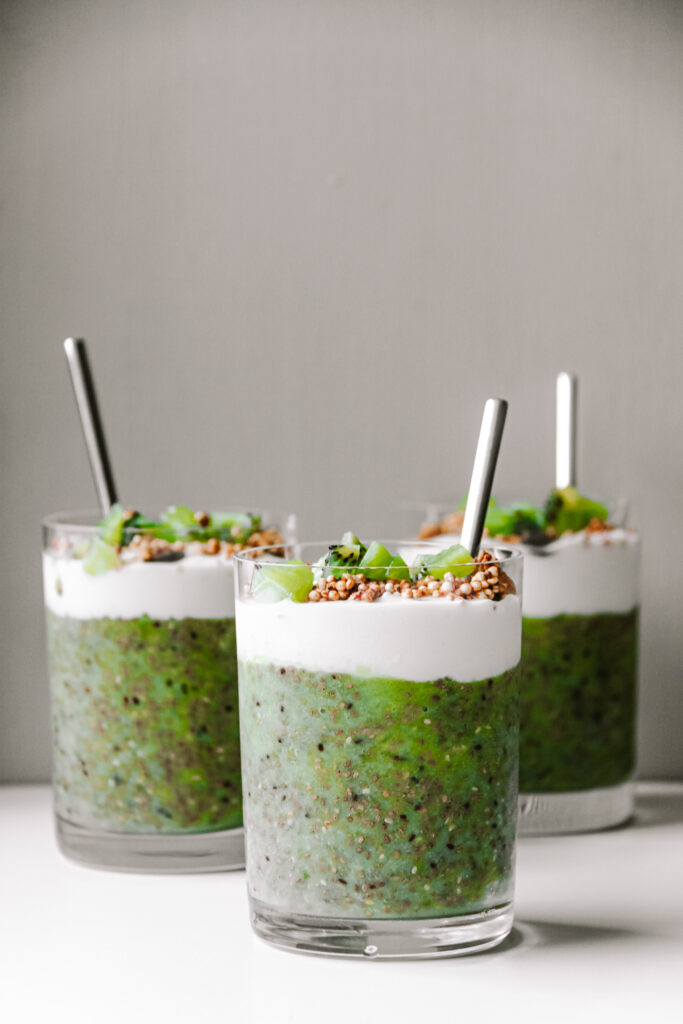
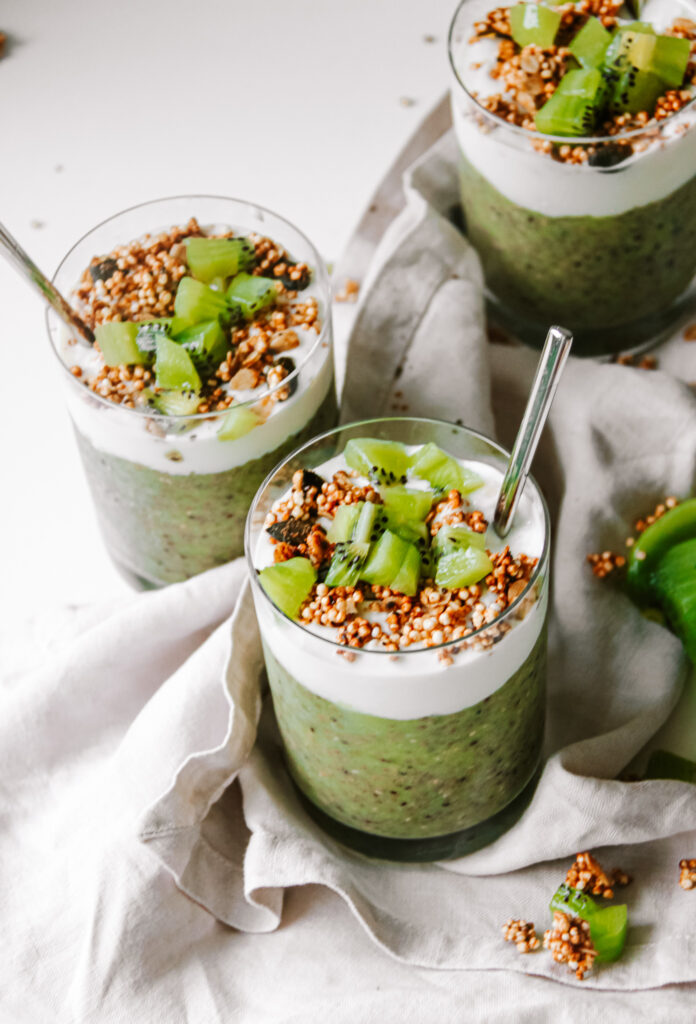
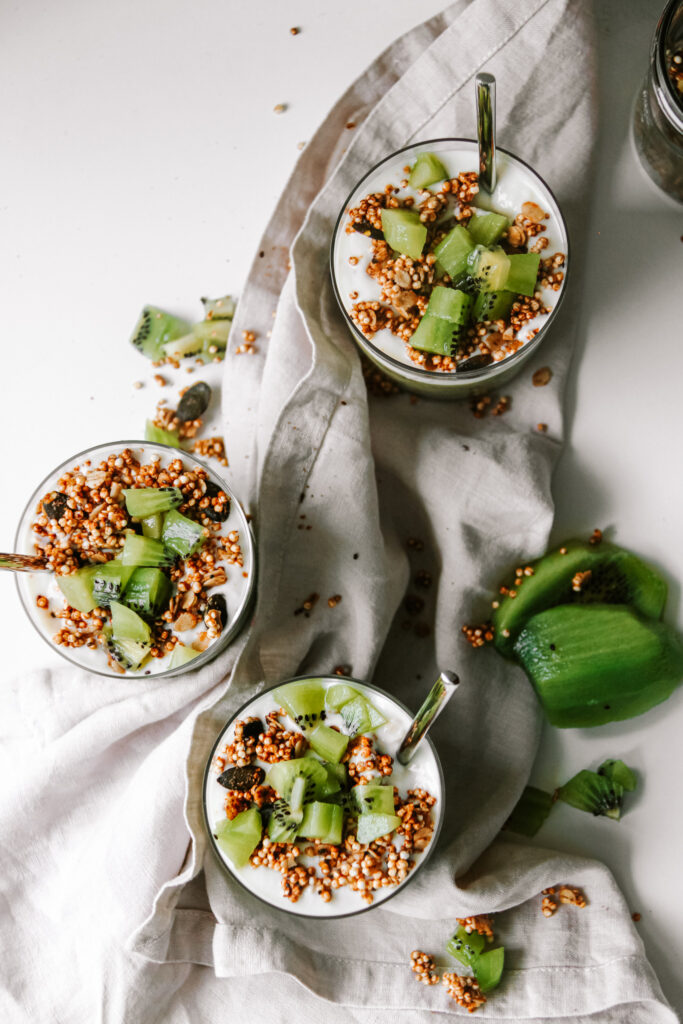
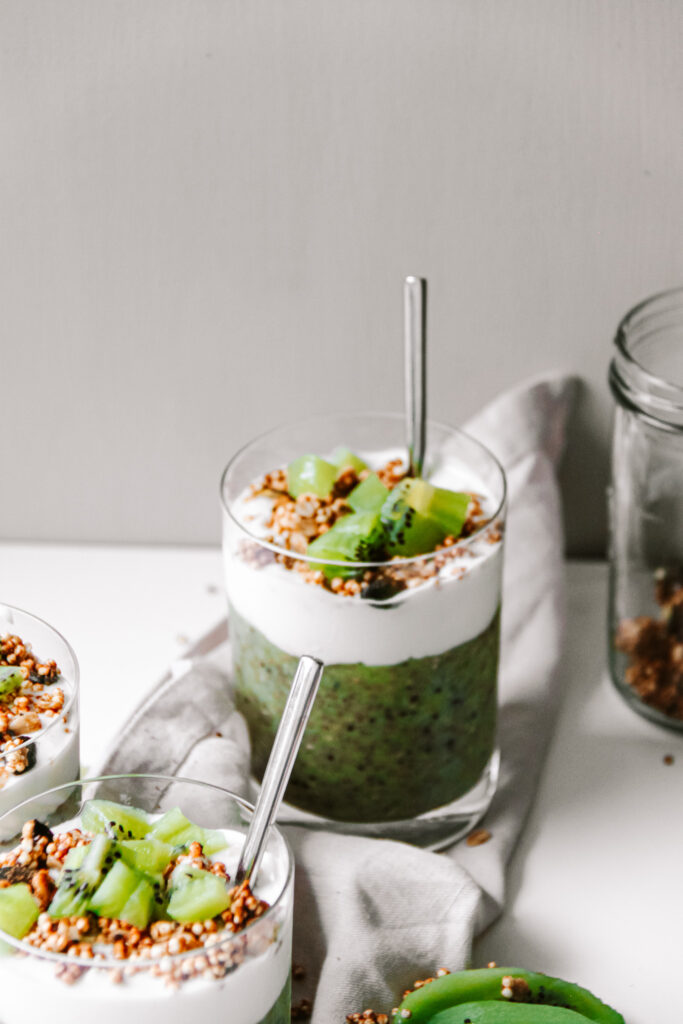
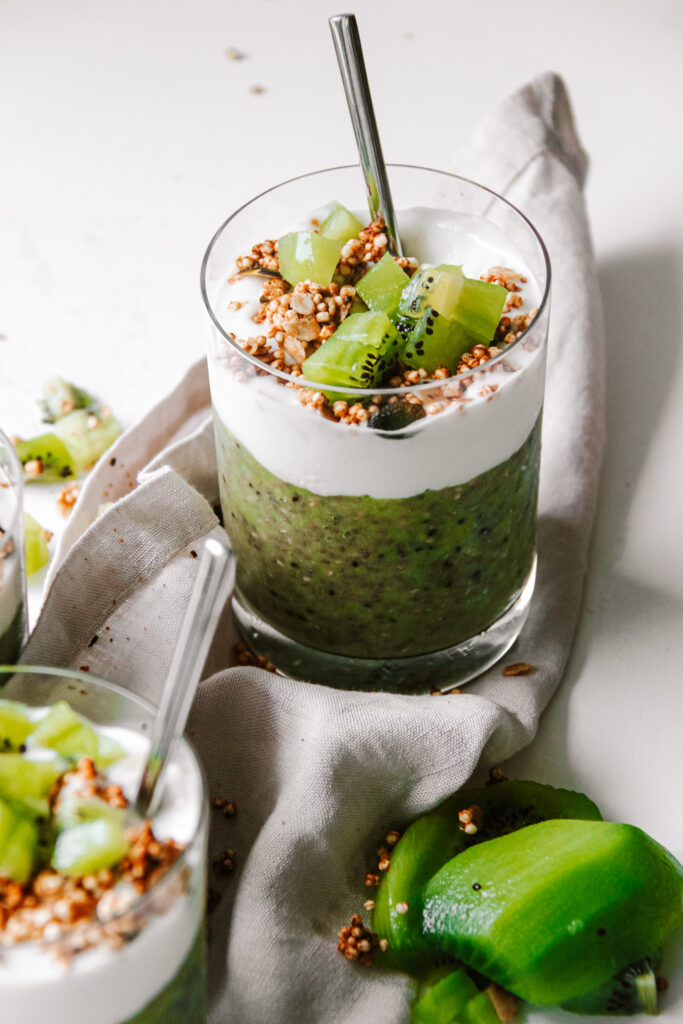
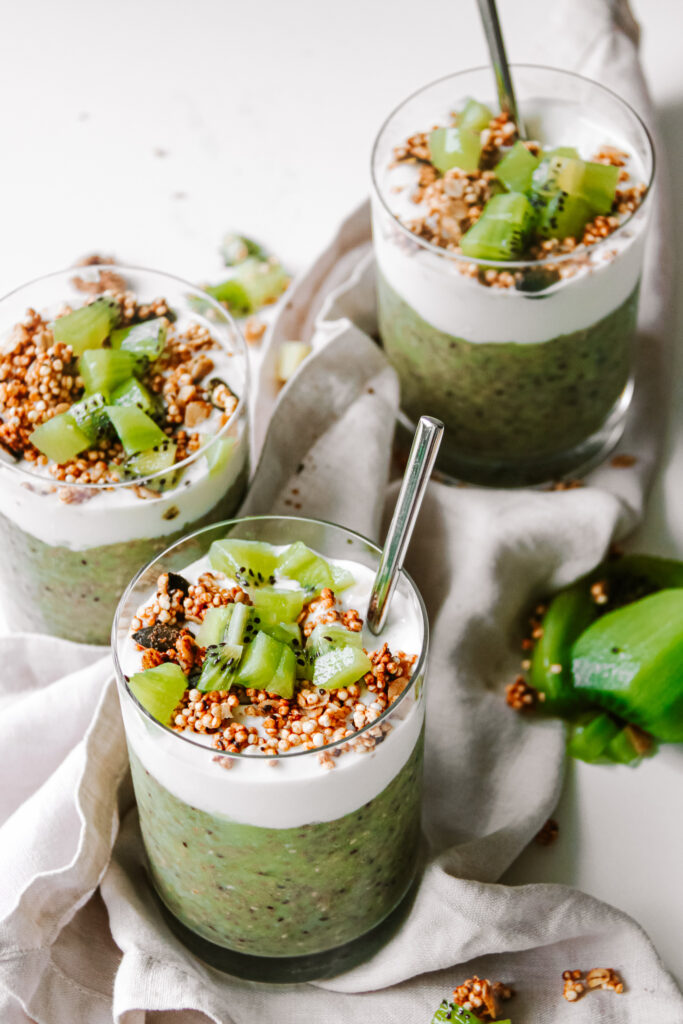
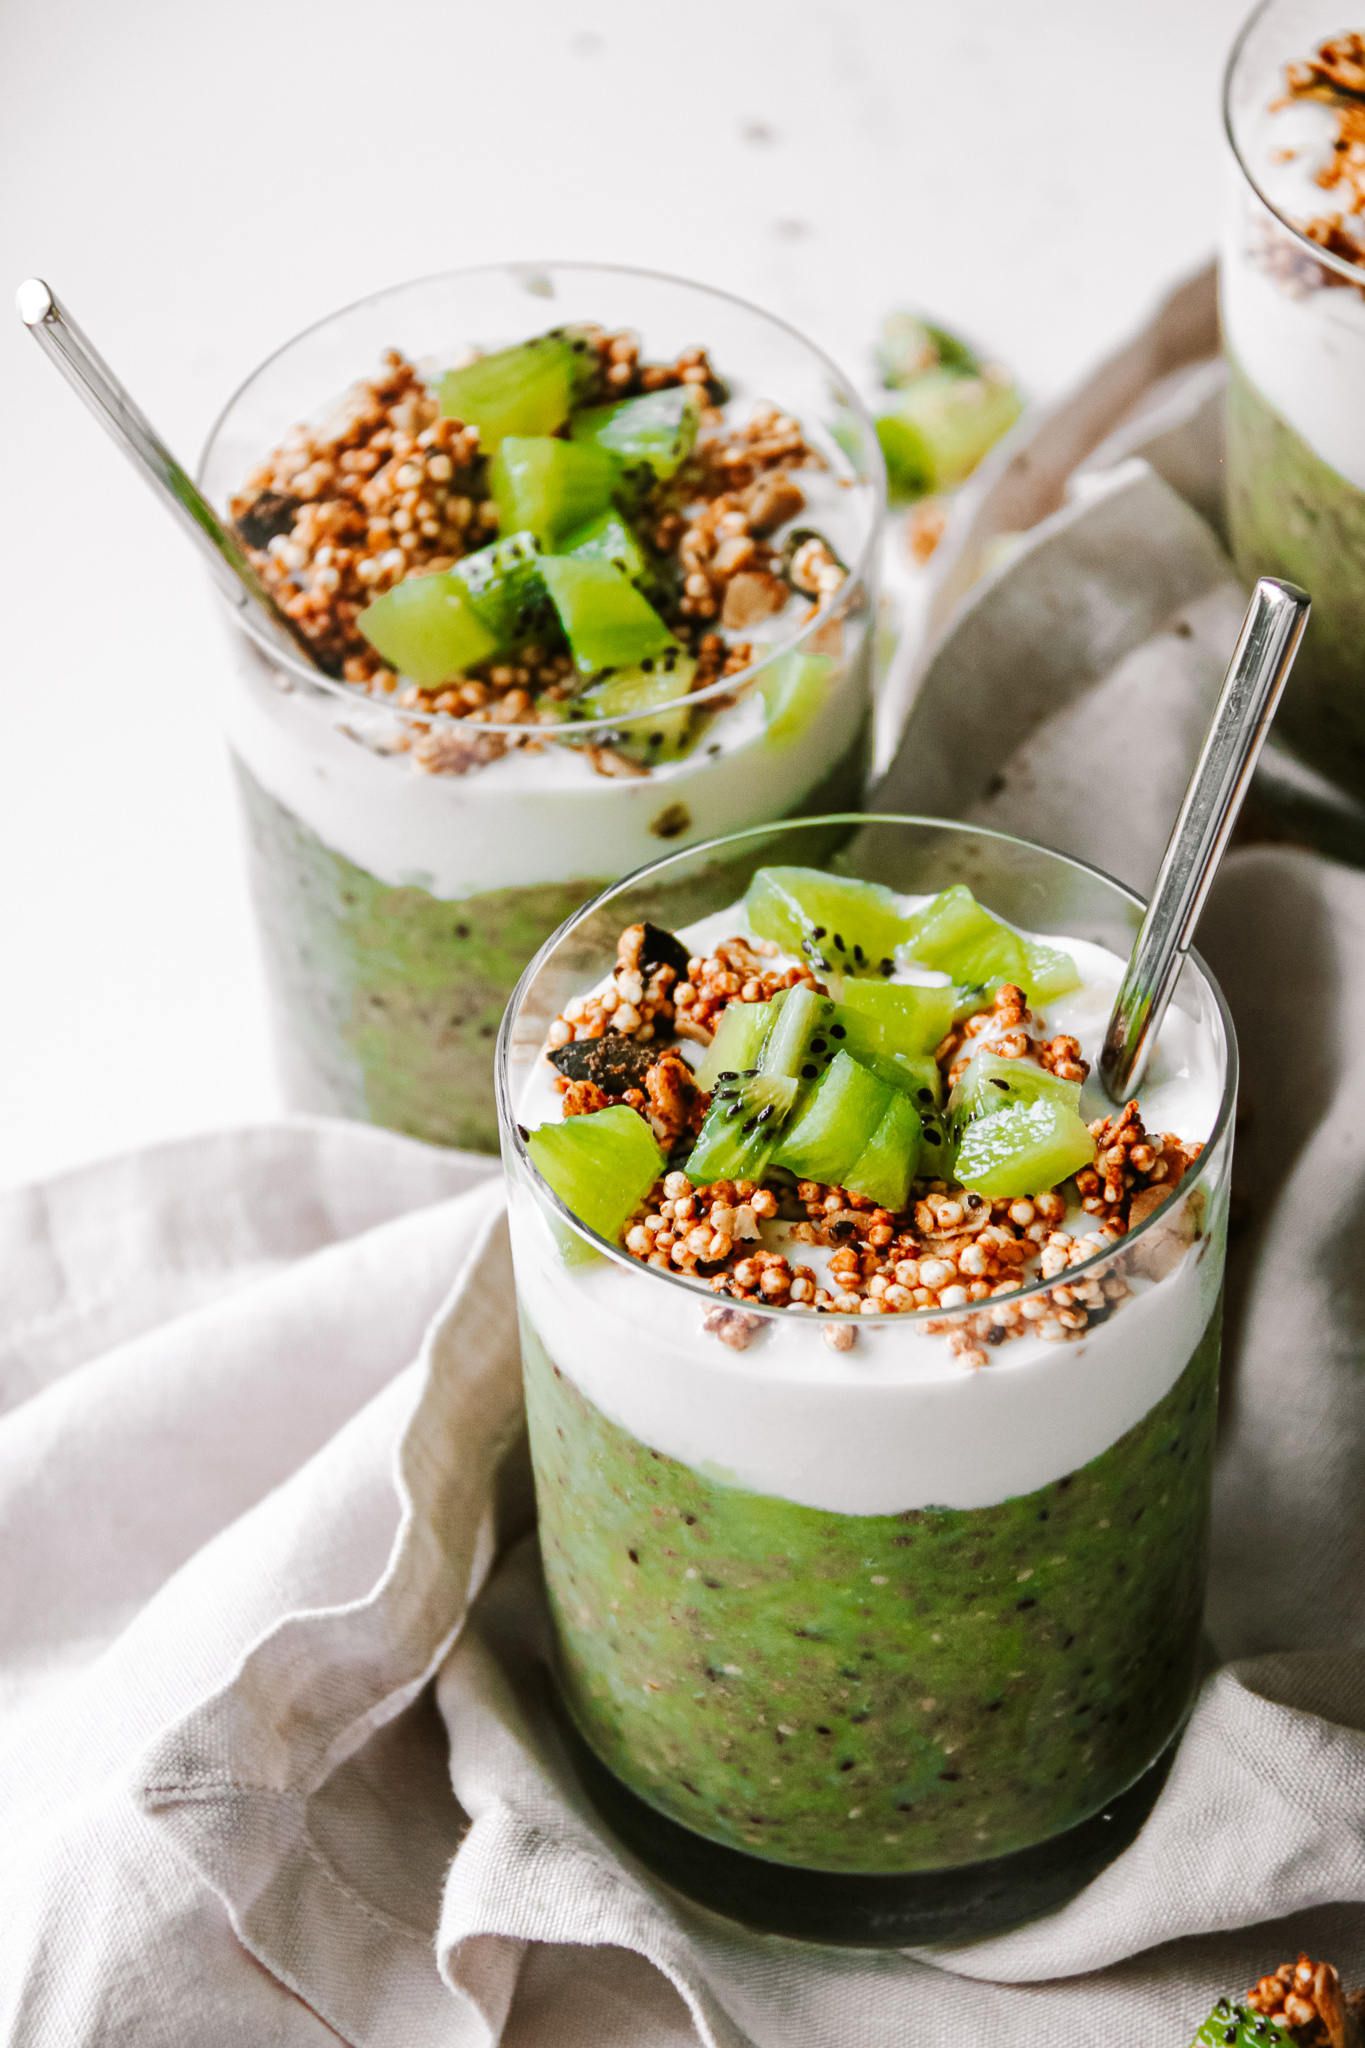
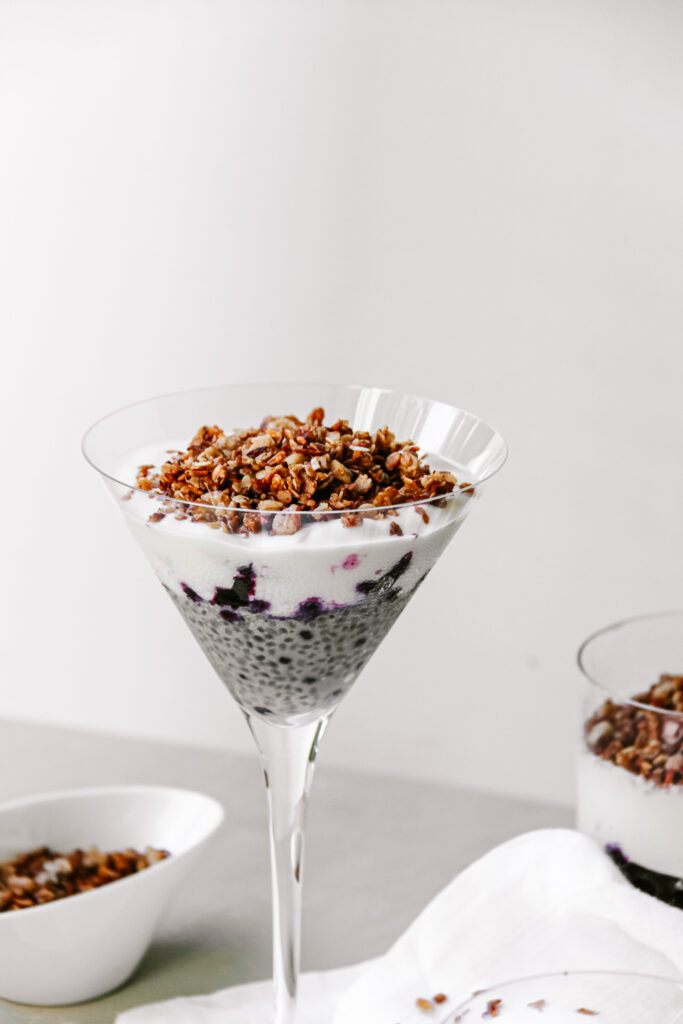
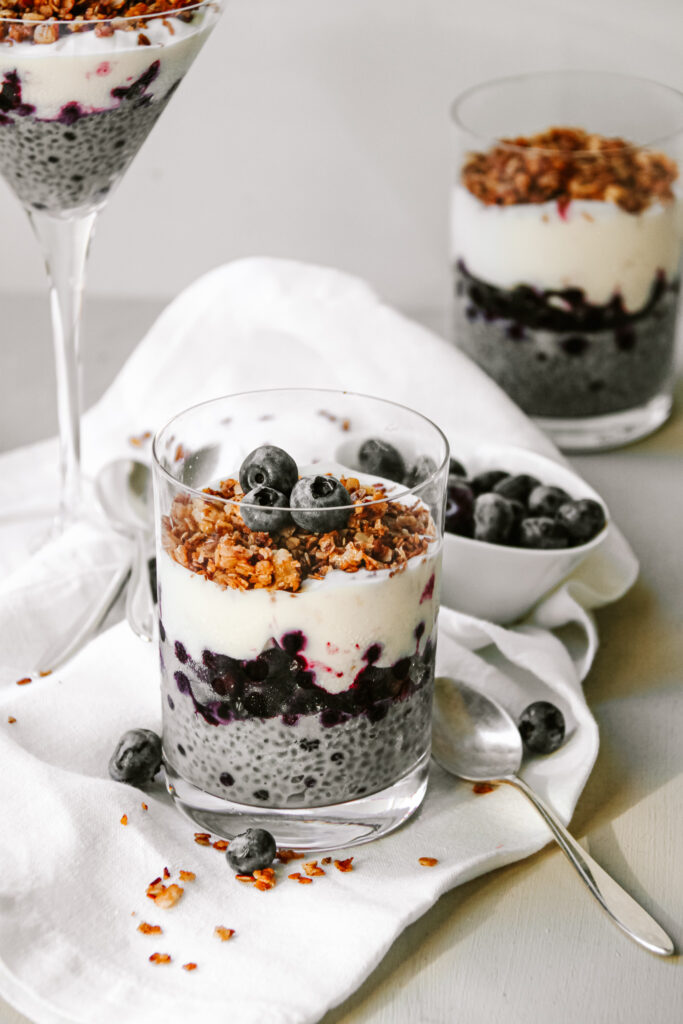
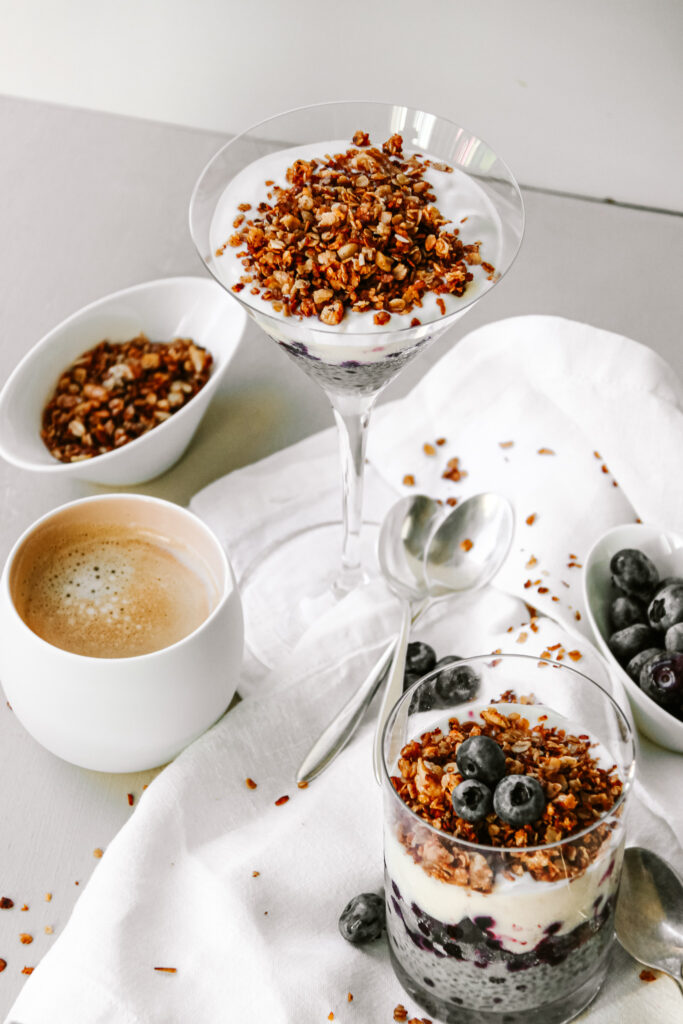
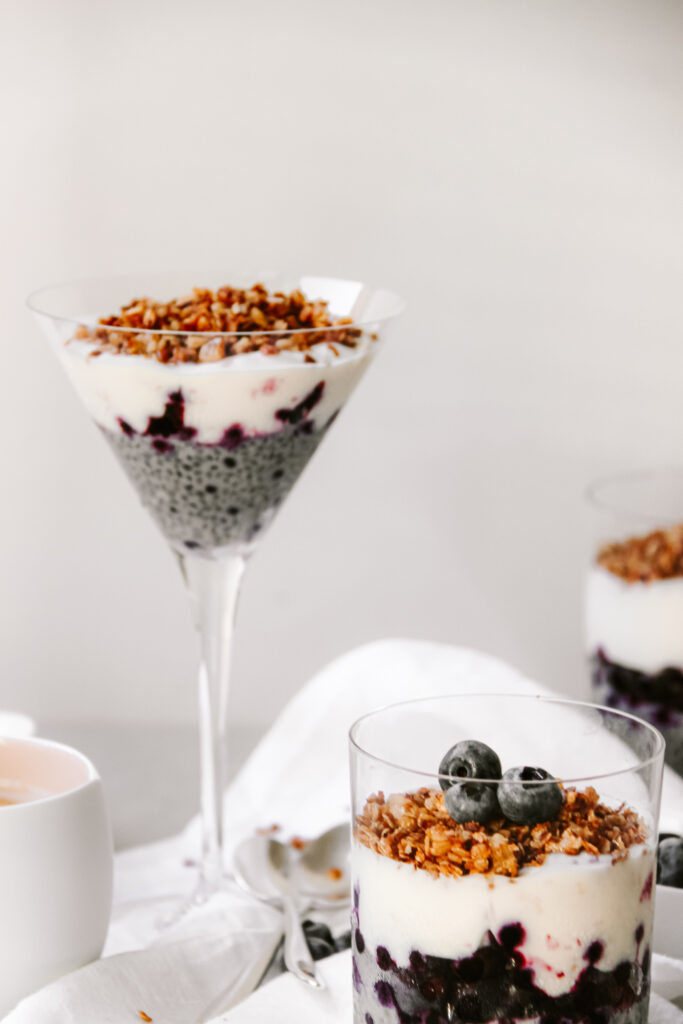
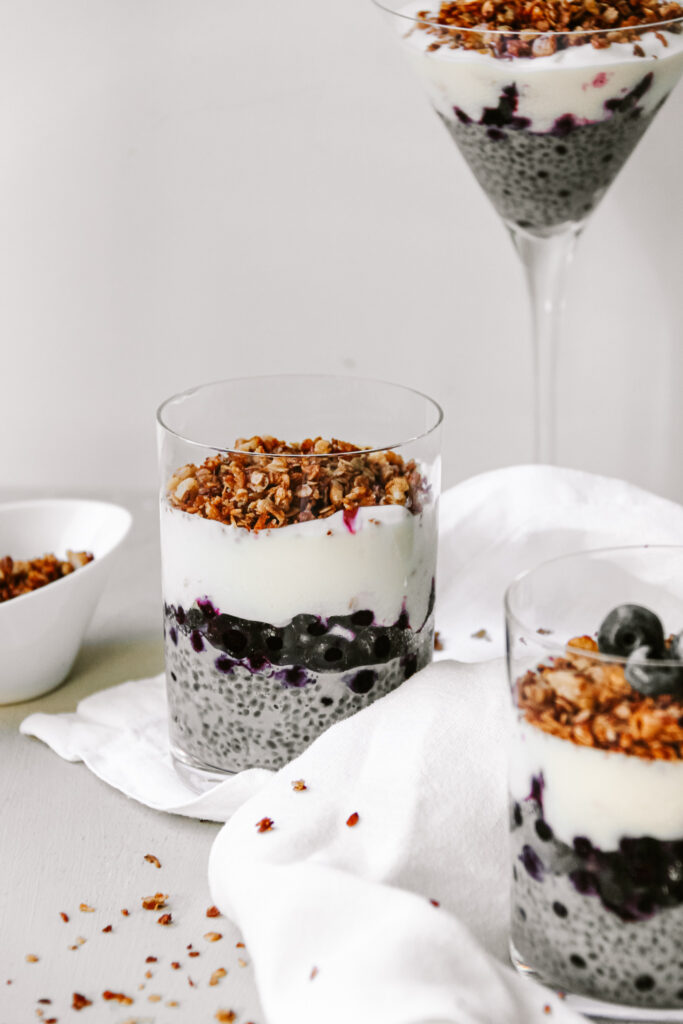
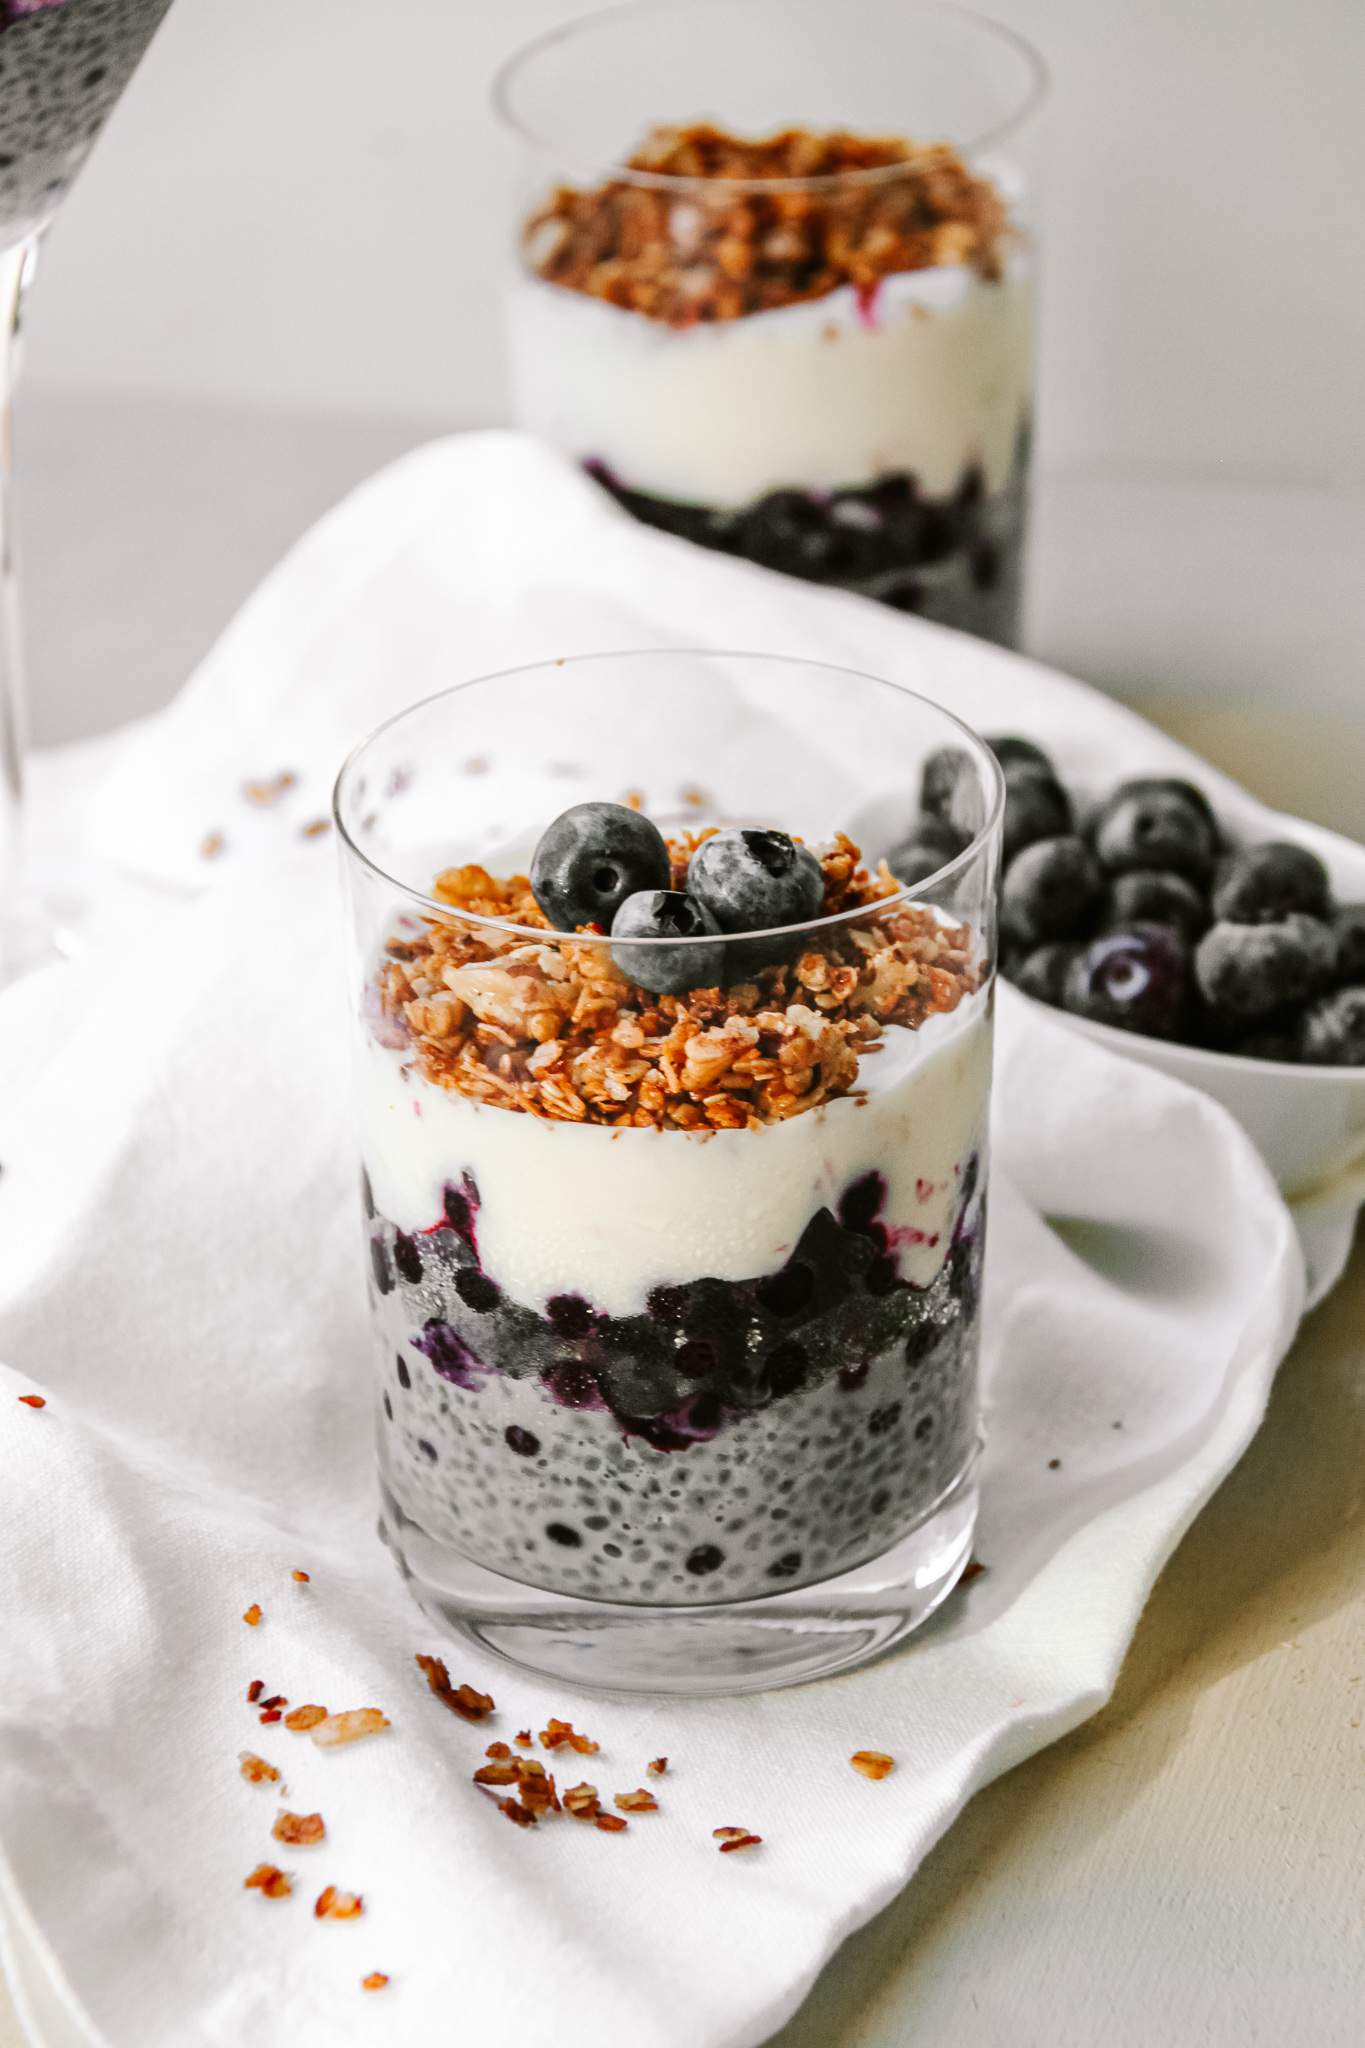
In our breakfast parfait we are having 3 different layers. The first one is a blueberry chia pudding. A creamy combination of blueberries, chia seeds and plant based milk. The second layer are blueberries. I believe frozen blueberries that have been thawed work best, because they add a bunch of flavour with their juice that is all over the jar now. Our third layer is just a delicious layer of plant based yoghurt (oat is my favourite) and our fourth and top layer is the crispy pan-fried granola!

Are they healthy?

Yes, yes and yes! Loaded with nutrients! So, let’s take it one at a time. The chia pudding is a great way to already have a super nutritious breakfast! Chia Seeds are loaded with fibre, protein and Omega-3 fats. Plus a bunch of minerals! The fibre really supports your digestive system and will keep you full for longer.

The blueberries, too, are loaded with fibre and vitamins, as any fruit is. The plant based yoghurt usually has a healthy amount of carbs and most also have probiotics in them too. And the granola, adds a great mix of carbs from the oats, fats from the almonds and some delicious sweetness (and even some nutrients) from the honey. All in all a very balanced breakfast with a combination of all food groups.

When and how to have it & meal prep friendly?

It is best to prepare everything the night before. So you make the chia pudding and layer the parfaits and make the granola ahead of time. Keep the jars in the fridge overnight and store the granola extra in an air-tight container outside of the fridge. In the morning just grab the jars, top with the granola and enjoy! You could also have this as a delicious snack or dessert. And as said, it works great for meal prep!

I hope that will add a fun twist to your breakfast and that you will have them over and over again (just as I do)! A delicious way to make your mornings a bit more nutritious!

Print

Double Blueberry Breakfast Parfaits with 10minute stove top granola

Easy, nutritious, delicious. We all need a delicous & quick healthy breakfast that'll fill us up and keeps us full! This is the most delicious solution!

Course Breakfast, brunch, Dessert, Snack
Prep Time 15 Minuten
Chilling time: 4 Stunden
Total Time 4 Stunden 15 Minuten
Servings 3 servings
Calories 298 kcal

What you will need

For the Chia Layer

  • 30 g chia seeds
  • 150 ml (plant based) milk
  • 100 g frozen blueberries
  • 1 tbsp honey

For the other layers:

  • 300 g (plant based) yoghurt
  • 200 g frozen blueberries
  • some fresh blueberries for garnish

For the super quick granola:

  • 1 tbsp vegan butter or oil
  • 1 tbsp honey
  • 3 tbsp rolled oats
  • 2 tbsp walnuts chopped up roughly
  • 1 tbsp coconut flakes
  • 1/4 tsp cinnamon
  • a sprinkle of sea salt

How to

  1. Mix all of the ingredients for the chia pudding and let sit in the fridge for 4 hours to overnight.

  2. Layer the jars with the chia pudding, on top the thawed frozen blueberries and on top the yoghurt.

  3. For the granola melt the vegan butter and honey in a pan until it is hot and starts to bubble. Add the chopped nuts, oats, coconut flakes, cinnamon and coconut shreds and keep on medium high heat for about 5 minutes, stirring constantly. When golden brown, take off the heat and add it to a bowl. Let it cool (the cooling will make it crispy). Once cooled add on top of the parfaits along with some blueberries! Serve and enjoy!

Happy Cooking,
Enjoy,
Katie // Une Petite Cuisinière

Kategorie: Breakfast, Desserts, Diet-Specific, Snack, Vegan, Vegetarian Stichworte: 10 minutes, blueberries, breakfast, breakfast parfaits, chia parfaits, chia pudding, easy, granola, healthy, healthy breakfast, healthy parfaits, meal prep, quick, stove top granola, vegan, vegan breakfast

Unbelievably Good Vegan Half-baked Cheesecake with secret ingredient (healthy)

September 14, 2020 by katharina.kuehr Kommentar verfassen

You‘ll be like .. cheesecake – vegan?? Seriously? Well, obviously it’s not cheese but really, it is at least as good! The consistency is absolutely amazing (identical to cheesecake) the ingredients are super nutritious, and the flavor is just 100% convincing! I promise!! 

Why vegan?

We probably all have a recipe for a delicious non-vegan cheesecake. So why not switching things up? And honestly, I love a nice challenge. Plus my bestie currently is vegan so I needed to get creative with coming up with a dessert recipe for her! (I already have 2 on my blog, bit we needed something new! Find the banana bread recipe here and the black bean brownies recipe here )

What is special about this dish? 

VEGAN CHEESECAKE! Isn’t that special itself? And then that the ingredients are really wholesome and nutrient dense too!! And of course our special ingredient: silken tofu!! No, it won’t taste like tofu in the end, and yes it works really well. 

Why using silken tofu in a dessert recipe?

Silken Tofu is a super soft tofu, almost a yoghurt consistency. This is great for creams, pudding or as here cheesecake but in vegan. It also has a very mild flavor and when blending it becomes really smooth. When baking, it helps to keep everything stick together while remaining that cheesecake consistency!  

How to make vegan cheesecake:

Here we have two different things to make because we have 2 different layers. The first layer is the crust. Here we do not do a regular cookie layer but more like a baked energy ball one and it‘s heaven. Basically it comes down to blending up oats, almonds and dates and that’s it! 

For the actual „cheesecake“ layer it is really not more difficult! You just need to add soaked cashews, silken tofu, maple syrup, oil, fig preserves and cornstarch to a blender and blend until it is creamy and smooth! If you have a high speed blender you do not essentially need to soak the cashews but if it doesn‘t have too much power, I would recommend soaking them!

When the first layer is done you need to press it into a cake pan and then pour over the blended „cheesecake“ filling. To finish off just top with sliced up figs and bake in the oven! That’s it!

A few notes on the recipe:

After taking it out of the oven, the consistency of the cake will be rather creamy. When you let it sit for a little while it will get firmer! Store in the fridge. About 20 minutes before eating take it out of the fridge. That way it will taste better! 

I hope you really like this recipe and that you‘ll love this little twist to your average cheesecake! 

Print

Healthy Vegan Half Baked Cheesecake with Silken Tofu

A delicious and healthy twsit onto your regular cheesecake. The silken tofu makes the consistency amazing and it tastes incredible too!

Course brunch, Dessert, Snack
Prep Time 15 Minuten
Cook Time 45 Minuten
Total Time 1 Stunde
Servings 8 slices
Calories 293 kcal

What you will need

For the base:

  • 100 g rolled oats
  • 30 g almonds
  • 200 g dates
  • a pinch of sea salt

For the "cheesecake" filling

  • 250 g silken tofu
  • 40 g cashews soaked overnight
  • 100 g coconut cream (just the firm part of the coconut milk! This is best seperated when putting the can in the fridge for about 2 hours)
  • 100 g maple syrup
  • 2 tbsp oil
  • 1 tbsp fig preserves
  • 2 tbsp cornstarch
  • 4-5 figs sliced up

How to

  1. Preheat the oven to 180°C.

    To a food processor add all of the ingredients for the base and blend until it forms a sticky paste. When too dry, add more dates or some oil, when too sticky, add more oats.

  2. Line a 20x20cm cake pan (or a springform pan) with parchment paper. Add the blended mixture and press to the bottom so it forms a flat layer.

  3. Into the food processor now add the ingredients for the "cheesecake" layer and blend until very creamy. Pour over the first layer.

  4. Top with the sliced figs and bake for about 45-55 minutes until the top gets golden brown.

  5. Take it out of the oven. The cake will get firmer the longer you let it sit. Store in the fridge and take out at least 20 minutes before eating for best flavor! Enjoy!

Happy cooking, 

Enjoy,

Katie

Kategorie: Desserts, Diet-Specific, My favorites, Snack, Vegan Stichworte: baked cheesecake. healthy snack, baked vegan, cheesecake, figs, healthy, healthy cheesecake, Healthy Dessert, plant based, plant power, silken tofu, tofu, vegan, vegan cheesecake, vegan dessert, vegan treat

The Crispiest Healthy Peach and Cherry Crumble you’ll make

Juli 22, 2020 by katharina.kuehr Kommentar verfassen

You know what I love about summer? There are so many fresh fruits and veggies!And there are just so many ways you can use them! Just like this one! Sweet and juicy fruits beneath a layer of Goey, sweet and crispy crumble. No, you can’t taste that it is healthy but you are going to want to have all of this at once!

Why crumble?

I need to say that I actually got the inspiration from a friend of mine. One night I forgot my keys at home and no-one was there so I stayed over at one of my friend´s houses and her mom had made this ultra tasty crumble. It was with apricots and not super healthy I think but it was amazing! So I thought I wanted to kind of recreate it and asked you guys on instagram what kind of recipes you’d like to see, and you answered crumble.

What is a crumble?

I think the name crumble comes from crumbs. I think you can already imagine what it is. So basically you can make this with any fruit you have on hand. They build the foundation. On top of the fruits are crumbs made out of butter, sugar and flour and then it is all baked in the oven. The fruits will loose some liquid but the flavour will intensify and the crumbles will crisper up. Imagine it as warm fruits with cookie on top.

Is crumble healthy?

Not really. I mean it is healthier than other desserts such as chocolate cake because it is mainly made of fruit but the crumble part is not healthy. Why? It has a lot of sugar and fat in it. Basically no vitamins or nutrients. So yes, it is better and lighter than most desserts but you can’t say that it is healthy.

How to make crumble healthy

This actually is super easy. Easier than expected. We leave the base as it is. So the fruit part is the same. But we change up the crumbles part. Instead of flour we are using rolled oats. But before using them we need to process them in a food processor until they have reached a really fine consistency, much like flour. Oats are super high in vitamins and fibre and are therefore way healthier than white flour is.

Instead of butter we use margarine. Margarine is made out of plants and oils and really high in unsaturated fat. It still is high in calories but it by far does not have such a high content of saturated fat. And instead of white sugar we are using coconut sugar. Coconut sugar is way less processed and actually has a bunch of nutrients and fibre.

Substitutes:

If you do not have peaches or cherries on hand, you could make it with berries, apricots or whichever fruit you have. It works best wit softer fruits though. Instead of rolled oats you could use any type of flour such as almond and wholewheat. If you do not have coconut sugar, you can also use brown sugar.

How to best serve it:

When you take it out of the oven let it sit for a few minutes to cool a little bit and let it crispen. Then I love to serve this with ice cream or some kind of yoghurt. Greek yoghurt, oat yoghurt or just normal one. Whatever you have one hand!

I hope that you will like this recipe (I am obsessed with it) and make it on repeat such as I do!

Print

Peach and Cherry Crumble

The best way to use all of the good summer fruits. Sweet and juice peaches and cherries beneath a layer of perfectly crispy crumble. Just a dream.

Course Dessert, Snack
Prep Time 10 Minuten
Cook Time 15 Minuten
Total Time 25 Minuten
Servings 6 servings
Calories 208 kcal

What you will need

  • 2 large peaches
  • 200 g cherries
  • 1 tbsp maple syrup or any other liquid sweetener such as honey
  • 1 tbsp cornstarch
  • 100 g rolled oats
  • 50 g coconut sugar
  • 50 g margarine

How to

  1. Preheat the oven to 180°C.

    Remove the pit from the peaches and cherries. Half the cherries and cut the peaches into small slices. Toss them first in the maple syrup and then in the cornstarch. Add them into a baking dish.

  2. In a food processor, process the oats until they have reached a very fine, flour-like consistency. Add the coconut sugar and margarine and pulse again until everything is combined.

  3. Crumble this mixture on top of the fruit and bake it in the oven for 10-15 minutes.

  4. Take it out and let cool a little bit. Then serve it with ice cream or yoghurt.

Happy cooking,
Enjoy,
Katie // Une Petite Cuisinière

Kategorie: Desserts, Diet-Specific, Season, Snack, Sugar Free, Summer, Vegan Stichworte: cherries, crumble, healthy baking, Healthy Dessert, healthy food, no sugar, peaches, plant based, sugar free, summer desserts, summer food, summer fruits, vegan

Incredibly Easy Kiwi Chia Pudding (Vegan)

Juni 26, 2020 by katharina.kuehr 2 Kommentare

As a child we often get pudding. But usually it is made out of the package, contains hundreds ingredients we cannot even pronounce and it is really unhealthy. But it does not have to be. Neither does it have to be the classic vanilla or chocolate flavour. No, we are being way fancier and healthier here. Kiwi Chia Pudding.

Why is pudding not healthy?

Usually pudding is made out of a lot of milk, sugar, cream or butter. None of which really is healthy. Sugar, obviously is pretty unhealthy for our bodies. Cream and butter are really high in fat, which also is not healthy. And when you get chocolate pudding, you even have chocolate in there, which means you have even more sugar and fat. So this is why pudding is not healthy.

How to make healthy pudding:

This probably is way easier than you think. And you do not need super fancy ingredients. This one only contains 3 ingredients, so it is super easy. Instead of the usual cornstarch to thicken everything up, we use chia seeds. When you let them sit in a liquid overnight, they will form sort of a jelly around them, making it into a pudding consistency. It actually is way easier than traditional pudding, because you do not need to heat anything up.

Are chia seeds healthy?

Totally. You probably know this by now because you can find them in every health food store or in the health section of you food store. But why are they actually healthy? They are high in healthy Omega-3 fats (just as salmon is), in protein and also in fibre. That way they help your digestion and also provide you many other vitamins and minerals. So they basically are a super food.

What else is in this pudding?

3 more ingredients in the base. Which makes 4 in total. Isn’t that amazing? I definitely believe so! Other than the chia seeds, we have Kiwi, milk, and a sweetener. For the milk I like to use oat milk, but you can use regular milk or any other milk alternative. The sweetener I like most here is maple syrup. Other sugar alternatives are coconut sugar or date sugar.

Does it only work with Kiwis?

No! Definitely not. This is what I love about this, you can make this with any fruit you like! Use the same amount but any you love. I am sure that works just as well with berries, cherries, mango, pineapple, or whatever. This is so amazing and versatile. A great dish.

When to have it?

You can have this as a snack, a breakfast or as a dessert. I love and have it as all of those. The best way to eat it (I believe) is to top it with some (plant based) yoghurt, some more fresh fruit and granola. This combination is simply amazing!

I hope that you will enjoy this recipe and that it helps you to make healthy and tasty swaps more often! If you like it, you are free to leave a comment!

Print

Kiwi Chia Pudding

4 ingredients, healthy, super flavorful and extremly easy. Perfect summer dessert!

Course bowl, Breakfast, Dessert, Snack
Prep Time 5 Minuten
Chill time 4 Stunden
Total Time 4 Stunden 5 Minuten
Servings 4 puddings
Calories 245 kcal

What you will need

  • 5 kiwis
  • 50 g maple syrup
  • 80 g chia seeds
  • 200 ml oat milk

For topping:

  • 200 g yoghurt plant based if wanted
  • some granola

How to

  1. Peel the kiwis and purée them in a food processor or a high speed blender. Add the milk and liquid sweetener and mix again. Mix in the chia seeds. Divide it onto the jars. refridgerate for at least 4 hours till overnight.

  2. Before eating top with the yogurt, fresh fruit and granola.

Enjoy,
Happy Cooking,
Katie // Une Petite Cusinière

Kategorie: Breakfast, Desserts, Diet-Specific, Snack, spring, Vegan, Vegetarian Stichworte: breakfast, chia jam, chia pudding, chia seeds, healthy, healthy breakfast, Healthy Dessert, healthy plant based, healthy pudding, healthy snack, healthy vegan, kiwi, plant based, pudding, tropical, vegan

« Vorherige Seite
Nächste Seite »

Footer

What has been happening on my Instagram

Copyright © 2024 Une Petite Cuisinière on the Foodie Pro Theme