• Zur Hauptnavigation springen
  • Skip to main content
  • Zur Fußzeile springen

feel food club

  • Home
  • About me
  • My Recipes
  • Blog
  • Navigation Menu: Social Icons

    • Instagram

Fall

Bircher Muesli with Honey Poached Apple

November 24, 2019 by katharina.kuehr 1 Kommentar

This Swiss style overnight oats is going to bring your breakfast to the next level! It is a great meal if you don’t have too much time in the morning because it littleraly takes 5 minutes when you have prepared it the night before. 

What even is Bircher muesli?

Bircher Müsli has actually been invented around 1900 by a Swiss doctor called Maximilian Bircher Brenner who served it his patients in the hospital as a medicine. The original recipe calls for rolled oats, water, cream, lemon juice, Apple and honey. In my recipe I have used almost the same ingredients but even made it a bit healthier.

Overnight oats vs Bircher muesli

Overnight oats are traditionally made either only rolled oats and milk soaked overnight. Bircher muesli also is made with oats being soaked in milk overnight but most of the time. To make it « Bircher » usually there are some nuts, seeds, dried fruits and yoghurt added overnight. When making “normal” overnight oats, you would only top them with fresh fruit, granola, nut butter and yogurt (usually but really depending on the preference) while for Bircher rules like the recipe calls for a freshly grated apple that you add to the yoghurt base. It then is topped with berries, bananas or apple, so just fruit. 

What do I need for this?

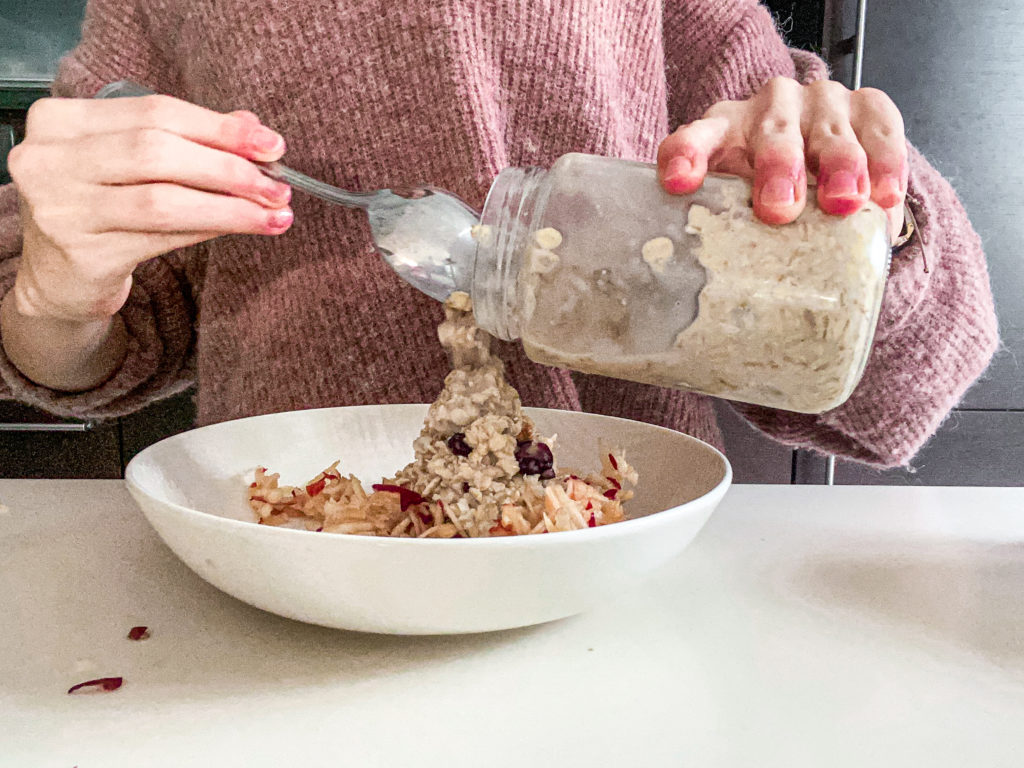
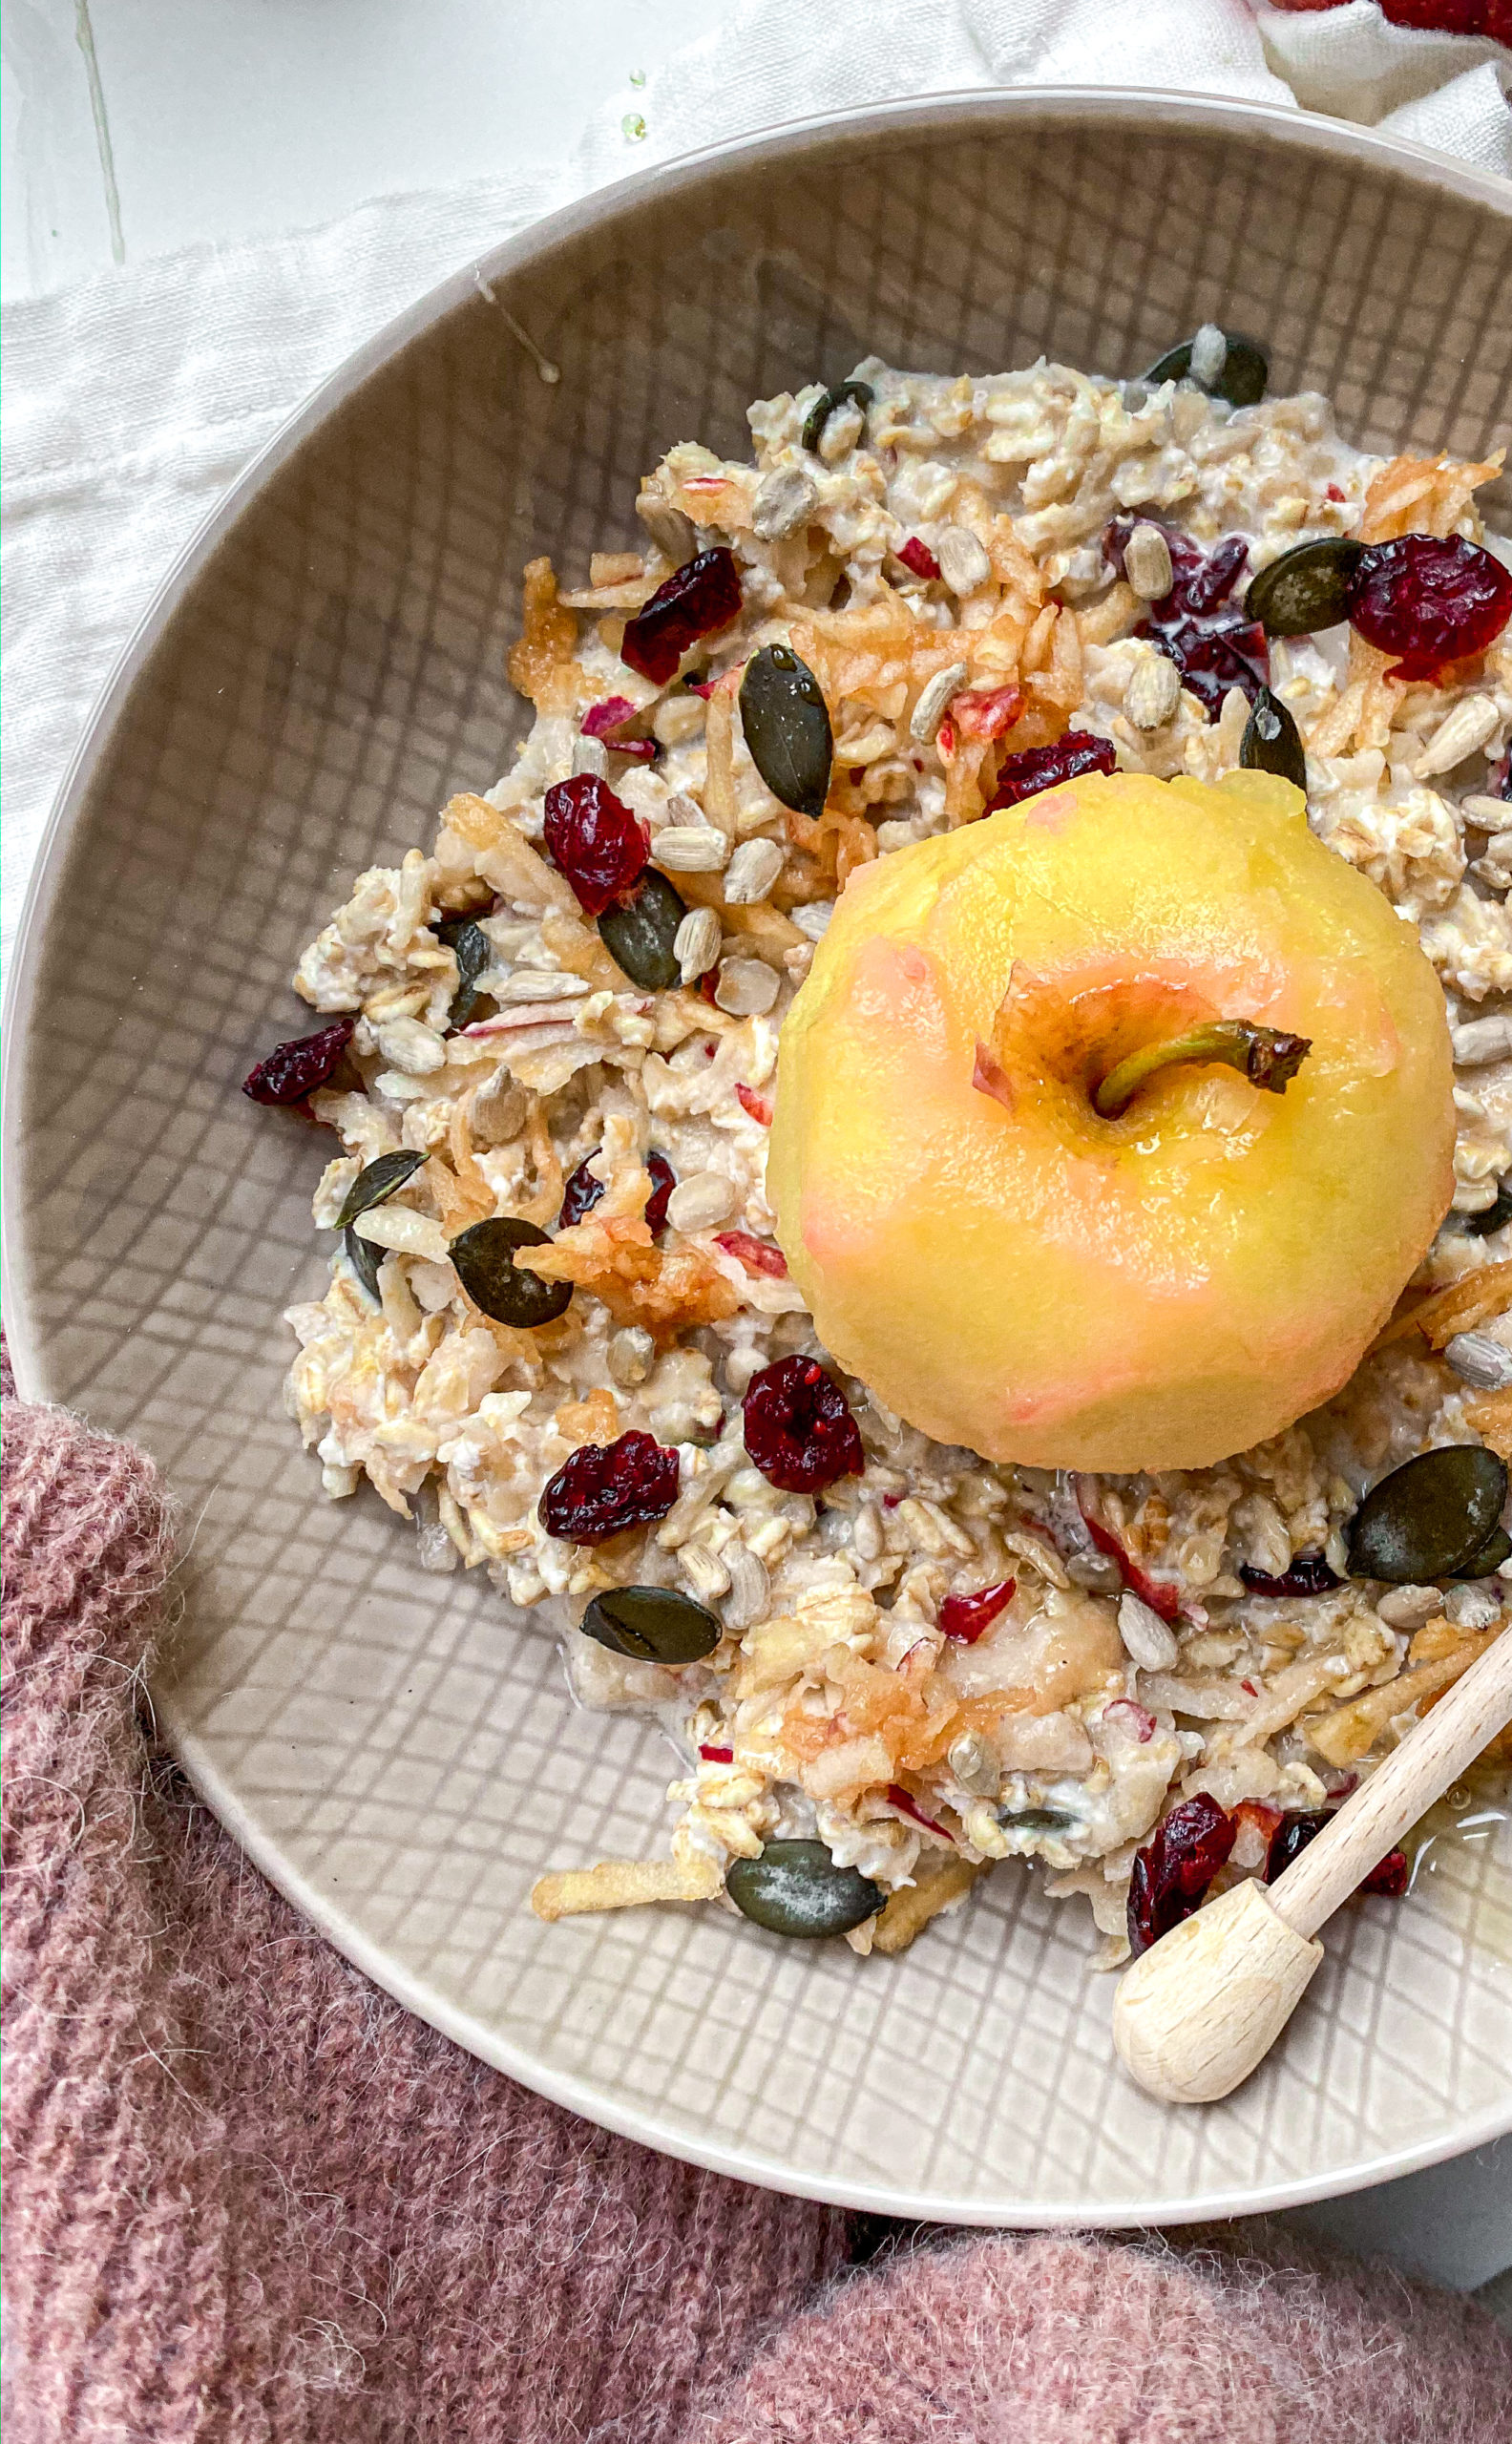
My basic recipe is really simple. You just have to add almond milk, yoghurt, rolled oats, seeds and/ or nuts, and some dried fruit to a jar and let them soak overnight! In the Morning all you have to do is take it out of the hat, mix under some grated apple and more yoghurt and serve! Honestly it already is incredibly delicious like that!! I love to eat it that way! 

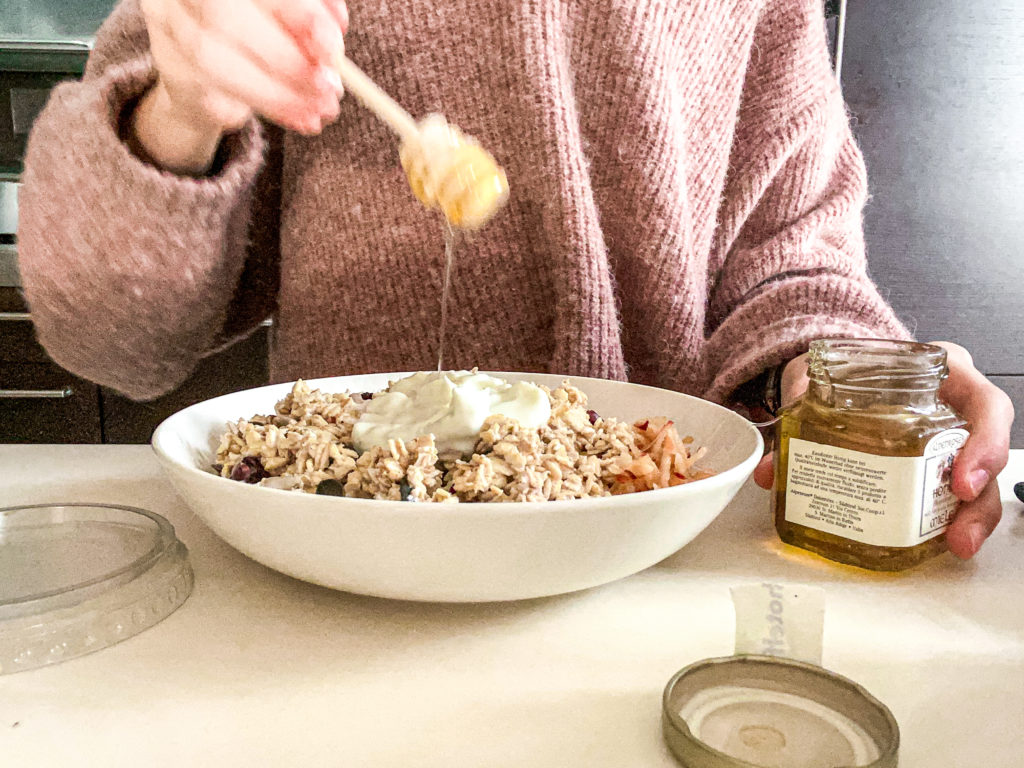
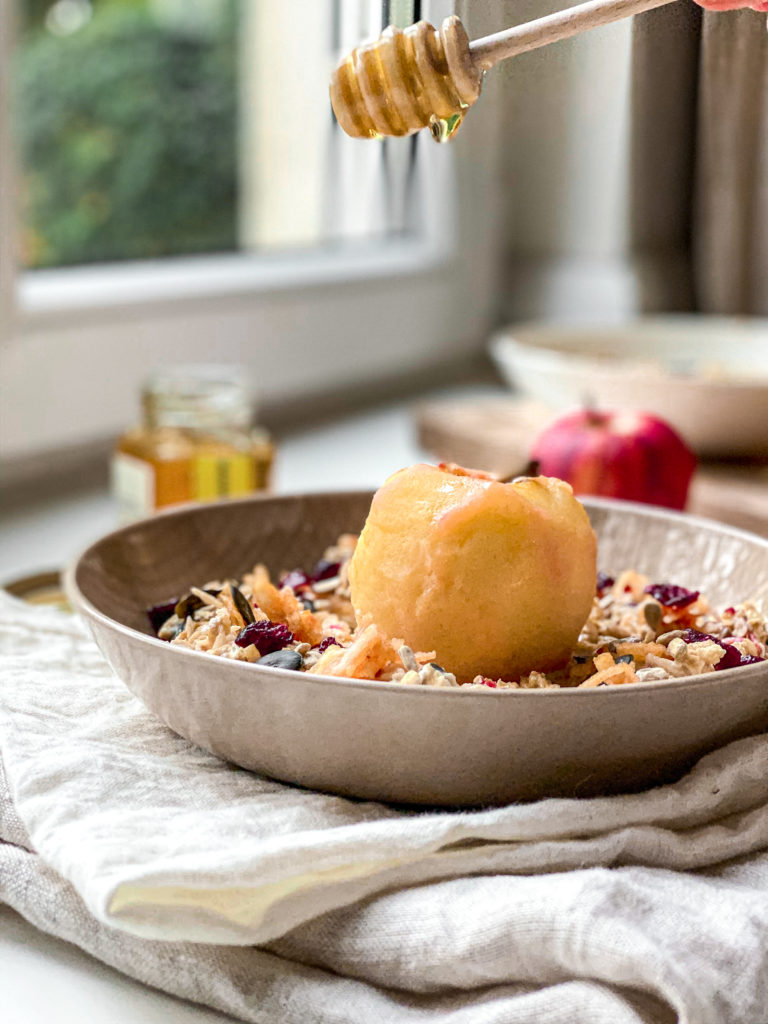
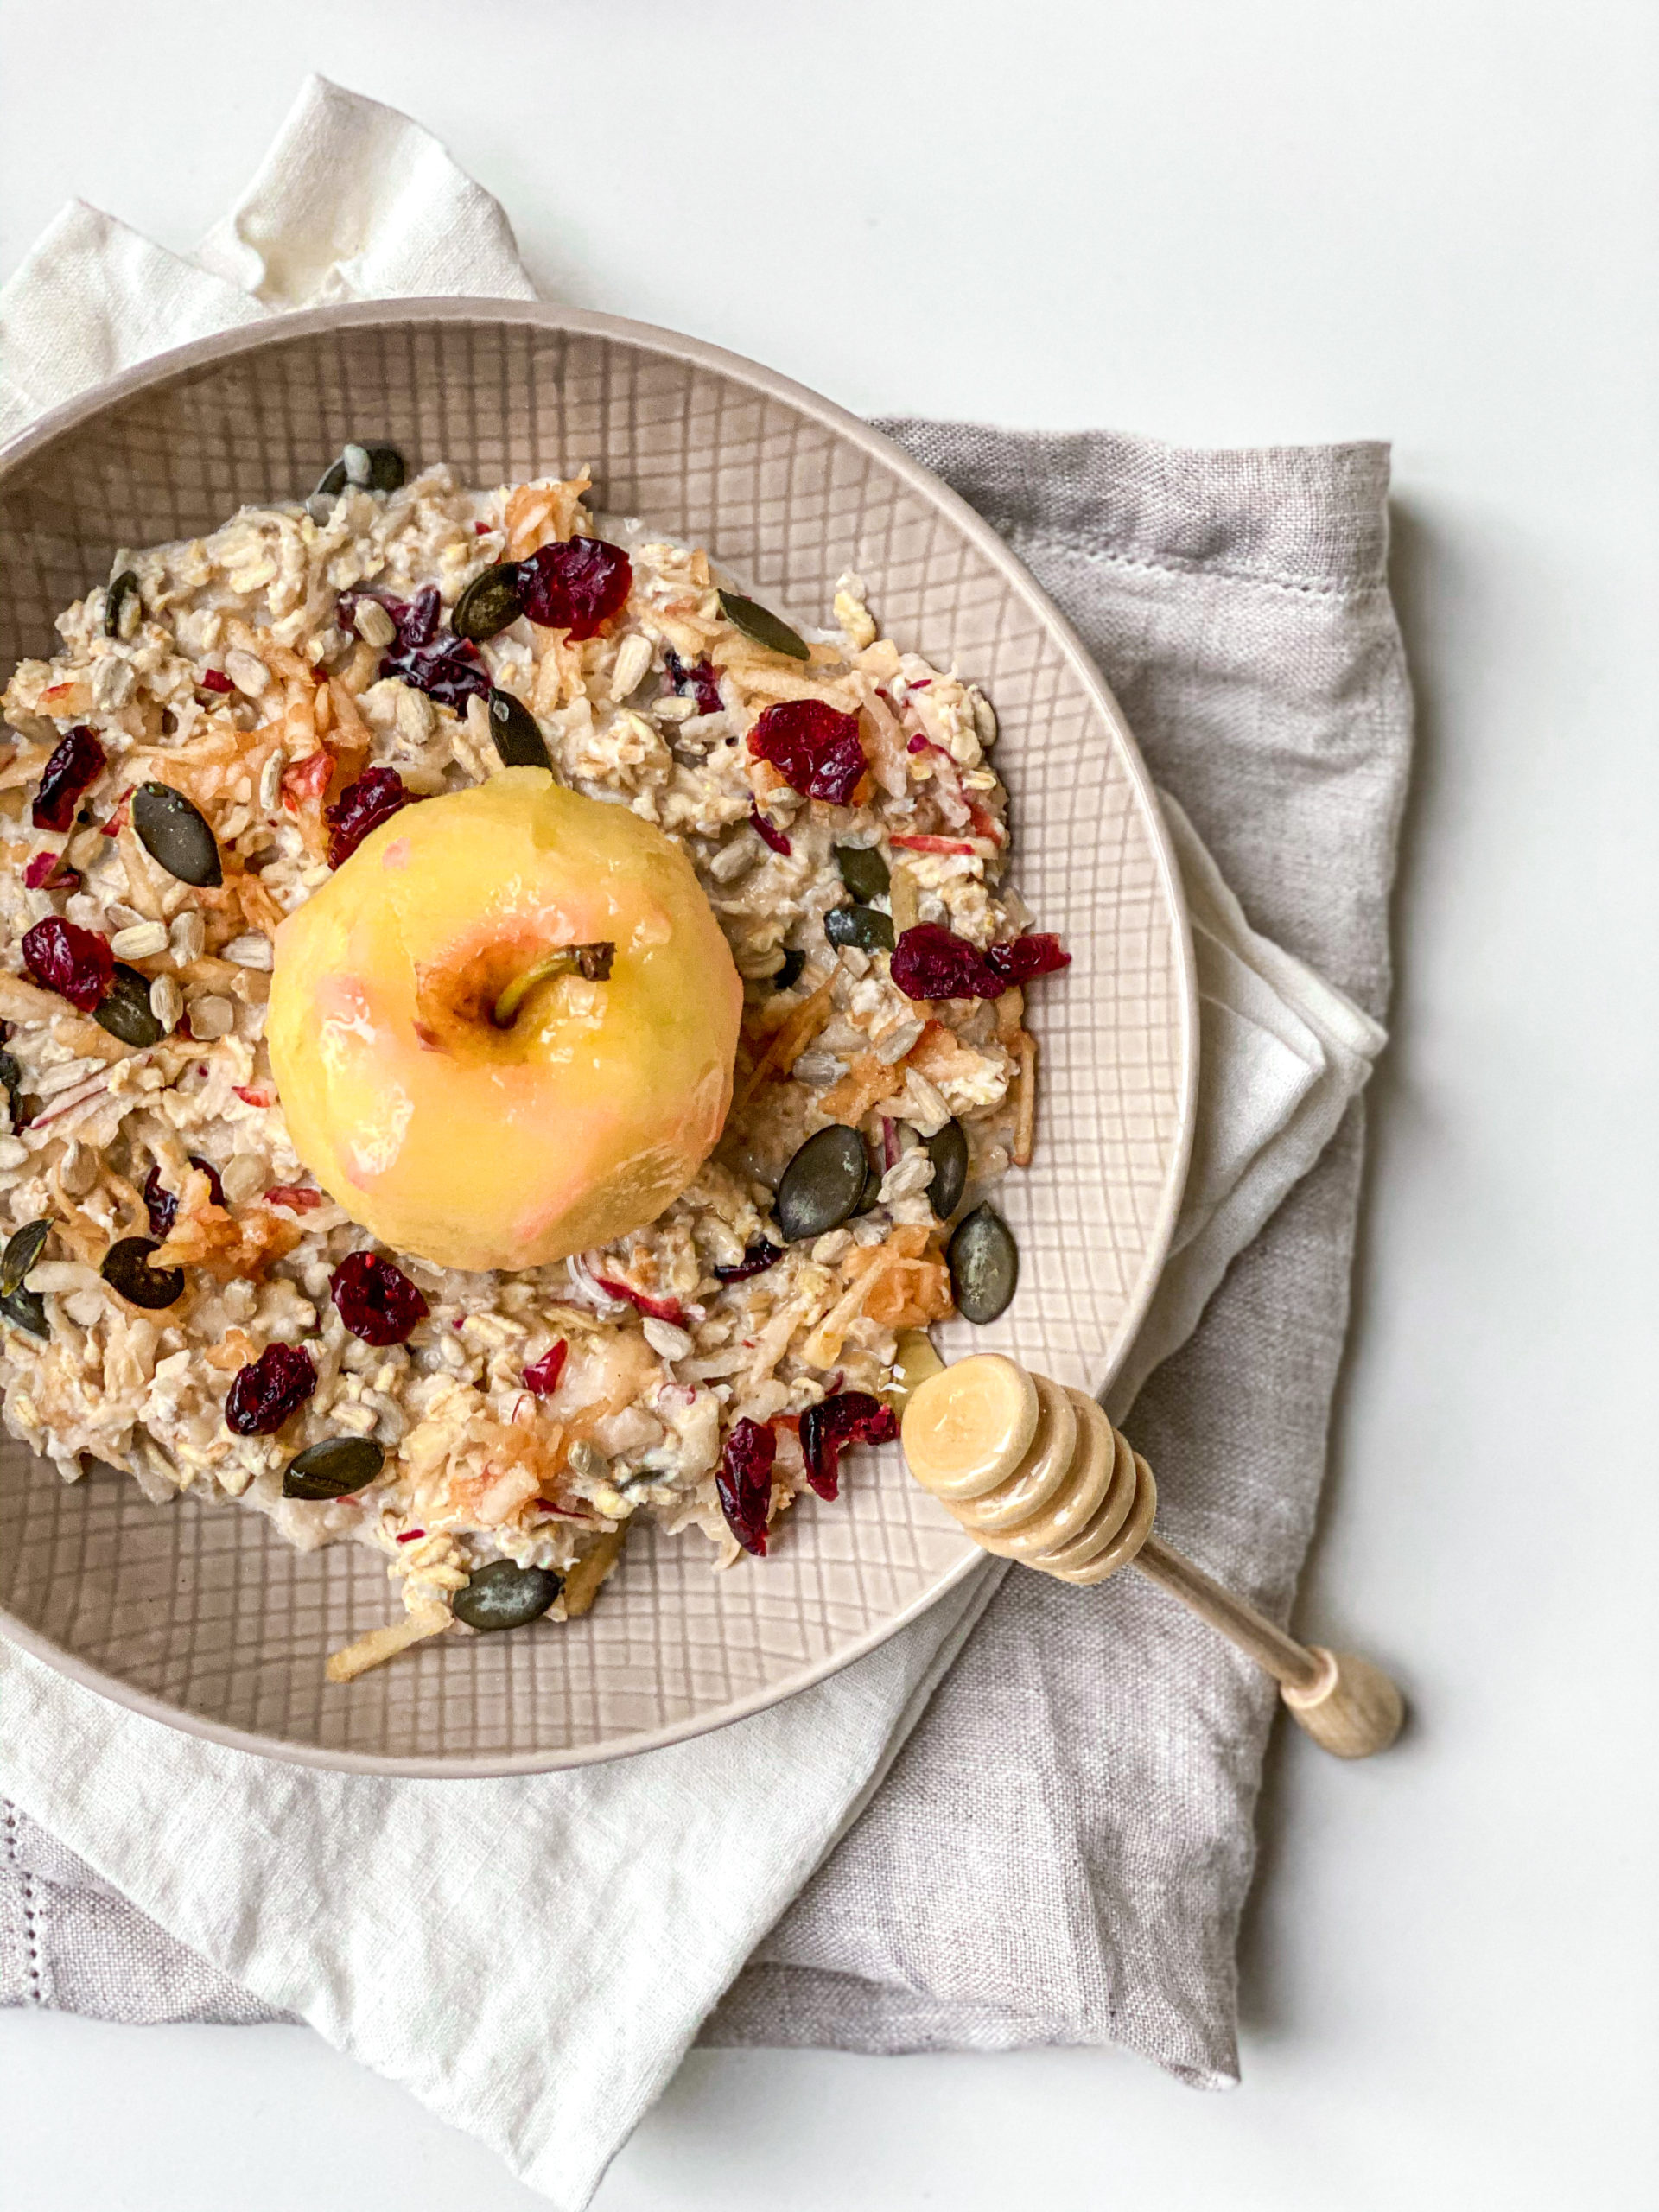
But in case you want to go next level, you can add the poached apple on top. This is not difficult either but takes some time. You can make this by adding an Apple into some simmering water with honey and apple sauce and let it simmer for about 20 minutes. Then you take it out, peel it if you want but it’s not necessary, drizzle some more honey and add it to the muesli! This takes it next level and is super good

My favourite honey utensil!

I think if you have been following me along on the blog, you probably know that I am in love with honey. The only thing is that it always is some plastic whenever you finish a packaging when squeezing it out. Because of this reason I have ordered the honey spoons from Tuuli kitchen ( http://www.tuuli-kitchen.com )! They are made out of natural wood and such a great utensil for honey! This way I can always buy and use honey from glasses and produce less waste. Plus they look super cute when serving! 

Is this Healthy?

Also the Bircher muesli is really healthy and nutritious. The oats provide you with good carbs, essential fiber, a good amount of protein and a lot of vitamins. The ains milk also adds some vitamins and liquids while the Greek yoghurt is packed with protein. The nuts and seeds give you the healthy fats you need and the dried fruit add some natural sweetness. The Apple also provides you a lot of vitamins and deliciousness. 

I hope that you will really enjoy this recipe! I honestly do and think that you will do so too! If you decide to recreate it be sure to tag me with @uneptcuisiniere or #unepetitecuisiniere! If you have time it would mean a lot to me if you would leave a comment and rating here on the blog too! 

Enjoy! 

Katie 

Print

Bircher Muesli

A delicious swiss breakfast recipe. It is similar to overnight oats, packed with nutrients and incredibly delicious! Enjoy!

Course bowl, Breakfast, brunch
Cuisine swiss
Prep Time 10 Minuten
Total Time 10 Minuten
Servings 3 servings
Calories 250 kcal

What you will need

The night before:

  • 100 g rolled oats
  • 200 ml almond milk
  • 1 heaped tbsp greek yoghurt can be substituted for a thick plant based yoghurt if making it vegan
  • 1 tbsp sunflower seeds
  • 1 tbsp pumpkin seeds
  • 1 tbsp dried cranberries or raisins
  • 1 tsp honey

The morning of:

  • 1 large apple
  • 3 tbsp yoghurt preferably thick such as greek yoghurt or skyr
  • a few nuts
  • some fresh berries for serving

How to

That is how it works:

  1. In a large jar or bowl add all the ingredients for "the night before" and stir until all mixed up. Place it in the fridge for at least 6 hours to overnight.

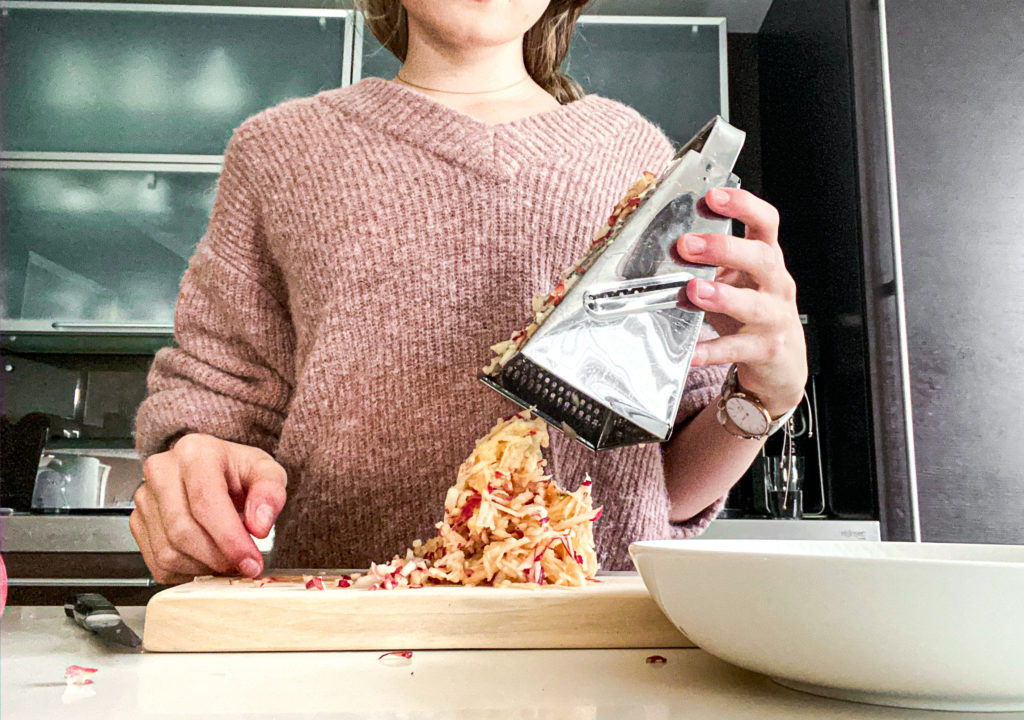
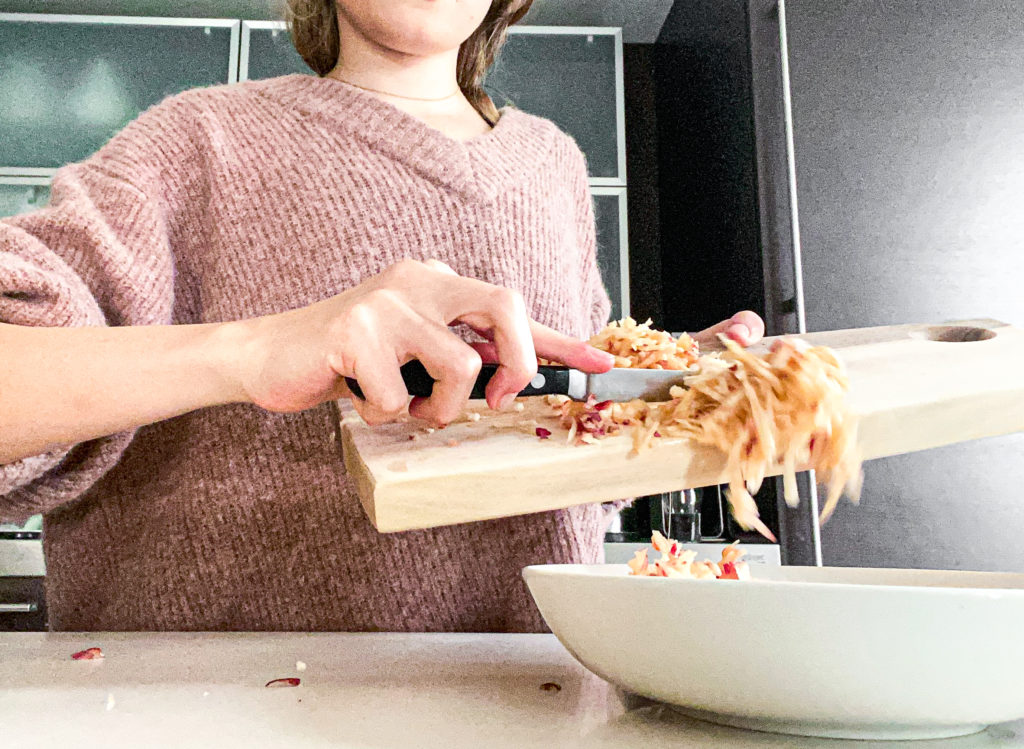
  2. In the morning take the jar out of the fridge and transfer it into a bowl. Grate an apple and add it to the soaked oats along with the yoghurt. Gently mix until evrything is combined. Sprinkle some more nuts or seeds and top with some fresh fruit or honey poached apple (see recipe below). serve and enjoy!

Print

Honey Poached Apple

This is a great way to prepare apples to use as a topping for bircher muesli, overnight oats, yoghurt or anything you like!

Course Breakfast, brunch, Dessert, Snack
Prep Time 5 Minuten
Cook Time 20 Minuten
Total Time 25 Minuten
Servings 1 apple
Calories 171 kcal

What you will need

  • 1 Apple
  • 2 tbsp apple Sauce
  • 1 tbsp honey

How to

This is how it works:

  1. Bring a pot with water to a boil. Add the apple sauce and honey and reduce to a simmer. Add in the Apple and let it simmer for 20 minutes.

    Once done take the apple out. You can peel the apple if you want, but it is not necessary. Drizzle some more honey and enjoy!

Kategorie: Breakfast, Desserts, Diet-Specific, Fall, Snack, Sugar Free, Swiss, Vegan, Vegetarian, Vegetarian Stichworte: Apple, appleseason, breakfast, breaky, brunch, fall, fallbreakfast, fallfood, healthy, healthy fall, honey, nut, nuts, plantbased, vegan, veganfall

Green Beans with Almond Bread Crumbs

November 20, 2019 by katharina.kuehr 1 Kommentar

It’s Thanksgiving next week and Christmas very soon! Although here in Austria we do not celebrate thanksgiving, I know that a lot of people around the world do! November and December are the months for family come-togethers and dinner party’s with friends. I don’t think that in any other month there are that many big meals. 

For us, at Christmas we always make a huge Roastbeef with some potatoes and a salad but this year, for sure, I am going to change the usual game and make these beans instead of the salad! They are so good! I made them once when friends were over for dinner and they immediately asked for the recipe. 

Since it always is difficult to cook for so many people and still chat with them while being a host, I have made a super quick and simple side dish for you. I really love to make this whenever someone is over at my house because it is something almost every one likes, plus it is super simple to make. Also, you can make it vegan, which is perfect for anyone who has a dietary restriction. It is a side that goes with really any dish. 

This green bean recipe works great with meaty dishes such as a Roastbeef, a meatloaf, turkey, a roasted chicken or pork. If you add a little twist to it, such as adding some lemon zest, it already is completely different and works perfectly with some fish or seafood. Also if you make a vegetarian or vegan pie, this is a great and fresh addition! If you already have a carby and filling side, this is a great addition in place of the boring green salad to get some more veggies. 

It is as quick as preparing a salad and really good! Just boiling the beans, tossing them in olive oil. Roasting the breadcrumbs and chopped almonds in some butter or olive oil and assemble. If you are vegan, use oil, if you are gluten free, go for only nuts or some gluten free breadcrumbs. If you do not like almonds, switch them out for any other nuts (but believe me, almonds work really good in here)! It is super versatile.

What I also really like about this recipe is that if you do not eat all of it you can use it for lunch next day or you can even meal prep it! Store the almond breadcrumbs in a separate container and it will last in the fridge for a few days! When I have this for lunch, I like to pair it with some boiled eggs as whole-wheat bread or some Quinoa to make it more filling. This is a really delicious and balanced meal then, as you have a lot of vitamins from the beans and eggs, a healthy amount of protein from the eggs, healthy fats from the almonds and oil, and some whole grain carbs from the bread or the Quinoa. 

So stop looking for a side dish recipe for thanksgiving or Christmas! Make these healthy and flavorful cream beans with almond bread crumbs to make everyone happy! And a little tip: try it before the big event to convince yourself that it is REALLY good! So if you do like it, it would mean a lot to me if you could leave a rating and/ or a comment here on the blogpost. Also if you decide to try it out be sure to tag me on Instagram with @uneptcuisiniere or #unepetitecuisiniere !

Enjoy!

Print

Green Beans with Almond Breadcrumbs (Vegan)

This is a great side dish for Christmas Eve or Thanksgiving, or litteraly any occasion. It is super versatile and incredibly delicious.

Course Appetizer, dinner, lunch, Side Dish
Prep Time 5 Minuten
Cook Time 5 Minuten
Total Time 10 Minuten
Servings 4 people
Calories 166 kcal

What you will need

That is what you will need:

  • 400 g green beans
  • 40 g breadcrumbs preferably whole wheat
  • 20 g almonds
  • 20 g Butter if wanting it vegan, use Olive Oil or vegan Butter instead
  • 1 tbsp Olive Oil
  • optional some lemon zest see recipe notes

How to

That is how it works:

  1. Bring a large pot with water to a boil. Generously salt. Cut of the ends of the green beans, and if they are very long cut them in half too. Add them to the boiling water and let them cook for about 5-7 minutes until ready. You will be able to notice that once you can stab through with a fork easily.

  2. In the meantime chop up the almonds into small chuncks. Heat up the butter in a small pan. Once hot add in, both the breadcrumbs, and the almonds and fry them for about 2-3 minutes on medium heat.

  3. Once the beans are done, rinse them and shock them with cold water. This helps to preserve the colour and the vitamins. Toss them in some Olive Oil and add them onto a pretty serving plate. Add the breadcrumbs on top and serve!

    Enjoy!

Notes

Feel free to add some lemon or orange zest to give it some freshness. This addition would make the dish a perfect match to fish and seafood! 

If you do not like almonds, you can use any other nut, but almonds work really great in here!

You can also use gluten free breadcrumbs. 

Kategorie: American, Appetizers, Diet-Specific, Fall, Lunch/ Dinner, Side, Vegan, Vegetarian, Vegetarian Stichworte: 10minute, almonds, beans, christmas, friendsgiving, green beans, healthy, healthy fall, nuts, quick, quickside, side, sidedish, thanksgiving, vegan, veganfall

Crispy Pumpkin Gnocchi with Browned Sage Butter

November 17, 2019 by katharina.kuehr Kommentar verfassen

Halloween is over, but that is by no means a reason to declare pumping season as being over too! Since this year fall lasts pretty long, regarding the weather, and it still is pretty warm, there still is some time for pumpkins to grow and plenty ways and occasions to enjoy them. I thought I’d get a little creative with the typical fall veggie and experiment with it.

And, as you can see, the mission was successful! 🙂 I know that if you are not a veggie lover, eating one and the same vegetable, just because it is in season, can get really boring really quickly. Because I want to avoid that, I always vary with the way I prepare them. Steam, bake, pan fry, eat them raw, just whatever I feel like. In order to give you some inspiration on what else to do with the star of fall I combined two of our favorite dishes; Pumpkin + Gnocchi to make this real good Pumpkin Gnocchi with sage butter.

I know that it sounds a little complicated to make, and to be honest it is not super quick BUT you can prepare them in large batches and freeze them. Just important to know is that if you freeze them, thaw them before pan frying because otherwise they will be crispy on the outside while they are not done on the inside, and not nice and soft!

I recommend using Hokkaido Pumpkin because I believe the consistency of it works best with this recipe. If you really do not like Hokkaido you can switch it out for any other of your desire you may need a little bit more flour then, depending on what you chose. Pumpkins are very nutritious as they are high in Vitamins especially Vitamin A! Also they contain a bunch of antioxidants and help boosting your immune system, which is great especially for the cold months! 

The only other necessary ingredient in making the Gnocchi except for pumpkin is flour! The flour helps the pumpkin to get a gnocchi like texture and taste. It binds it together. I also added some spices to give it more flavor and a heartier note which transforms the into pure deliciousness! 

Making the gnocchi is not too complicated, just a lot of work. First you have to cut and peel the pumpkin into smaller pieces. Best is about 4cm wide and 2 thick. I steamed my pumpkin because when boiling they soak up a lot of water which later would make the gnocchi squishy and not crispy. Another option would be to bake it in the oven until soft. You can test this by simply piecing through with a fork. If that works easily, it is done, if not, it’ll take a little more time! Depending on the size of your chunks it will take approximately 20-30 minutes.

After steaming, they are mashed and all the water needs to be squished out for the perfect results! Combine it with the flour and spices. When the dough is done you can cut off some small pieces, for them into gnocchi and place them on a plate. Let the finished ones chill in the fridge while preparing the rest. 

The preparing after that is really easy. You just have to melt some butter with fresh sage in a pan until it gets brown. At this point, your kitchen will smell like heaven, so good. The sage works perfectly together with the pumpkin, it is just so good! Once it got a little brown, add the gnocchi and pan fry them for about 2 miuntes on each side. I know, this is not the traditional way to prepare gnocchi but it really is incredibly delicious. We do nto boil them in water because the Gnocchi are softer than usual gnocchi and would fall apart. If you really do not like the frying, you can add more flour until the dough is harder and then boil it. 

To serve it top it with some more of that butter and a fresh burrata because you can never go wrong with burrata! Otherwise you can also add some freshly grated parmesan cheese, pecorino, or mozzarella.

If you do look for a different way to enjoy pumpkin, you will definitely like this recipe. It is such a great one to enjoy in fall. 

If you decide to recreate it be sure to tag me with @uneptcuisiniere or #unepetitecuisiniere on Instagram and it would mean a lot to me if you would leave a rating here on the blog!

Bon appetit!

Katie

Print

crispy Pumpkin Gnocchi with Browned Sage Butter

A great way to enjoy the star of fall in a different way. If you like Gnocchi and Pumpkin, this dish will be for you!

Course dinner, lunch, Main Course
Prep Time 40 Minuten
Total Time 1 Stunde 10 Minuten
Servings 5 bowls
Calories 408 kcal

What you will need

For the Gnocchi

  • 400 g Hokkaido Pumpkin
  • 380 g Flour
  • 1 TSP Cinnamon
  • 1 tsp muskat
  • 1 tsp paprika powder
  • 1 tsp sea salt
  • some more flour for forming

For the Preparing/ Garnish:

  • 70 g Butter
  • 1 handful Sage
  • Burratta
  • some pine nuts

How to

Thats how it works:

  1. Bring a large pot with water to a boil. Peel the pumpkin and cut it into about 3-4cm wide and 2cm thick pieces. Lay them into a steamer and add the steamer on top of the water. Let the pumpkin steam for 25 miuntes.

  2. After 25 miuntes the pumpkin should be soft. You can test this by piecing through it with a fork. If it goes through easily it is done. If you do not have a steamer, you can also boil or bake the pumpkin. Smash the pumpkin down with a fork. there will be some water at the bottom now and we want to get rid of that in order to mak our gnocchi moist and not smushy.

  3. Take a kitchen towel or a cheese cloth and add the smashed pumpkin into it. Gently sqish it so some more water will come out. Once all the excess water is out, return the pumpkin into a bowl. Add the flour little by little, mixing through continuosly until a dough is formed. If you feeel like you have a good dough without adding all of the flour, leave some out, and if you feel like you do need more, add some more.

  4. Once the dough is formed take a smaller piece of that and roll it out into a saussage form. Cut off 3cm large pieces of that and form them into gnocchi in your hands. Here you might need some more flour on your working place in order to not make the Gnocchi stick. Once you have formed them place them on a plate and store in the fridge while making the other ones.

  5. When all of them are done, melt the butter in a large pan and add the sage. Let the butter brown for about 1-2 miuntes. Then add the Gnocchi in and let them fry for about 2 miuntes on each side.

  6. Add them onto the plates and top with some more butter. Cut uo the burratta and add it on top as well. To finish it off sprinkle some pine nuts and serve!

    Enjoy!

Kategorie: American, Cuisine, Diet-Specific, Fall, Lunch/ Dinner, Season, Side, Vegetarian, Vegetarian Stichworte: healthy, healthy fall

Harvest Buddha Bowl with Apple Chicken

November 6, 2019 by katharina.kuehr Kommentar verfassen

When the weather is getting cold outside we are very likely to crave some hearty comfort foods! Unfortunately these foods mostly are not the healthiest as there are simply not as many colorful vegetables as in spring for example. BUT there still are some! So there actually is no excuse to eat a healthy, utrient-packed, hearty meal in fall. I know that it is a little harder since there are not too many vegetables in season but still quite some. To make it easier for you, I decided to share a recipe with you for a Fall Harvest Buddha Bowl!

Buddha Bowls are bowls which are made up of several different ingredients, which are cooked, baked, and raw, and a dressing. They are packed with every nutrient group and make a perfect balanced meal. In order for you to experiment a little with creating such bowls, I have a little Buddha Bowl Guide for you here:

1.The base

The base usually consists of some type of carbohydrate. It gives structure, fills you up and provides you with energy. Best is using a cooked whole grain such as

  • Brown Rice
  • Quinoa
  • Bulgur
  • Couscous
  • Buckwheat

If you are low-carb, simply substitute the cooked grain with some greens. 

2. Greens:

The greens here add some color and a bunch of nutrients. Here you are totally free and can use whichever you prefer/ like the most! Depending on what you have chosen, you can either add it raw, cooked, or steamed. For example:

  • Kale
  • Spinach
  • Swiss Chard
  • Lambs lettuce
  • Lettuce

3. Vegetables:

3.1: Baked/ Pan Fried Vegetables: The baked vegetables add some heartiness to the dish, as well as some texture. Simple drizzle them with some oil and spices and pop them into the oven. Here I like to use:

  • Sweet Potato
  • Pumpkin
  • Brussel Sprouts
  • Cauliflower
  • Mushrooms
  • Zucchini
  • Bell Peppers

3.2: Boiled/ Steamed vegetables

For the Boiled/ Steamed vegetables I like to use vegetables of which I prefer the taste when being boiled or steamed. If you do not want to use and extra pot, you can also go ahead and add them to the baking tray or eat them raw. Vegetables that I prefer to steam/ boil are

  • Beets
  • Broccoli 
  • Green Beans
  • Asparagus
  • Corn
  • Peas

3.3: Raw vegetables:

Adding raw vegetables to your Buddha Bowl is important. They add some crunch, and they (mostly) contain more vitamins than heated ones. Plus, they also add some extra crunch and freshness, which works great in combination with the remaining ingredients. The best ones here are:

  • Tomatoes
  • Carrots
  • Celery
  • Cucumber
  • Bell Peppers
  • Radishes

4. Protein

A source of protein is essential when building a Buddha Bowl! It makes the dish a complete meal as it adds nutrients. Also here you can be really creative and add whatever you like! Some options are:

  • Chicken
  • Tofu
  • Prawns
  • Tempeh
  • Edamame
  • Beef
  • Lentils
  • Beans

5. Fruits:

I know, adding fruits into your meal may sound a little bit weird but in this case, it definitely is not. The combination of adding something sweet with the savory is incredibly delicious and fruits also add a great freshness. In most cases it is best to use them raw, but with some fruits it works if they have been cooked too (I cooked my apples with the chicken, and this tasted really good too!). Here you can use

  • Grapes
  • Apples
  • Berries
  • Mango
  • Pomegranate Seeds
  • Stone fruits
  • Literally, everything available

6. Dressing

The dressing is maybe the most important ingredient of the dish because it packs everything together and combines the flavors. It coats the entire dish, which means that if you dressing doesn’t take amazing, your entire dish will be rather bad. Here you can use your favorite salad dressing or get a little more creative. If you want something thicker, to dip your bowl-ingredients into, that works great too! Examples are..

  • Balsamic Vinaigrette
  • Hummus
  • Mashed Avocado
  • Tahini Sauce
  • Yoghurt Dressing

7. Topping:

This is the last, but definitely not least ingredient in this dish. Here you have the last option to add some healthy fats and crunch. I like to top this with some nuts or some chopped up vegetables like

  • Walnuts
  • Spring onions
  • Coconut chips
  • Sunflower seeds
  • Pepitas
  • Nori

For this bowl I used one or two ingredients from every group. I used Bulgur (Carbohydrate), Kale (as a green), Sweet Potato (as a roasted vegetable), mushrooms (sautéed vegetables), beetroot (steamed vegetable), Carrots (raw vegetable), chicken (protein), Grapes & apple (fruits), Dijon-Tahini-Sauce (dressing), and walnuts (topping). 

This together makes an awesome combination off several super delicious and nutritios fall ingredients into one bowl. The flavors work really great together. If you tend to ave prepared some of those ingredients ahead of time and store them in the fridge, which a lot of people have, then this bowl comes together really quick. This meal is a great way to enjoy all the fall ingredients, I hope you like it!

If you decide to recreate this recipe, share it with me on intsagram with @uneptcuisiniere or #unepetitecuisiniere and be sure to leave a comment, thank would mean a lot to me!

Enjoy!

Print

Fall Harvest Buddha Bowl

A delicious meal that packs all the delicious fall ingredients. A perfectly balanced meal with all the food groups. Super delicious and comforting!

Course bowl, dinner, lunch, Main Course, Salad
Servings 2 bowls
Calories 586 kcal

What you will need

For the Chicken

  • 150 g Chicken
  • 0.5 tbsp Oil
  • 1/2 apple
  • 100 ml white wine
  • 2 tbsp apple sauce
  • 100 ml water

For the remaining bowl:

  • 60 g Bulgur
  • 150 g Sweet Potato about 1/2
  • 1/2 tsp cinnamon
  • 1/2 tsp paprika powder
  • 100 g mushrooms
  • 1 cooked beetroot
  • 1 carrot
  • 2 handful kale
  • 1 tbsp lemon juice
  • 1 tbsp Oil
  • a few seedless grapes
  • 10 g walnuts

For the dressing:

  • 1 tbsp Tahin
  • 2 tbsp orange juice
  • 1 tbsp white wine vinegar
  • 2 tsp Dijon Mustard
  • 1 tsp Honey

How to

Thats how it works:

  1. Preheat the oven to 180C. Cut the sweet potatoes into 1cm sized chunks. Coat them with the tbsp of oil, the paprika powder, and the cinnamon. Place it on a baking tray and bake it for 10 minutes. Take it out, add the mushrooms, stir it all around and bake it for another 15 minutes.

  2. Meanwhile prepare the bulgur according to the package instructions.

  3. In a pan heat up the oil for the chicken. Chop the apple into small cubes. Once hot, add the apple into it and sautee it for 2 minutes. If using one chicken breast cut it in half, so it is thinner and will cook faster. Add the chicken breast to the apple and fry it on both sides for about one minute. Add the wine, apple sauce and water and let it simmer for 8-10 minutes.

  4. Massage the kale with the lemon juice and set aside. Grate the carrots and slice up the beetroots. Half the grapes and chop up the walnuts.

  5. For the dressing add all the ingredients into a food prosessor and blend until smooth. If too thick, add some more water.

  6. By now the sweet potato and bulgur should be done too and it is time to assemble.

  7. Seperate the ingredients onto two bowls. Drizzle the dressing over everything, serve & enjoy!

Kategorie: Fall, Fish & Seafood, Lunch/ Dinner, Poultry & Meat, Season, Vegetarian Stichworte: Apple, appleseason, beetroot, bowl, bowlfood, buddha, buddhabowl, bulgur, chicken, fall, fallfood, grapes, healthy, healthy bowl, healthyfall, kale, nourrishbowl, nourrishing, nuts, Sweet potato

« Vorherige Seite
Nächste Seite »

Footer

What has been happening on my Instagram

Copyright © 2024 Une Petite Cuisinière on the Foodie Pro Theme