• Zur Hauptnavigation springen
  • Skip to main content
  • Zur Fußzeile springen

feel food club

  • Home
  • About me
  • My Recipes
  • Blog
  • Navigation Menu: Social Icons

    • Instagram

katharina.kuehr

Seed Coated Beetroot Balls

Oktober 13, 2019 by katharina.kuehr Kommentar verfassen

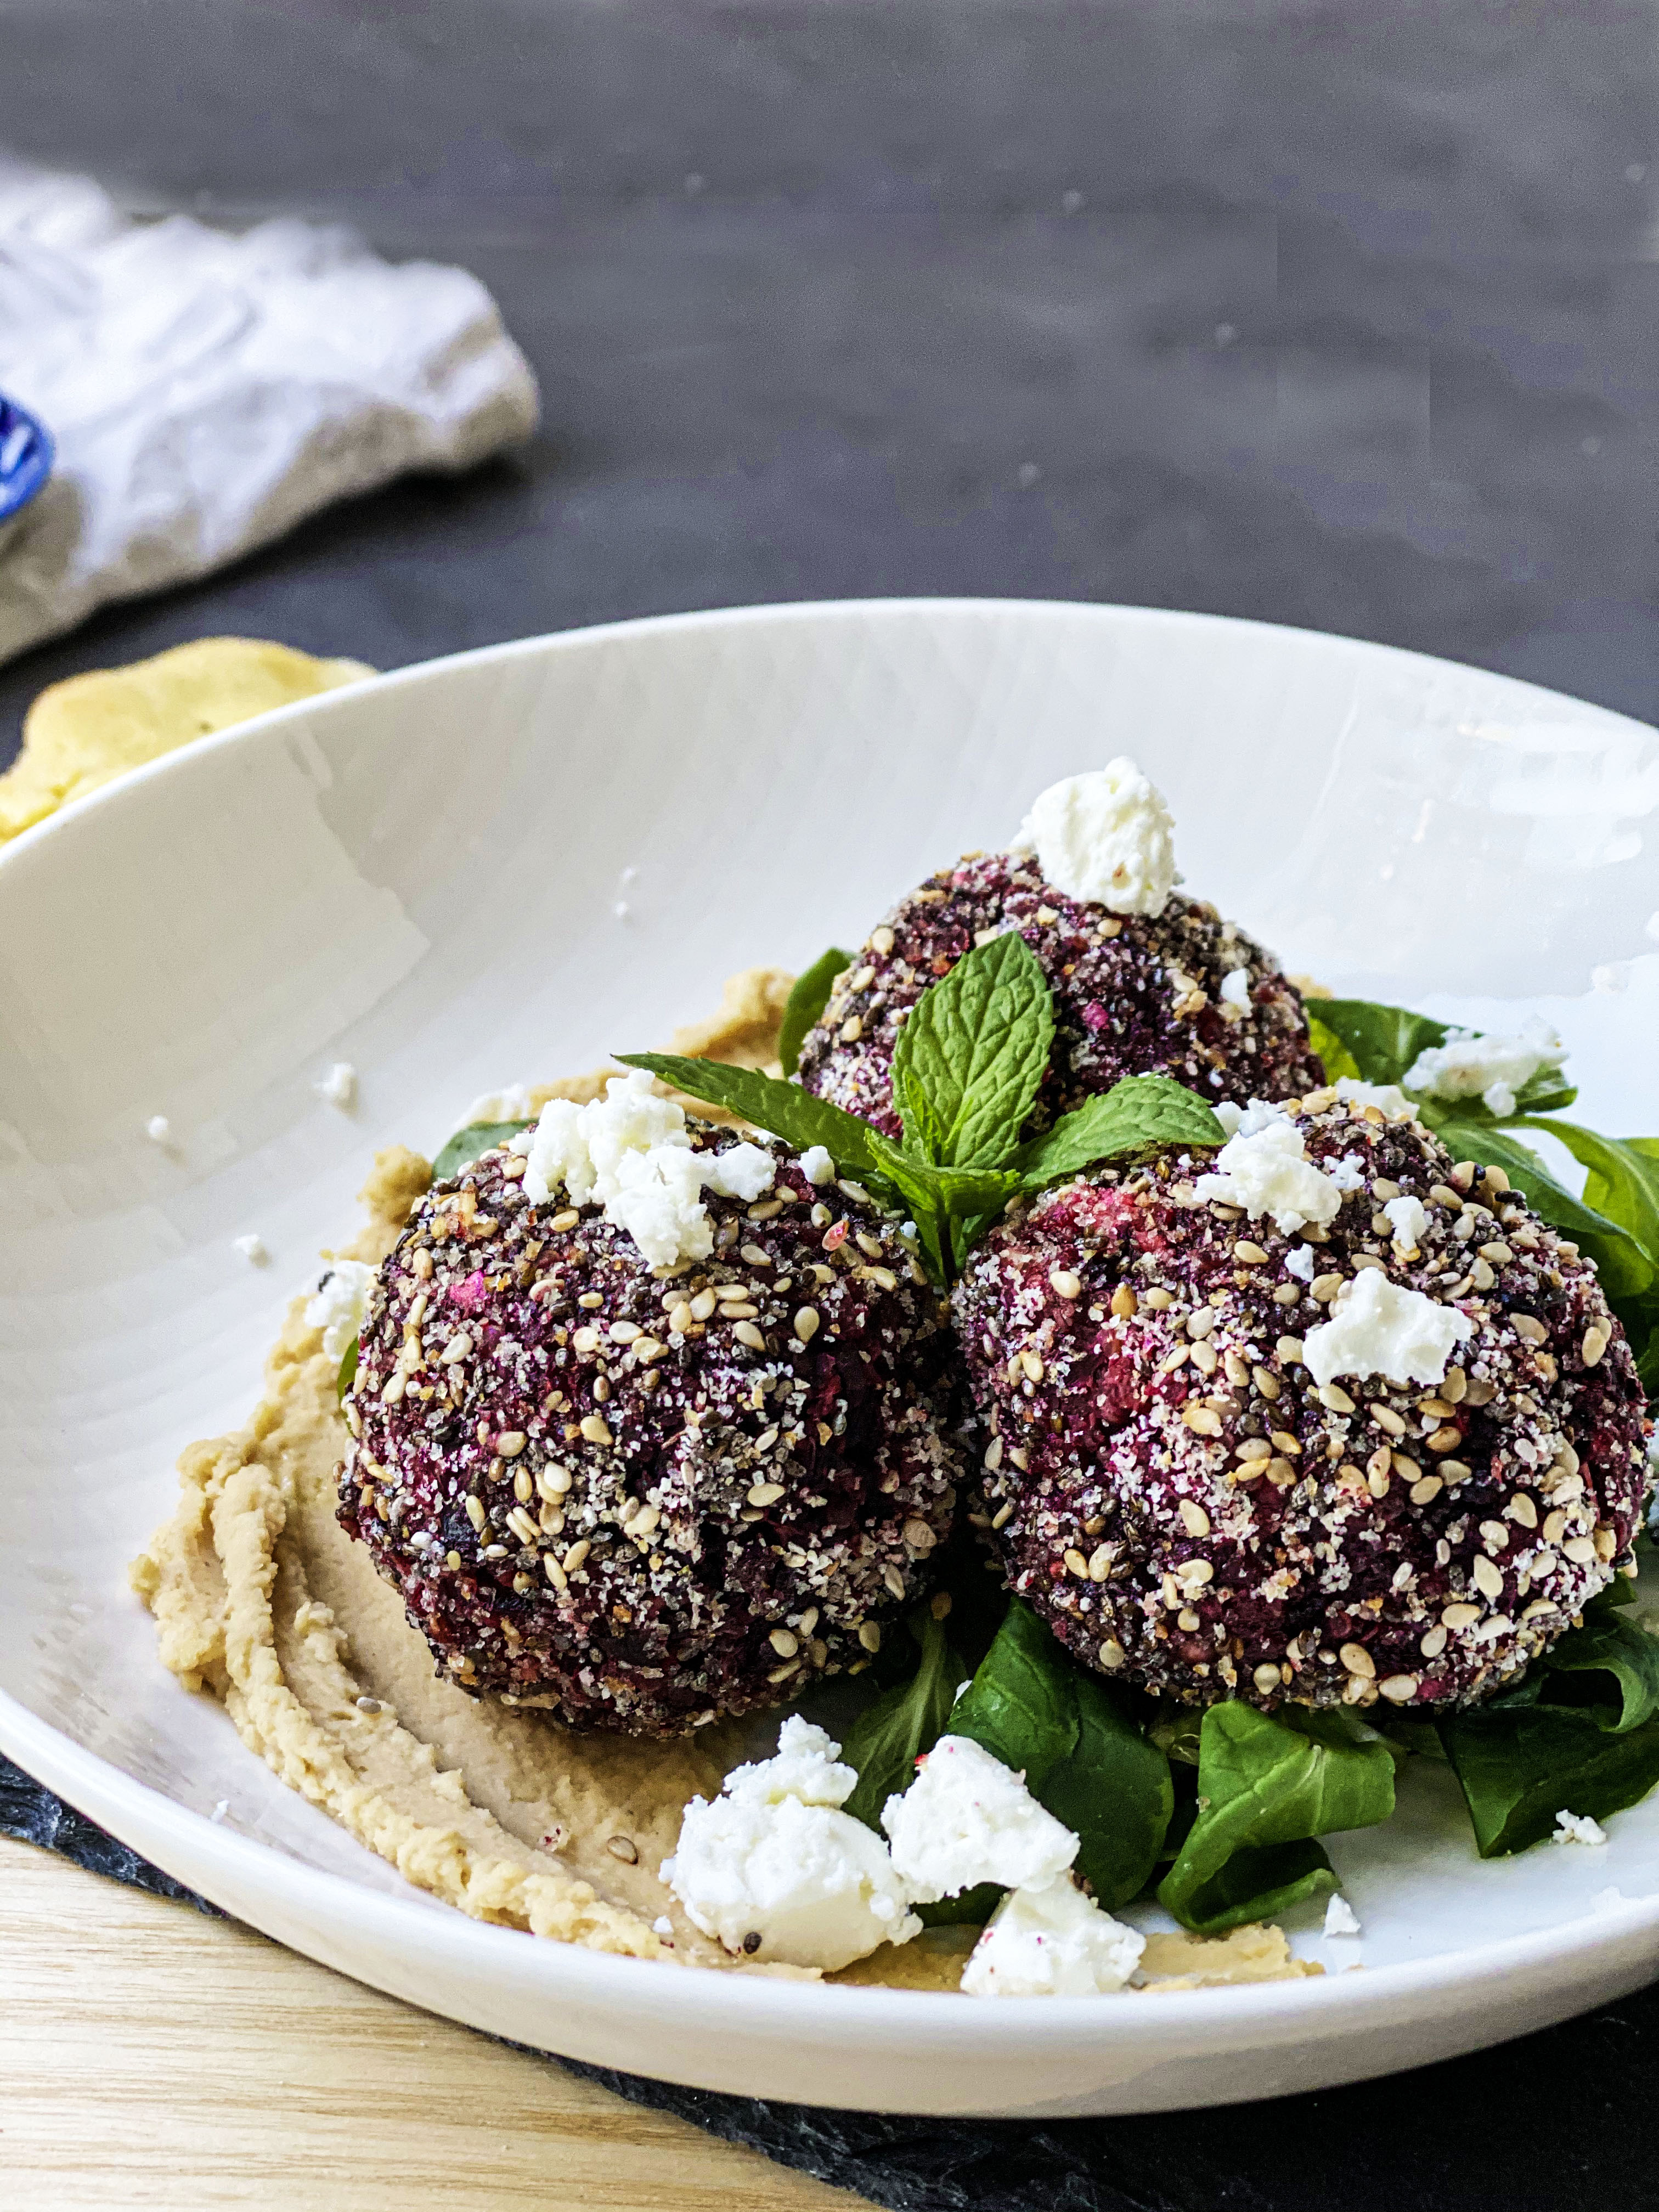
Need some inspirational recipes for pink food? Then you have to try these sesame coated beetroot balls! Packed with so much flavor, a great texture, fluffy and soft, a beautiful pink color and coated in crispy seeds. Served in a bed of hummus and salad and topped of with some crumbled feta! Isn’t Fall a great season? With all the good seasonal food? At least I think so! 

Beetroots are such a healthy vegetable. They are packed with fiber and loaded with vitamin B9, which helps to form the DNA and RNA and helps the protein metabolism. Moreover they contain good amounts of manganese, potassium and Vitamin C. Also, they are great for vegetarians and vegans because of their high iron content. 

Beetroots are also proven to have numerous health benefits. When consumed they can control your blood flow levels, lower blood pressure, and increase your exercise performance! They help preventing cancer and are really low in calories. If all of this information hasn’t convinced you yet to try it than maybe look at that color! It’s so pink and pretty! 

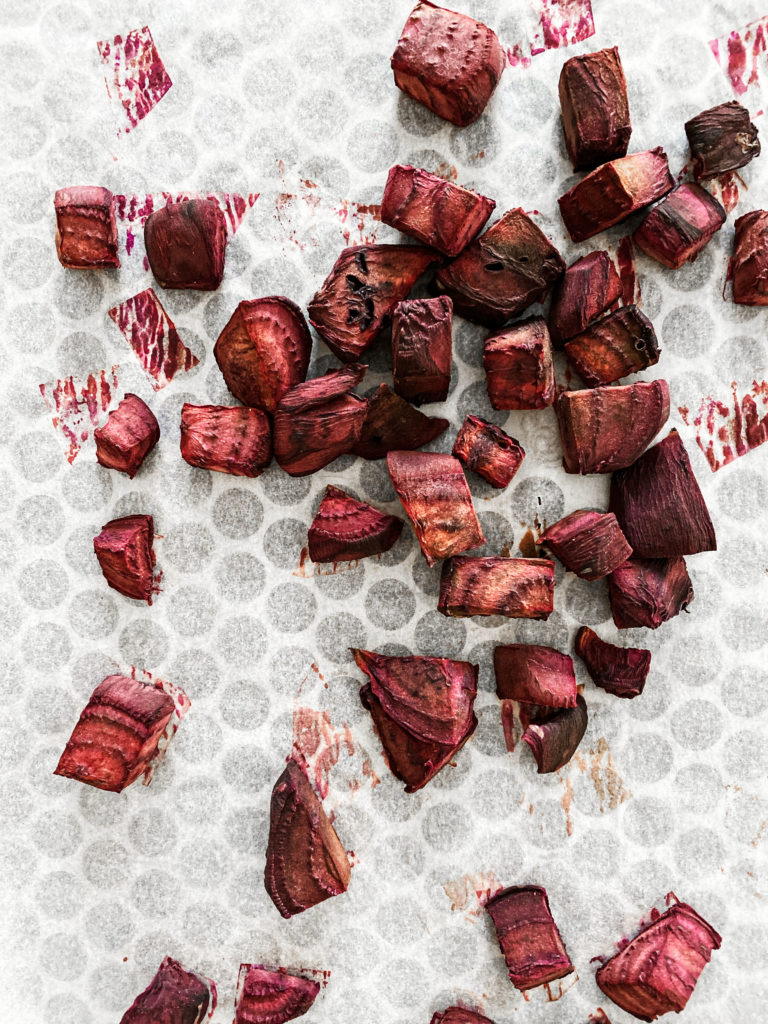
The only reason why I did not cook with beets very often was because I did not know how to prepare them! I always thought of them being really difficult to prepare but actually they are really simple! You can either boil them, or steam them or bake them. I prefer baking the most because you can put it into the oven for about 50 minutes and don’t really have to leave an eye on it. It is so incredibly simple, I don’t know why I haven’t realized this earlier. Really missed out on something. 

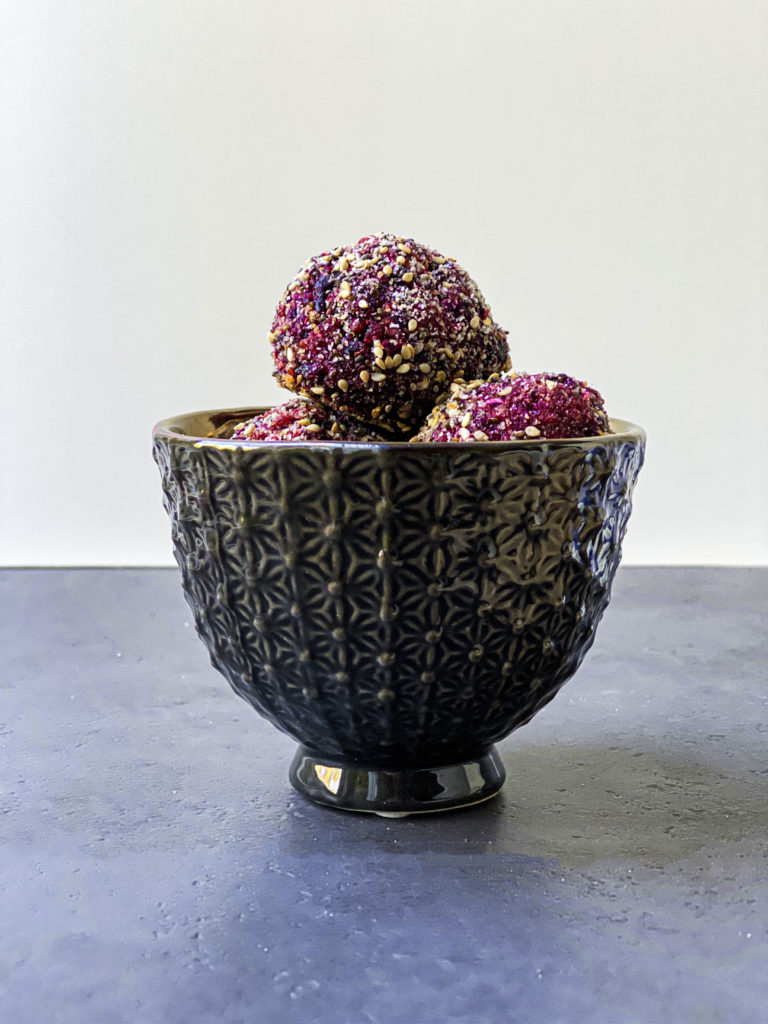
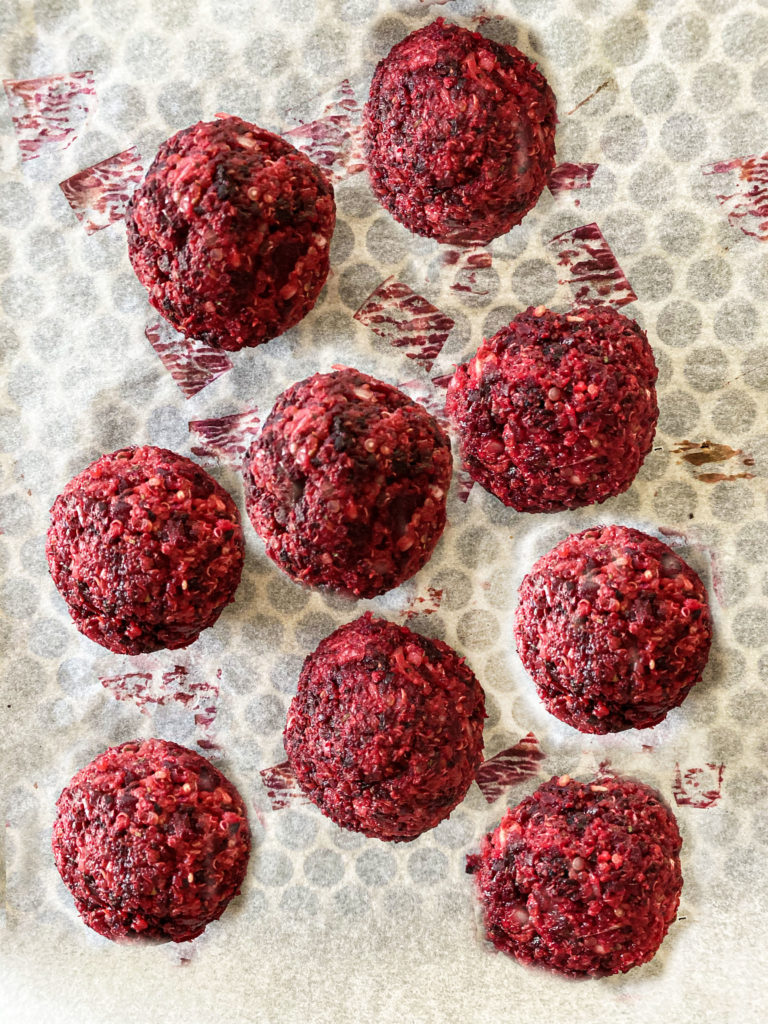
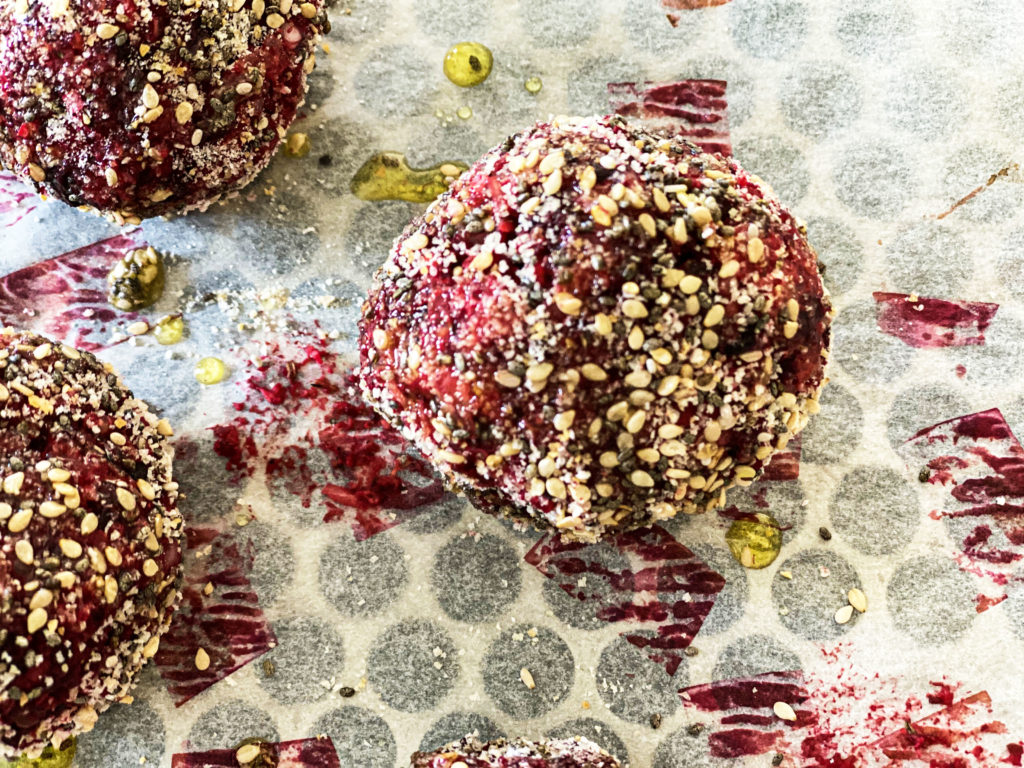
After the little chunks have been baked, they just need to be combined in the food processor with a few other ingredients to get a doughy consistency. If you do not have a food processor you can just combine all the ingredients with a potato masher or a fork, simply bake the beets for a little bit longer! Form the balls, and roll them in the seed mixture. The seeds are really nutritious too and add an extra kick of protein to the balls, as well as some crunch. Think falafels but with beetroot and baked. 

If you feel like turning in the oven for just two servings isn’t worth it, than I have good news for you! Firstly, you can meal prep beets on the weekend so you have them in several dishes throughout the week, and secondly, you can make these balls in a big batch and freeze them (without baking). Whenever you need them, just take them out of the freezer and bake them in the oven and voila! 

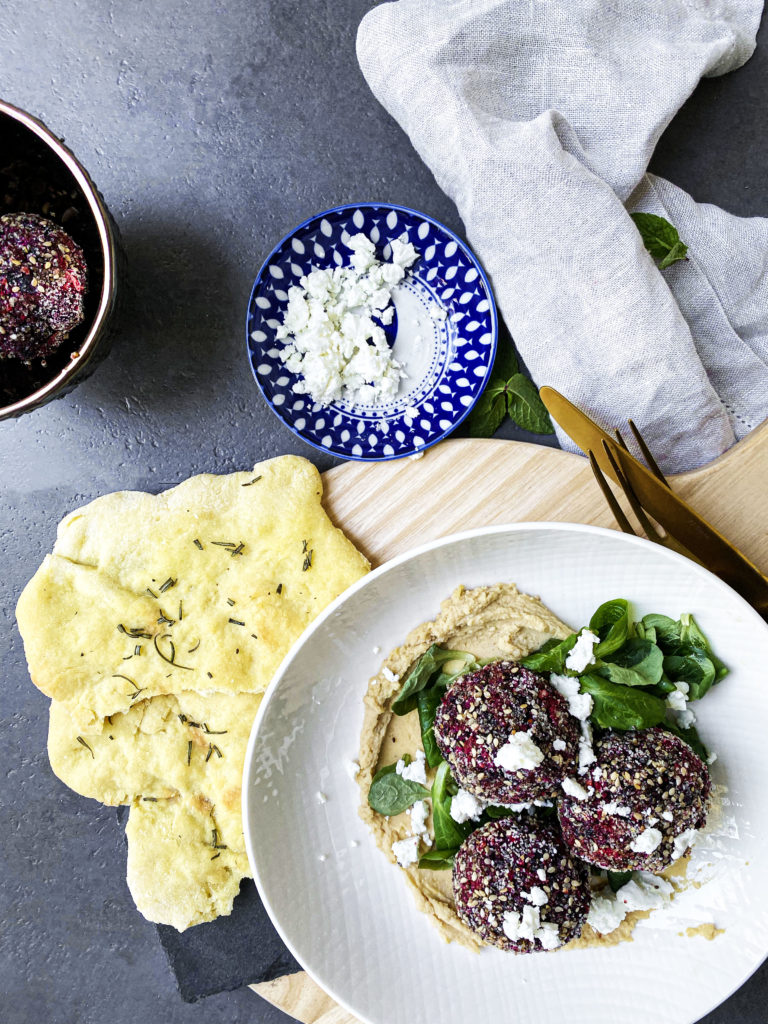
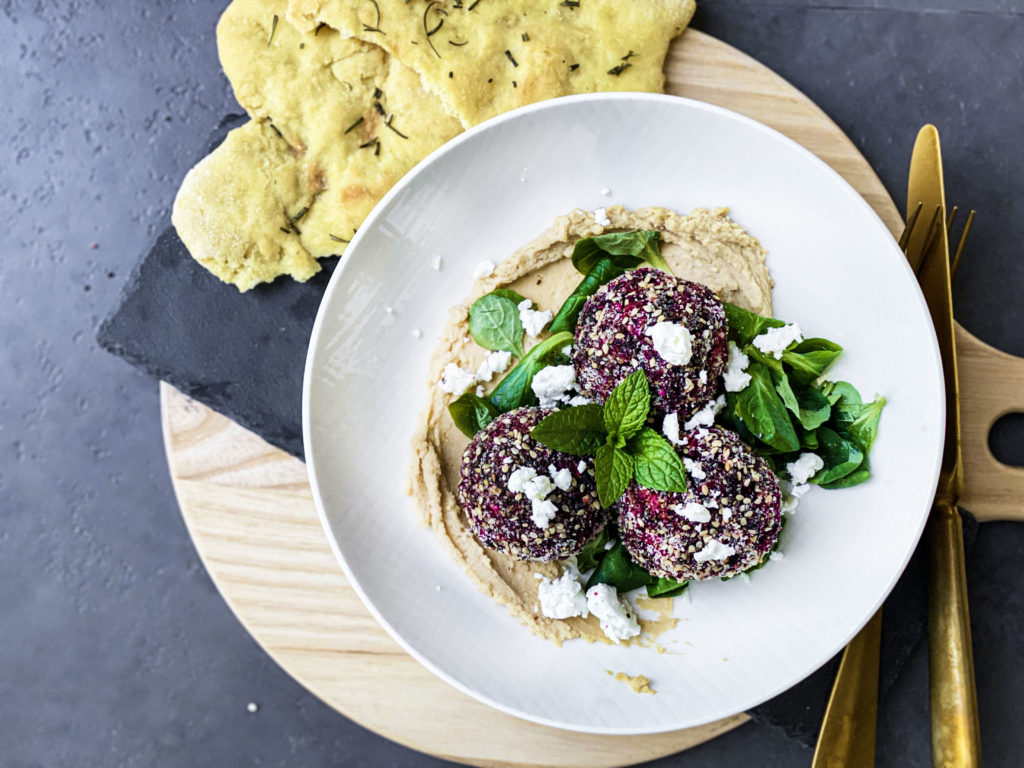
I love to serve them on a bed of hummus because I am a hummus addict but if you prefer something else, Greek yoghurt for example would be really great too, or even some mashed avocado. On top some crumbled feta, it adds some freshness and I think the combo of beets and feta cheese is just bomb. Of course, if you prefer a vegan option, you can leave that out but if you are not vegan, I would definitely recommend to add it on top. 

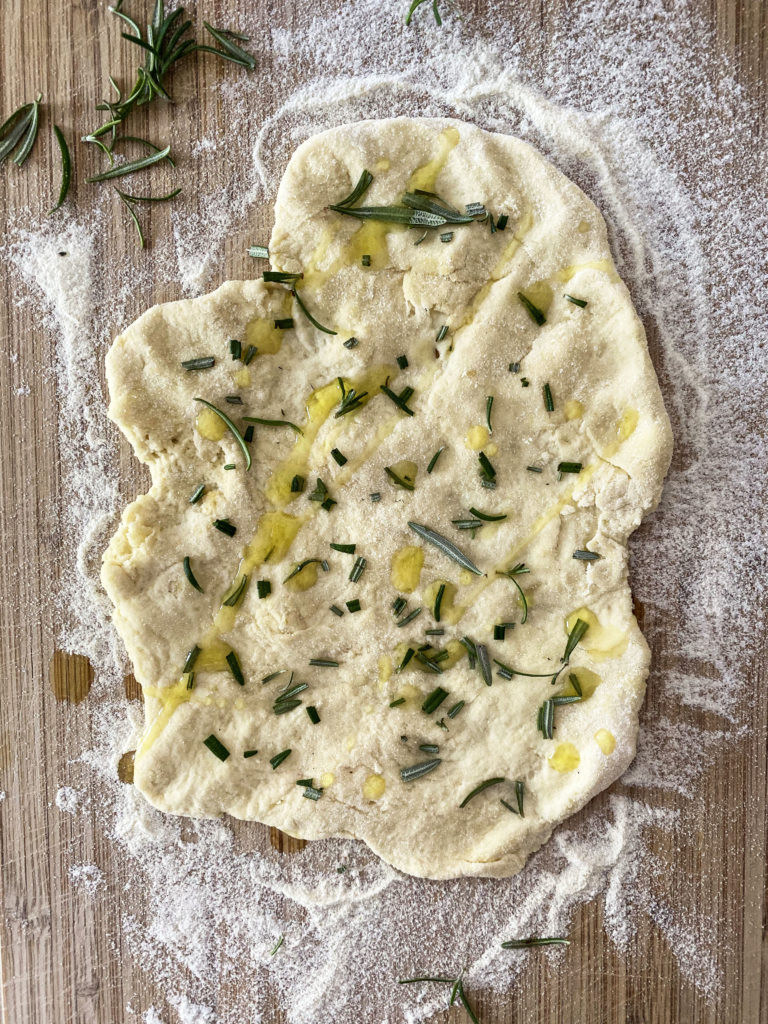
Also, what I love to eat it with is some homemade focaccia. It basically is pizza, but only drizzled with some olive oil and fresh thyme. So good! If you don´t have the time or patience to make homemade focaccia, baguette, naan, or pita definitely works to. Or if you want to keep it low-carb, then leave the bread out!

I really enjoy making this recipe in fall because I believe that it is a healthy and funny way to switch up the game when preparing beetroots. It is not too hard but tastes amazing! I hope you like it and if you do so, I would really be thankful if you could leave a comment. Also be sure to tag me on Instagram with @uneptcuisiniere or #unepetitecuisiniere so I can see it! Happy fall, and I hope tht you will enjoy it!

Print

Seed Coated Beetroot Balls

A really delicious and nutritious way to add a twist onto your classic beet preperation.

Course brunch, lunch, Main Course
Prep Time 15 Minuten
Cook Time 1 Stunde 5 Minuten
Total Time 1 Stunde 20 Minuten
Servings 2 people
Calories 438 kcal

What you will need

  • 5 beets
  • 1 white onion
  • 2 cloves garlic
  • 60 g Quinoa
  • 2 tbsp cornstarch
  • 2 tbsp breadcrumbs
  • 2 tsp herbs de provence (or any other herb-based seasoning
  • 1 tsp salt
  • 2 tsp chia seeds
  • 3 tsp sesame seeds
  • 2 tsp bread crumbs
  • 1 tbsp olive
  • 3 tbsp hummus
  • 1 big handvull salad lambs lettuce or arugula or spinach works best
  • 40 g feta cheese
  • some more olive oil to drizzle on top
  • some focaccia or pita to serve

How to

That is how it works:

  1. Preheat the oven to 180C. Peel the beets and cut them into 1cm sized chunks. Layer them out on the baking tray, generously salt, and let them bake in the oven for about 50-60 minutes. After that time peek in with a fork. The beets should still have a little grip, and should not be too soft becaus eotherwise the mixture will be too soggy later on. Meanwhile cook the Quinoa according to the package instructions!

  2. Once baked add them into a large food processor. Add the 2tbsp of breadcrumbs, the cornstarch, salt quinoa, and the herbs. Pulse until combined and a crumby texture is created.

  3. Take the mass and form small balls. If you have, take an ice cream scoop and evenly portion them out into about 6 even sized balls. In a small bowl mix the seeds and the breadcrumbs. Roll the formed balls in the mixture so they are covered. Place them on a baking tray and drizzle with the olive oil. If you have an oil spray, you can use this.

  4. Bake them in the oven for 10-12 minutes, until crispy. Spread the hummus onto two plates. Top with the salad. Add the beetroot balls on top and spinkle with the crumbled feta cheese. Drizzle some more olive oil and serve with some focaccia or bread. Enjoy!

Kategorie: Fall, Lunch/ Dinner, Vegan, Vegetarian Stichworte: balls, beet, beetroot, falafel, fall, fallafel, feta, healthy, healthy fall, lunch, pink, veganfall, vegetarian, veggie

Healthy Carrot Cake Muffins

Oktober 9, 2019 by katharina.kuehr Kommentar verfassen

Healthy Carrot Cake Muffins with Whipped Ricotta Frosting. Doesn’t that sound amazing? A sweet treat between classes, as a dessert or a snack to balance out your afternoon low. Yes! Yes! And yes! I think we all need this, like every week at least a few times! 

Taking a vegetable and putting it into a desert?! Sounds weird although it has already worked out so many times. Think pumpkin pie or zucchini bread. Also carrot cake is many people’s favorite dessert but I mostly is packed with tons of sugar and saturated fat and topped with a rich cream cheese or butter frosting. It is delicious but really heavy and not the healthiest thing to eat in the world. 

But not this version of it. The muffin itself is light and fluffy, no butter or refined white sugar. Light and delicious. The ricotta on top has its natural sweetness which doesn’t ask for any other sugars and works great with the muffins. Pair them with a cup of coffee as a snack, or top with almond butter and fresh banana for a delicious and healthy breakfast or just grab one on the go. You will get your veggies in without even noticing.

The batter is made out of simple ingredients of which most are everyone’s household staples. Grated carrots of course, greek yoghurt for protein and good fats, eggs for texture, protein, vitamins, and healthy fats, Apple sauce for sweetness. A mix of wholegrain and white flour for fiber and carbs, some enrythrit or coconut sugar for sweetness, cinnamon for the heartiness and pecan nuts for the crunch and healthy fats. 

A great balance of ingredients and nutrients that turn out to be a really delicious dessert. I believe it is a really great way to switch up your average use of carrots and try something new with them. I love making them when it is rainy and cold outside as the feeling of baking gives that comfortable feeling and coziness. They are perfect for the days now when it is getting colder and when carrots are in season.

I love enjoying them warm, when the frosting is melting on top of them, but they are also really delicious when chilled. The frosting is optional so if you do not like ricotta or want to go for an even lighter version you can of course leave it out but in my opinion it tastes amazing with it! If you decide to recreate that recipe be sure to tag me with @uneptcuisiniere or with #unepetitecuisiniere and if you could leave a comment that would mean and lot to me. I hope you will enjoy it!

Print

Healthy Carrot Cake Muffins

A healthy twist on the all beloved cake. LIght and delicious.

Course Breakfast, brunch, Dessert, Snack
Prep Time 12 Minuten
Cook Time 20 Minuten
Cool time 15 Minuten
Total Time 47 Minuten
Servings 10 muffins
Calories 127 kcal

What you will need

  • 2 carrots about 150g
  • 100 g Greek Yoghurt
  • 100 g Appl Sauce
  • 2 Eggs
  • 100 g Erythrit you can also use coconut sugar, or raw cane sugar if prefered
  • 80 g Whole Wheat Flour
  • 80 g Wheat Flour
  • 1.5 tsp Baking Powder
  • 2 tsp cinnamon
  • 1/2 tsp salt
  • 200 g Ricotta
  • 2 tsp Honey

How to

That´s how it works:

  1. Preheat the oven to 180C. Peel the carrots and grate them into a bowl. They shouldn’t be grated too thin, a little thicker worst best. Into the same bowl add the 2 eggs, the Greek yoghurt, the apple sauce and the sugar of your preference. Mix it well until all combined. 

  2. In a separate bowl combine the 2 flours along with the cinnamon, the baking powder, and the salt. One by one, slowly fold the flour under the wet mixture. Don´t whisk fast, gently fold it under with a spatula.

  3. Portion the mass out into 10 muffin forms. This works best with an ice cream scoop. Fill the muffin tin ¾ of the way. Place the muffins in the oven and bake them for about 18-25 minutes. Take a tooth pick and poke into the muffins, if no dough keeps sticking on the toothpick they are done. 

  4. Don´t take them out immediately, because they will fall back together and the fluffiness will be gone. Turn off the oven and let them sit in there for about 15-20 minutes. 

  5. Meanwhile in a bowl whip up the Ricotta and the honey. Once the muffins are completely cooled, add the frosting and enjoy! 

    They last in the fridge for up to 1 week!

Kategorie: Breakfast, Desserts, Fall, Snack, Sugar Free, Vegetarian Stichworte: Carrot, carrot cake, carrotcake, dessert, fall, fallbreakfast, fallfood, healthier, healthy, Healthy Dessert, healthy fall, Muffins, Snack, sugarfree

Veal Stuffed Zucchini Cannelloni

Oktober 6, 2019 by katharina.kuehr Kommentar verfassen

This dish basically is a lighter twist on stuffed cannelloni – just without the cannelloni. When I was in the kitchen creating this dish, I actually did not mean to recreate cannelloni or put a lighter twist in them. I just let myself experiment. After finishing cooking, when I ate this dish I realized that it actually looked like the typically Italian pasta. It tasted sooo good. Just all the flavors and textures worked really well together. The crunch of the zucchini, the texture of the ground meat, the softness of the melted cheese, and the intense flavor of the tomato sauce. 

It is a little work, to make this dish, so it is not the perfect dish to have as a quick dinner, but it is if you have some more time and want to cook it together with someone else on a date night or a family dinner. I really, really like this dish because it is family friendly, still sneaks in some vegetables and kind of is a lighter twist on a baked pasta dish.

I decided to use minced veal as a meat simply because I really like the flavor and it is pretty lean. If you prefer to use beef, turkey, pig, or even a vegetarian mince that would work too. I just think that the veal doesn’t overpower the other ingredients but still brings a nice flavor and texture. Also, it makes the dish a little bit more Italian because in Italy, veal is used very often. When frying it in the pan, don’t leave it in there for too long since it shouldn’t be completely cooked through as it would get dry in the oven. Also if you do not have an oven safe pan, you can use any other oven safe dish to bake the “cannelloni” in.

The Ricotta that is in the filling along with the meat gives this entire dish such a delicious richness and hearty flavor, which I realllllyyy like. Of course, you can use cream cheese or curd cheese instead but it won’t be the same. Ricotta just has this little something and this instant-Italian twist on every dish you use it in, so I would not substitute it with anything else. All the herbs that are packed into the Ricotta just give it a freshness and make it real good. Never skip the herbs & spices!

When baking the zucchini in the oven, the sauce will get more liquid since the zucchini will loose water. I personally like it because you can pour some more onto your plate but if you prefer to having it thick you can blanch the zucchini strips in simmering water for a few minutes and dry them with a paper towel. This is quite a lot of work because there are a lot of them, so I leave this step out and go for the thinner sauce. Especially when there is not too much time then I’d recommend not doing this extra step.

All in all, this is a pretty simple Italian inspired dish. It is a little bit of work but really fun to make and such a great way to lighten up stuffed cannelloni. I know that some Italians would come and beat me up now if I keep calling this “cannelloni” but it is really good. A dinner that all of your family is going to love!! If you do make it, be sure to share it with me on Instagram and tag me with @uneptcuisiniere or #unepetitecuisiniere. I’d love to see it! 

Print

Veal Stuffed Zucchini Cannelloni

A delicious lighter twist on the traditional italian classic. Made with ground veal and herbed ricotta, which is all packed into nourishing Zucchini and topped with fresh tomato sauce and molten cheese. Just good.

Course dinner, lunch, Main Course
Cuisine Italian
Prep Time 30 Minuten
Cook Time 20 Minuten
Total Time 50 Minuten
Servings 4 people
Calories 370 kcal

What you will need

  • 2 Zucchini
  • 1.5 tbsp Olive Oil
  • 1 White Onion
  • 2 Cloves Garlic
  • 400 g Ground Veal can substitute for any other meat
  • 200 g Ricotta
  • 1 Egg Yolk
  • 1 tbsp Minced Basil
  • 1 tbsp Minced Sage
  • 1 tbsp Minced Oregano
  • 400 ml Tomatoe Sauce
  • 50 g Parmesan Cheese Do not use pre-grated ones if possible since the quality is alway lower
  • 50 g Mozarella Cheese Buffalo is best

How to

That´s how it works:

  1. Preheat the oven to 180C. With a peeler, peel of strips of the Zucchini that are about 1-2mm thick. In a pan heat up the olive oil. Meanwhile finely mince the onion and garlic. Once hot add them to the oil and cook them for about 1 minute. Add the meat and generously salt and pepper. Cook for about 5-8 minutes, it does not have to be completely cooked through. 

  2. In a bowl mix the Ricotta with the egg yolk, the fresh herbs, salt, and pepper. On a flat surface lay out about three to four Zucchini strips* at a time, depending on how big they are, slightly overlaping. 

  3. Grate the parmesan cheese and chop of the mozarella into about 1.5 cm large pieces. 

  4. At the lower end of them spread one tablespoon of the Ricotta mixture and 1 tablespoon of the minced veal on top. Carefully roll them up and place them aside. Continue until there is no Zucchini and Meat left. 

  5. In an oven-safe dish or pan spread half of the tomato sauce. Carefully place the Cannelloni horizonatlly in it. Top them with the rest of the tomato sauce and the different cheeses.

  6. Bake in the oven for about 12 minutes, so the cheese has all molten and the Zucchini is cooked through. Serve with some fresh basil and enjoy!

Notes

*if you want the dish to be less watery, blanch the Zucchini strips in simmering water for about 1 minute here. Then transfer them into an ice bath and pat them dry. Continue to follow along the recipe. 

I do not think that this step is necessary because I like it to be saucy but this depends on your preference.

Kategorie: Italian, Lunch/ Dinner, Poultry & Meat Stichworte: cheese, dinner, family, familydinner, healthy, italian, light, low-carb, pasta, ricotta, stuffed, tomato, Veal, Zucchini

Apple & Cranberry Granola

Oktober 2, 2019 by katharina.kuehr Kommentar verfassen

It is finally fall, and finally October and everyone is going crazy about pumpkins. For a good reason. They are insanely delicious and can be eaten basically with anything. But because of this hype so many people are forgetting about apples. The super delicious, sweet or sour apples that are in season right not, that are available in so many different colors, shapes, and flavors. They are seasonal at the moment and grow local here in Austria. I feel apples are underrated and we should actually keep the quote „an apple a day keeps the doctor away“ in mind every day.

Apples actually are pretty healthy. They are really rich in fiber, antioxidants, reasonable amounts of Vitamin C and K. That being said we should consider eating one a day. But the famous little sentence we tell all the kids does not mention the form we should eat them in. So why not eating them in a different way than usually?! Why not eating them in form of Granola. In form of Fall Apple Granola. To be honest, it doesn’t still contain a lot of vitamins in that form, but it gives us an excuse to eat apples. 

This granola tastes like fall in a bowl. It instantly gives you the feeling of hiking through the vineyards and grabbing fresh apples from the tree while all the leaves are turning red and yellow. It gives you the feeling of collecting chestnuts and smelling that good fall flavor. I love eating this on top of a cozy oatmeal or in a yoghurt bowl for breakfast. The crunch makes it a perfect topping for any creamy base or also with milk when enjoyed as cereal. 

I decided to make this granola with popcorn to lighten it up a little, and give it more volume. The popcorn also soaks up the liquid ingredients really well and just soaks up all of the flavor. The oats, pumpkin seeds and nuts add some texture, fall feeling, as well as good carbs and healthy fats. The flax seeds, some fiber, and the hemp seeds some protein. The dried apples and cranberries add some sweetness and chewiness which makes it really addicting. A necessary ingredient which definitely can’t be left out is the cinnamon. It adds sweetness, is super healthy, and makes it all cozy and comforting. Last but not least I added some sea salt to bring out the flavor and maca powder (which is optional) because it has a lot of health benefits.

The liquid ingredients are pretty clean and simple too. I am using Apple sauce (of course) as a base to get that Apple flavor and sweetness without any refined sugars. The coconut oil adds some fats and helps to crisp up the granola when in the oven. The maple adds sweetness and color as it will caramelize in the oven while baking and turn everything delicious golden-brown. When mixing together it already combines the different flavors and  smells. 

You will be able to smell it in the entire house once you take it out of the oven and you won’t have to wait until everything is gone. Won’t take long, I promise. It last up to one month when stored in an air tight container but mine was gone way quicker. I hope that you will enjoy this recipe and if you decide to recreate it be sure to tag me in your post with @uneptcuisiniere or #unepetitecuisiniere

Print

Apple Granola (V,SF)

A delicious fall twist on your regular Granola perfect for October!

Course Breakfast, Snack
Prep Time 10 Minuten
Cook Time 25 Minuten
Total Time 35 Minuten
Servings 12 servings
Calories 93 kcal

What you will need

  • 50 G Popcorn
  • 30 G Almonds Chopped
  • 30 G Oats
  • 30 G Pumpkin seeds
  • 1 Tbsp Hemp Seeds
  • 1 Tbsp Chia Seeds
  • 1 tbsp Cinnamon
  • 2 Tsp Maca Powder
  • 20 g Cranberries
  • 20 g Dried Apples

Wet ingredients:

  • 100 G Apple Sauce or Apple Butter
  • 1 tbsp coconut Oil
  • 1-2 Tbsp maple syrup

How to

That’s how it works:

  1. Preheat the oven to 180C.

  2. Chop the Almonds. Add them into a big bowl along with all the other dry ingredients except for the dried Apple. Mix them well until all combined.

  3. In a smaller bowl mix together the Apple sauce, molten coconut oil an maple until it has a smooth consistency.

  4. Pour the liquid mixture over the dry one and gently stir through until all of it is covered. Then spread it on a baking tray covered with parchment paper and bake it in the oven for about 20-25 minutes.

  5. When done take it out of the oven and let cool completely. Meanwhile chop up the dried apples. Mix the through the granola. Now you can also add cranberries or any other add ins that you would like.

  6. Store it in an air tight container for up to one month. It is best enjoyed over Jogurt, Porridge, or simply with milk.

Kategorie: Breakfast, Desserts, Fall, Snack, Sugar Free, Vegan, Vegetarian Stichworte: Apple, breakfast, cinnamon, fall, fallbreakfast, fallfood, granola, healthy, healthy fall, sugarfree, vegan, veganfall

« Vorherige Seite
Nächste Seite »

Footer

What has been happening on my Instagram

Copyright © 2024 Une Petite Cuisinière on the Foodie Pro Theme