• Zur Hauptnavigation springen
  • Skip to main content
  • Zur FuĂźzeile springen

feel food club

  • Home
  • About me
  • My Recipes
  • Blog
  • Navigation Menu: Social Icons

    • Instagram

veggie

The Easiest 15 minute Saucy Avocado Pasta

Mai 18, 2021 by katharina.kuehr Kommentar verfassen

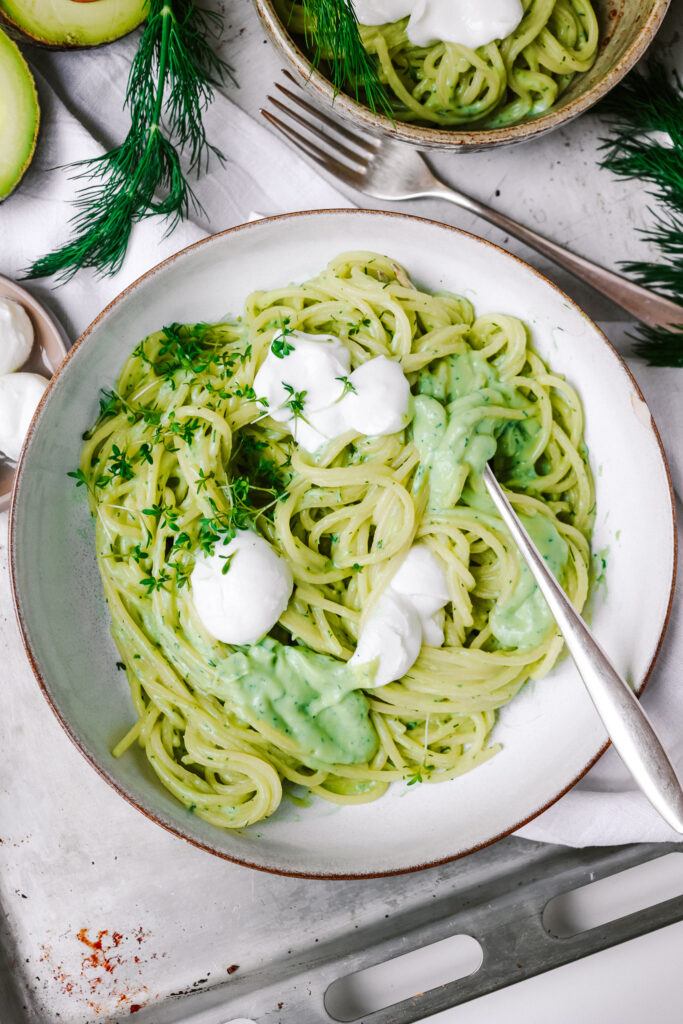
Pasta itself is a dream. Avocado itself is a dream. Well, can you now imagine what the combination of pasta and avocado tastes like? Like the best dream. Not only does it taste amazing, no, it also is incredibly easy to make (as easy as tomato sauce), super healthy and soso simple. Really, there is no excuse left not to make this!

What’s special about this dish?

It is everything else than traditional (sorry to all my Italian fellows, if this may hurt you). Avocado does not really grow in Italy and defintely is not eaten with pasta. Usually you’d eat it with bread, in bowls, with nachos or just as is. And I mean, all of those are some sort of carbohydrates – so is pasta! Why not eating avocado with pasta then? So besides it being very non-traditional, it also comes together really really quickly.

Plus, it is very versatile. If you want it springy, go ahead and add some herbs or dill, if you want it vegan, substitute the parmesan cheese for nutritional yeast and the greek yoghurt for a plant based yoghurt. If you wanted it a bit more meaty, you could also fry some bacon in a pan and toss it into the sauce, so you have a kinda cabonara-style avocado pasta. Or you could also fry some prawns or chicken and add that on top. It really is up to you and your preferences how you make this and that makes it really special and great!

Is this even healthy?

Yep, yep! Avocados are superfoods, this needs to be said. They are loaded with healthy (omega-3) fats, which are great for your brain and your heart. Then they also contain more potassium than e.g. bananas, great for your cells and heart, they contain a bunch of fibre, so your digestion works perfectly and they contain numerous different vitamins and minerals to keep you feeling fit and healthy.

Then we also have some greek yoghurt, which is loaded with protein and calcium, parmesan cheese, which is loaded with deliciousness, fresh herbs (always a nutrient bomb) and the pasta. Pasta, unlike many claims, can actually be very beneficial for you. The carbs give you lots of energy to do all the things you love. Plus, if you go for whole-grain pasta, you get another dose of fibre and minerals. And, obviously, pasta is very good for your soul 🙂

How to make this?

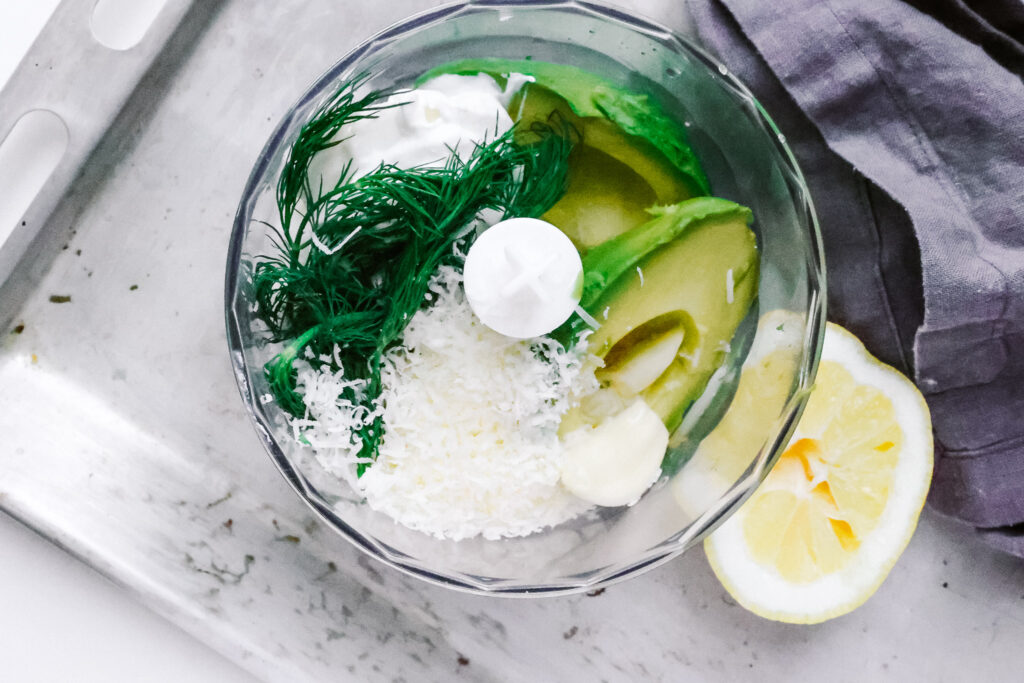
When I say this is easy, I mean this is EASY. You start by boiling the pasta (according to package instructions). Then we either use a blender or a fork to continue. When doing it with a fork, it will be less creamy, more like a pesto-guac consistency. When blending it’ll be saucy. So we grate the parmesan, and either add it to a bowl or a blender with chopped up herbs, greek yoghurt, grated garlic and mashed avo. And then we either mash or blend it until creamy.

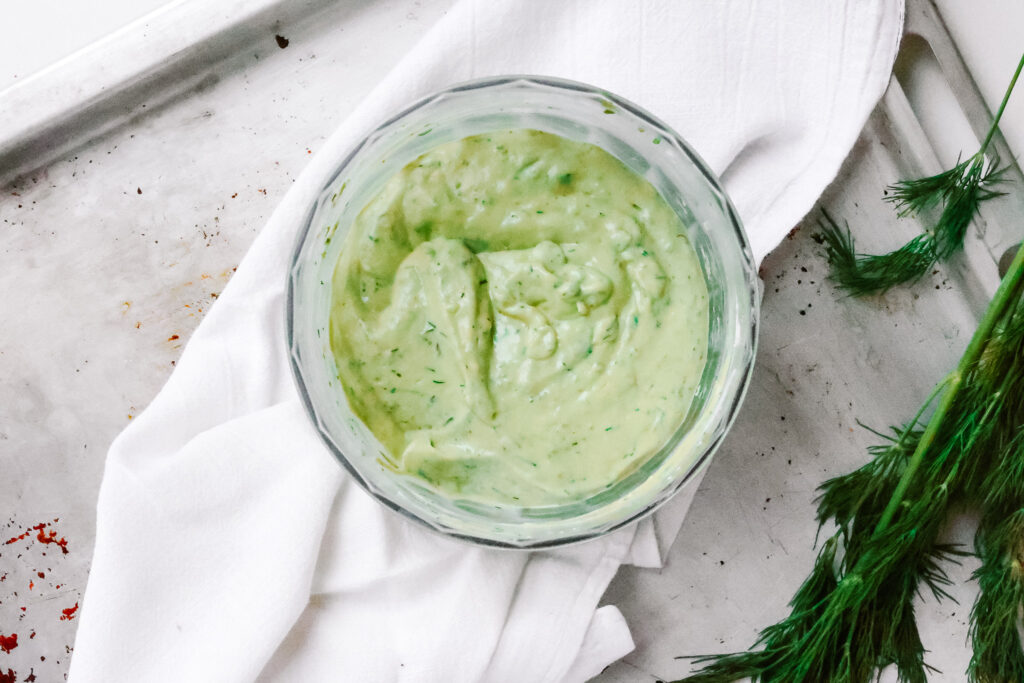
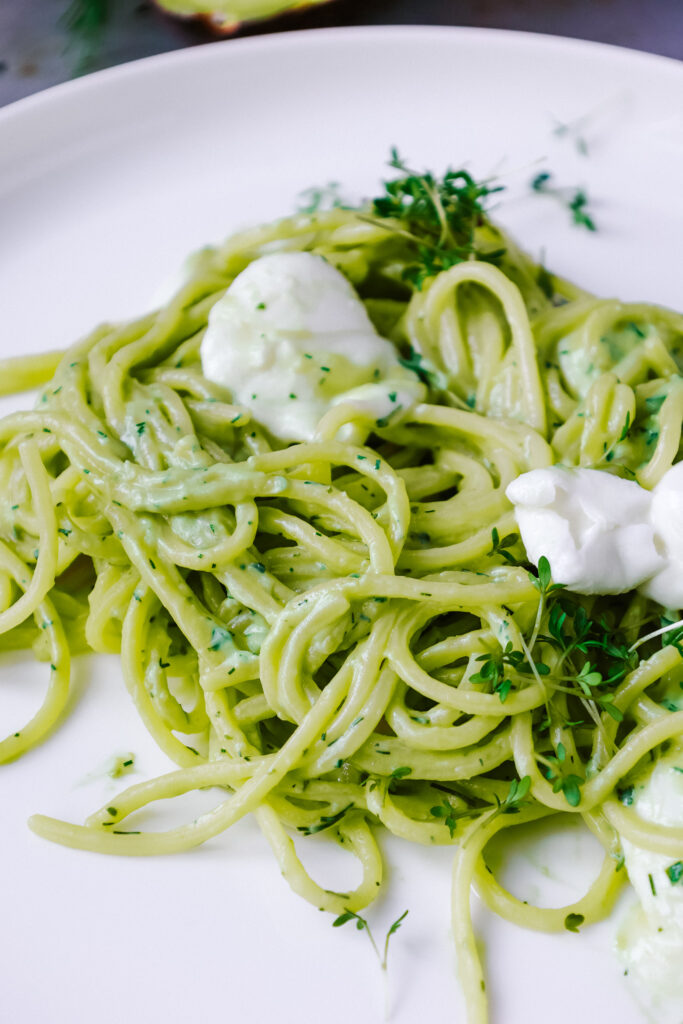
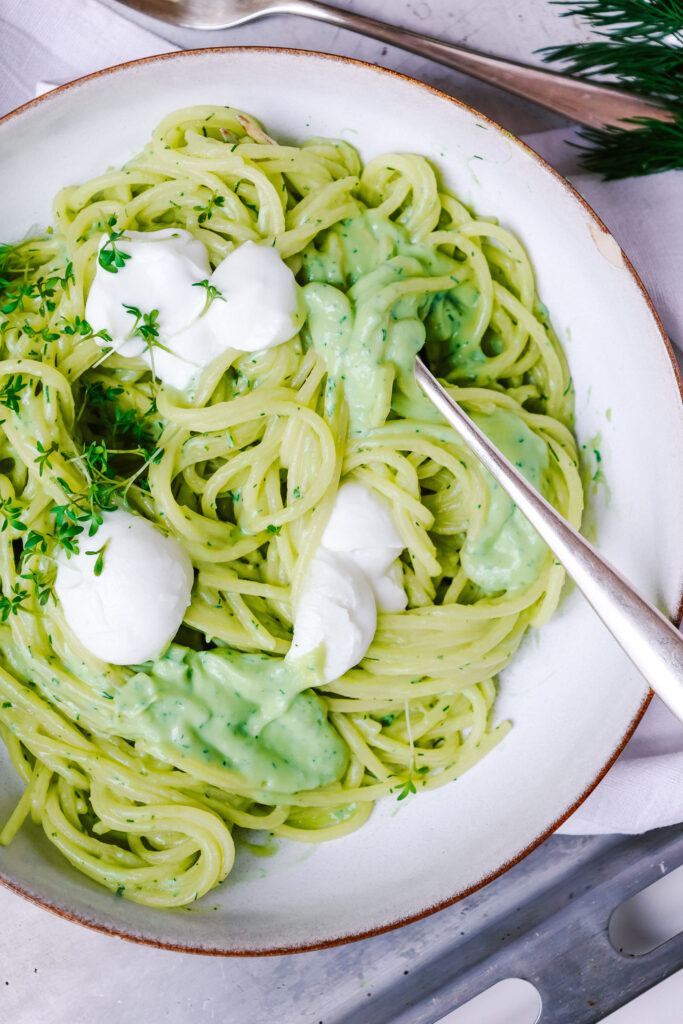
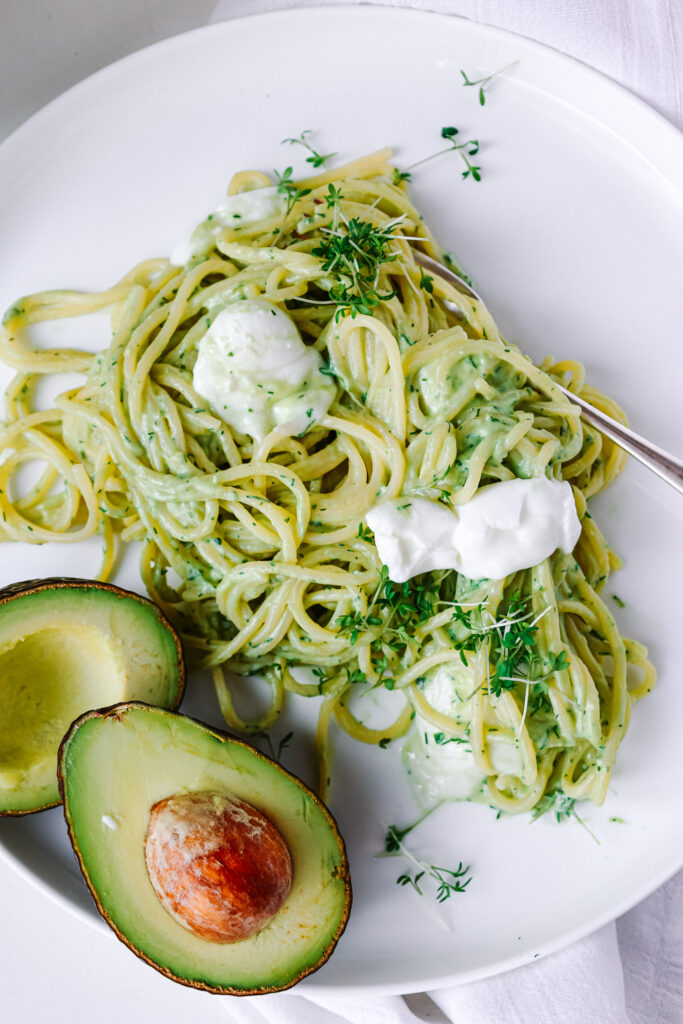
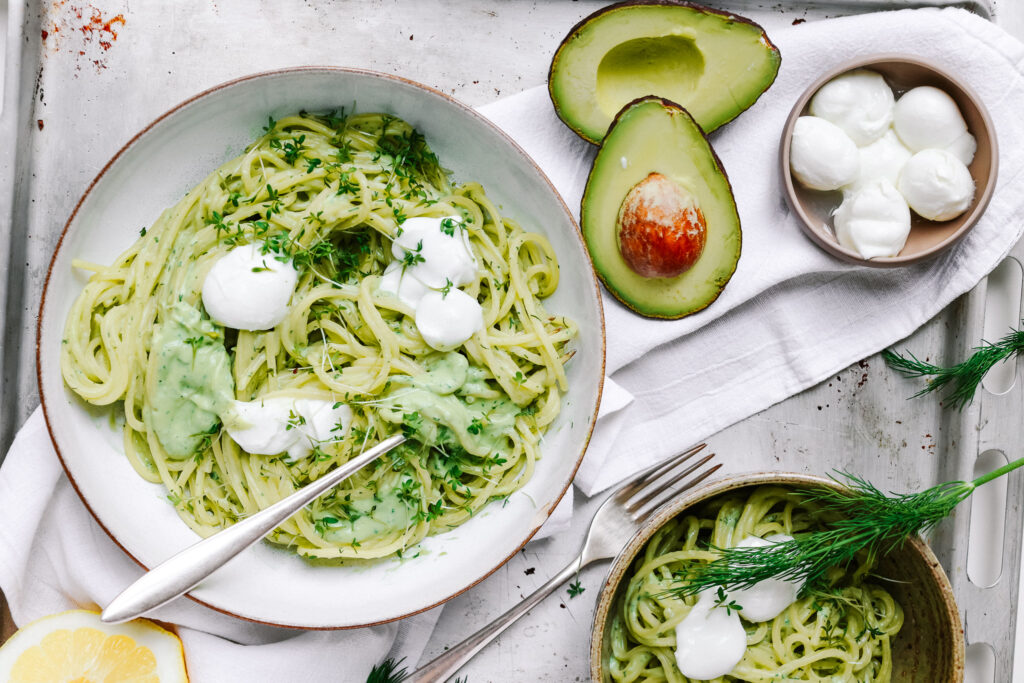
Before the pasta is done, we’ll reserve some pasta water, then drain it and mix it with the avocado sauce and the pasta water. That already is it! Really easy right? Now you can add any toppings you like, if you want to, like tomatoes, prawns, chicken, chickpeas, or just more cheese (always a good choice)!

This dish really is perfect for summer, or warm spring days, for easy lunches or quick dinners. I would even say it´s justifiable as a brunch dish (bc it’s basically like avocado toast just with pasta, right?). Regardless or when you’ll enjoy it, I hope you will enjoy it! Have a great time cooking!

Print

The Easiest 15 Minute Saucy Avocado Pasta

Easy, delicious, healthy. Just on another level. The combination of pasta and creamy avocado sauce is just like a bite into heaven, plus it is so incredibly easy to make! A must try!

Course Main Course
Prep Time 5 Minuten
Cook Time 10 Minuten
Total Time 15 Minuten
Servings 4 servings

What you will need

  • 500 g pasta (spaghetti work best)
  • 1,5-2 avocados (depending on how big they are)
  • 100 g greek yoghurt
  • 100 g parmesan cheese
  • 2 garlic cloves
  • 1 tbsp chopped herbs (a mixture of dill, basil and parsley works best)
  • sea salt
  • mozarella, prawns, chicken or anything else to serve with

How to

  1. Bring a pot with salted water to a boil. Cook the pasta according to package instructions. 2 minutes before they're done, you can reserve 1 cup of the pasta water. Drain them.

  2. If you have a blender, peel the avocado and the garlic, grate the parmesan and add everything to a blender and mix until creamy.

  3. If you do not have a blender, mash the avocado, grate the parmesan and garlic and mix and mash everything in a bowl until as creamy as possible. You may need some (plant based) milk).

  4. When the pasta is done, mix it with the sauce and a bit of the pasta water to start with (you can add more later on if you feel like it needs to become a bit creamier).

  5. Divide onto bowls and serve with whatever you love! Enjoy!

Love,
Katie // Une Petite Cuisinière

Kategorie: Diet-Specific, Lunch/ Dinner, Vegetarian, Vegetarian Stichworte: 15 minute, 5 ingredients, avocado, easy lunch, easy meals, family meals, healthy, lunch, nutritious, pasta, pasta recipes, quick lunch, quick meals, summer food, summer lunch, vegan, vegetarian, veggie

Healthy-ish Double Chocolate Salted Caramel Brownies

März 12, 2021 by katharina.kuehr Kommentar verfassen

There is nothing like this. I promise. All of the good things combined and more than you have ever wanted. On the bottom we have the fudgy and chocolaty brownie (which already is so good on its own), then we have the creamy salted date caramel layer, which is just heaven and then everything is topped with a crunchy chocolate layer. If you are not hungry by now, I do not know what would make you hungry…

What’s special about this dish?

Well, a lot actually. The brownies are refined sugar and butter and made with wholewheat flour. So, they are pretty healthy actually. Then for the caramel, instead of cream, butter and sugar we are only blending dates, coconut milk and sea salt. This will become really creamy and thick and just tastes amazing!! Honestly, it was a mistake not having combined brownies and date caramel for such a long time! This combo is out of the world. Not exaggerating. So the brownie is pretty healthy, easy to make and still tastes really good!

Is this dish healthy?

Yepyep, as already mentioned, unlike regular brownies, this one is not loaded with sugar and saturated fats. It’s made out of eggs, coconut sugar (which still does contain sugar but less than white, refined sugar, plus it also comes with other nutrients), vanilla, oil (which is high in unsaturated fats), wholewheat flour (great source of fibre) and cacao powder (actually really good for you because it is super high in antioxidants)

Obviously we also have chocolate (super good for your soul 🙂 – when purchasing the chocolate, make sure to check the label to best get one that has been sweetened with any form of natural sweetener and does not contain a bunch of ingredients you don’t know and cannot pronounce). Plus, the dates, which also are really high in fibre, and dates in general are a super beneficial food for you as they are a great source of antioxidants and vitamins). So you see – all in all, pretty healthy. And especially healthy for your soul!

How to make this dish:

Easy peasy, chocolate squeezy. Or something like that. No, this is fairly easy. No eggs need to be separated, no complicated things need to be done. It essentially comes down to melting chocolate in the microwave, whipping eggs, sugar and vanilla till fluffy and then pouring in the chocolate and oil, as well as the flour-cacao powder mixture. That’s already it for the brownie, so very safe to make for everyone.

The caramel layer is not much more difficult. If you have soft dates (like medjool dates), then they blend perfectly fine. If yours are a bit harder, you can just soak them in hot water for a few hours and they will also become soft, which makes them easier to blend. So these are then just mixed with the coconut milk and the sea salt and that’s it. The chocolate layer on top is very self-explanatory, so you just need to melt the chocolate and pour it above. It’s easier if the other layers have cooled down a bit.

Meal prep friendly?

In theory yes! In real life, let’s say, I’d be surprised. Every time we make them, they’re gone within 3 days (If they even last this long). But yes, in theory they would definitely last up until a week in the fridge if covered or stored in an air tight container. If you have too many and make them on batch, you could also freeze some and slowly thaw them up before eating (so just placing them at room temperature and slowly letting them unfreeze).

In terms of how to best have these, there is no right answer. Breakfast, lunch, snack, dinner, dessert. Do we even need to ask when to best have brownies? Is there even a time where you cannot have brownies? I hope not. How to best have them is a different question. They are really good and rich on their own, so there is no need to add anything else, although they go great with some ice cream.

This recipe really is a must try for all chocolate lovers out there! Easy, healthyish and so worth it to make. They’ll upgrade ANY week! I hope you genuinely like them and enjoy making them!

Print

Healthy-ish Double Chocolate Salted Caramel Brownies

The best (and only) brownie recipe you'll ever need! This is easy, not your average brownie and so good.

Course Dessert, Snack
Prep Time 20 Minuten
Cook Time 20 Minuten
Total Time 40 Minuten
Servings 12 slices

What you will need

For the brownies:

  • 3 eggs
  • 180 g coconut sugar
  • 1/2 tsp vanilla powder
  • 100 g milk chocolate (preferably one that has been sweeneed with natural sweetener like coconut sugar)
  • 100 g dark chocolate (preferably one that has been sweeneed with natural sweetener like coconut sugar)
  • 120 ml oil (flavor neutral oil)
  • 120 g whole wheat flour
  • 40 g cacao powder
  • 1/2 tsp baking powder

For the rest:

  • 250 g dates (soft ones work best – if you do not have soft ones, you can soak them in hot water for a few hours)
  • 150 ml coconut milk
  • a pinch sea salt
  • 100 g chocolate (preferably one that has been sweeneed with natural sweetener like coconut sugar)

How to

For the brownies:

  1. Melt both chocolates in the microwave, then combine with the oil and let cool a bit. Whisk the eggs, sugar and vanilla for about 5 minutes until fluffy.

Love,
Katie // Une Petite Cuisinière

Kategorie: Desserts, My favorites, Snack, Sugar Free Stichworte: brownie, brownies, cacao, caramel, chocolate, dates, dessert, fudgy, healthy, Healthy Dessert, refined sugar feee, Snack, sugar free, veggie

Seed Coated Beetroot Balls

Oktober 13, 2019 by katharina.kuehr Kommentar verfassen

Need some inspirational recipes for pink food? Then you have to try these sesame coated beetroot balls! Packed with so much flavor, a great texture, fluffy and soft, a beautiful pink color and coated in crispy seeds. Served in a bed of hummus and salad and topped of with some crumbled feta! Isn’t Fall a great season? With all the good seasonal food? At least I think so! 

Beetroots are such a healthy vegetable. They are packed with fiber and loaded with vitamin B9, which helps to form the DNA and RNA and helps the protein metabolism. Moreover they contain good amounts of manganese, potassium and Vitamin C. Also, they are great for vegetarians and vegans because of their high iron content. 

Beetroots are also proven to have numerous health benefits. When consumed they can control your blood flow levels, lower blood pressure, and increase your exercise performance! They help preventing cancer and are really low in calories. If all of this information hasn’t convinced you yet to try it than maybe look at that color! It’s so pink and pretty! 

The only reason why I did not cook with beets very often was because I did not know how to prepare them! I always thought of them being really difficult to prepare but actually they are really simple! You can either boil them, or steam them or bake them. I prefer baking the most because you can put it into the oven for about 50 minutes and don’t really have to leave an eye on it. It is so incredibly simple, I don’t know why I haven’t realized this earlier. Really missed out on something. 

After the little chunks have been baked, they just need to be combined in the food processor with a few other ingredients to get a doughy consistency. If you do not have a food processor you can just combine all the ingredients with a potato masher or a fork, simply bake the beets for a little bit longer! Form the balls, and roll them in the seed mixture. The seeds are really nutritious too and add an extra kick of protein to the balls, as well as some crunch. Think falafels but with beetroot and baked. 

If you feel like turning in the oven for just two servings isn’t worth it, than I have good news for you! Firstly, you can meal prep beets on the weekend so you have them in several dishes throughout the week, and secondly, you can make these balls in a big batch and freeze them (without baking). Whenever you need them, just take them out of the freezer and bake them in the oven and voila! 

I love to serve them on a bed of hummus because I am a hummus addict but if you prefer something else, Greek yoghurt for example would be really great too, or even some mashed avocado. On top some crumbled feta, it adds some freshness and I think the combo of beets and feta cheese is just bomb. Of course, if you prefer a vegan option, you can leave that out but if you are not vegan, I would definitely recommend to add it on top. 

Also, what I love to eat it with is some homemade focaccia. It basically is pizza, but only drizzled with some olive oil and fresh thyme. So good! If you don´t have the time or patience to make homemade focaccia, baguette, naan, or pita definitely works to. Or if you want to keep it low-carb, then leave the bread out!

I really enjoy making this recipe in fall because I believe that it is a healthy and funny way to switch up the game when preparing beetroots. It is not too hard but tastes amazing! I hope you like it and if you do so, I would really be thankful if you could leave a comment. Also be sure to tag me on Instagram with @uneptcuisiniere or #unepetitecuisiniere so I can see it! Happy fall, and I hope tht you will enjoy it!

Print

Seed Coated Beetroot Balls

A really delicious and nutritious way to add a twist onto your classic beet preperation.

Course brunch, lunch, Main Course
Prep Time 15 Minuten
Cook Time 1 Stunde 5 Minuten
Total Time 1 Stunde 20 Minuten
Servings 2 people
Calories 438 kcal

What you will need

  • 5 beets
  • 1 white onion
  • 2 cloves garlic
  • 60 g Quinoa
  • 2 tbsp cornstarch
  • 2 tbsp breadcrumbs
  • 2 tsp herbs de provence (or any other herb-based seasoning
  • 1 tsp salt
  • 2 tsp chia seeds
  • 3 tsp sesame seeds
  • 2 tsp bread crumbs
  • 1 tbsp olive
  • 3 tbsp hummus
  • 1 big handvull salad lambs lettuce or arugula or spinach works best
  • 40 g feta cheese
  • some more olive oil to drizzle on top
  • some focaccia or pita to serve

How to

That is how it works:

  1. Preheat the oven to 180C. Peel the beets and cut them into 1cm sized chunks. Layer them out on the baking tray, generously salt, and let them bake in the oven for about 50-60 minutes. After that time peek in with a fork. The beets should still have a little grip, and should not be too soft becaus eotherwise the mixture will be too soggy later on. Meanwhile cook the Quinoa according to the package instructions!

  2. Once baked add them into a large food processor. Add the 2tbsp of breadcrumbs, the cornstarch, salt quinoa, and the herbs. Pulse until combined and a crumby texture is created.

  3. Take the mass and form small balls. If you have, take an ice cream scoop and evenly portion them out into about 6 even sized balls. In a small bowl mix the seeds and the breadcrumbs. Roll the formed balls in the mixture so they are covered. Place them on a baking tray and drizzle with the olive oil. If you have an oil spray, you can use this.

  4. Bake them in the oven for 10-12 minutes, until crispy. Spread the hummus onto two plates. Top with the salad. Add the beetroot balls on top and spinkle with the crumbled feta cheese. Drizzle some more olive oil and serve with some focaccia or bread. Enjoy!

Kategorie: Fall, Lunch/ Dinner, Vegan, Vegetarian Stichworte: balls, beet, beetroot, falafel, fall, fallafel, feta, healthy, healthy fall, lunch, pink, veganfall, vegetarian, veggie

« Vorherige Seite

Footer

What has been happening on my Instagram

Copyright © 2024 Une Petite Cuisinière on the Foodie Pro Theme